Windows error code 80192EE7 can be caused by Windows Information Protection (WIP) scope issues, device enrollment failure in Intune, DNS misconfiguration, etc. To fix it, you can try closing background apps, disabling security software temporarily, and more.
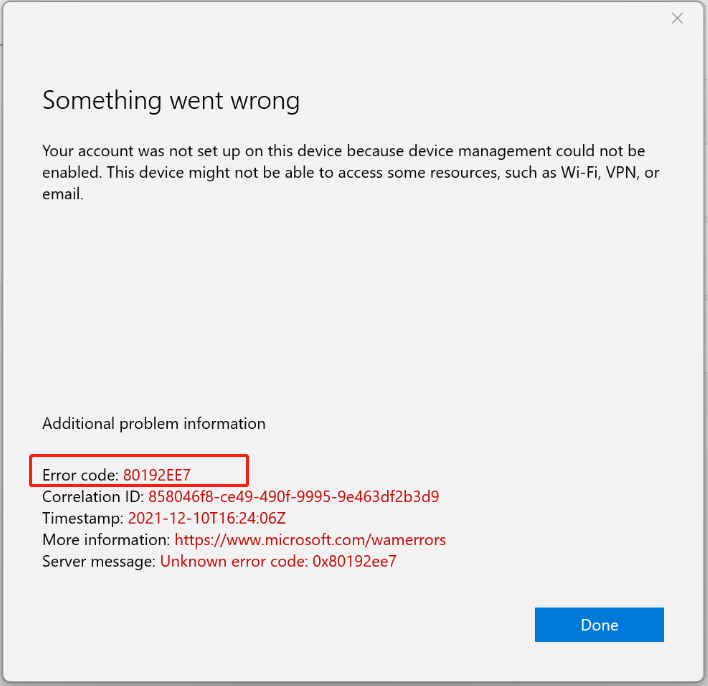
Many users report that they encounter a bothersome Microsoft error code 80192EE7 during the Microsoft 365 or Intune setup process.
Have you also encountered the same error? If so, you can continue reading to figure out the possible causes of the error and get some useful solutions.
What Causes Error Code 80192EE7
Microsoft error code 80192EE7 indicates that a device cannot be enrolled for management. This issue often arises in a Microsoft Intune or Office 365 environment, as device management cannot be enabled. Various reasons can trigger this error, including:
- Windows Information Protection (WIP) scope issues: If the WIP user scope is set to “Some” or “All”, it forces the device to use protection features that block enrollment.
- Device enrollment failure in Intune: If there is residual data from an old enrollment that was not removed correctly, the leftover traces may prevent re-adding it.
- Network connection issues: Network problems may block connections to Microsoft servers. Besides, if you access Microsoft 365 via a web browser, browser cache and cookies may also cause you to encounter errors.
- Unsupported Windows version: Those devices running Windows Home edition cannot enroll in Intune.
- Multiple accounts conflicts: If you add both personal and work accounts on the same device, it may sometimes cause conflicts during setup.
- Security problems: Some security software may block adding a new account and resulting in the 80192EE7 error code.
- Policy misconfigurations in Intune or Azure AD: Sometimes, the custom rules applied by IT admins block the enrollment process.
- Intune licensing issues: If the user doesn’t have the right Intune license or device management permissions in Microsoft 365, it’s also easy to cause the error code 80192EE7.
- Autopilot conflicts: If the PC has already been set up using Windows Autopilot, attempting a manual setup may cause errors.
- DNS misconfiguration: If the DNS is misconfigured, the device cannot reach Microsoft’s MDM servers as well.
How to Fix Error Code 80192EE7
To fix the Microsoft Intune error 80192EE7, you can try running MiniTool System Booster, temporarily disabling security software, verifying Microsoft 365 license, checking Intune Enrollment Status, re-registering the device with Azure AD, etc.
Method 1. Try Some Basic Tricks
Before you try advanced methods to fix the error code: 80192EE7, you can try some basic tricks:
- Get closer to the network source
- Use Ethernet instead of Wi-Fi
- Restart the router or modem
In addition to these tips, you should also check your Windows version, as Intune doesn’t work with Windows Home. If your Windows is a home edition, you need to upgrade it to Pro or a higher edition.
Furthermore, if none of these tips can help you solve the error, try the following methods.
Method 2. Use Deepclean
From the causes section above, you can know that the Microsoft Intune error 80192EE7 can also be caused by network problems, cookies, and caches. In this case, you need to clear them to fix the error.
To do that, I highly recommend MiniTool System Booster. It is PC tune-up software that offers the NetBooster feature to increase network stability, and the Internet Cleanup feature to help you clean out cookies, caches, temporary files, and more.
Here’s how to use it:
Step 1. Download and install MiniTool System Booster on your computer. Then, launch it to enter the main interface.
MiniTool System Booster TrialClick to Download100%Clean & Safe
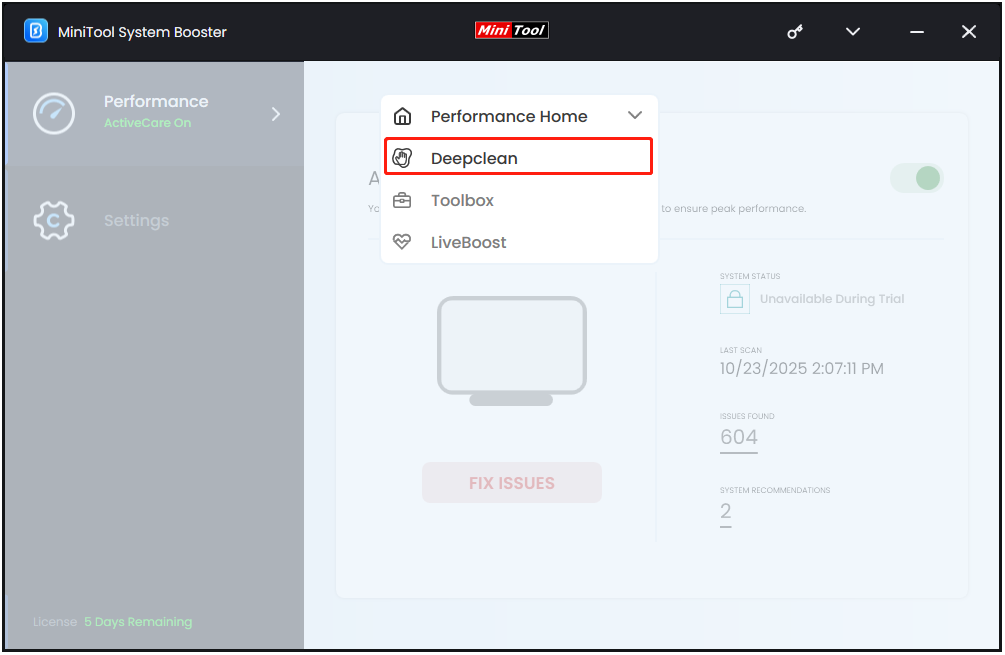
Step 2. In the Performance page, click Performance Home to expand a drop-down menu, and then select Deepclean.
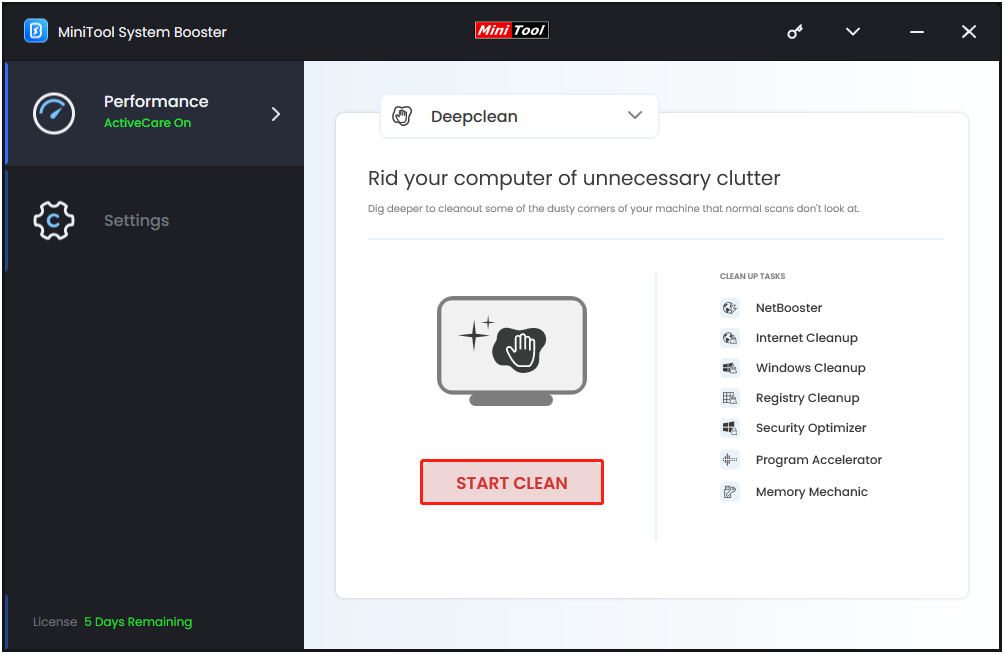
Step 3. Click START CLEAN to start a series of tasks on your system. The NetBooster and Internet Cleanup tasks are the first two tasks to help you boost your network and clear internet junk files, browsing data, etc.
Step 4. Once done, the system will be cleaned.
Now, try to log in Microsoft account again and check if the error has been resolved.
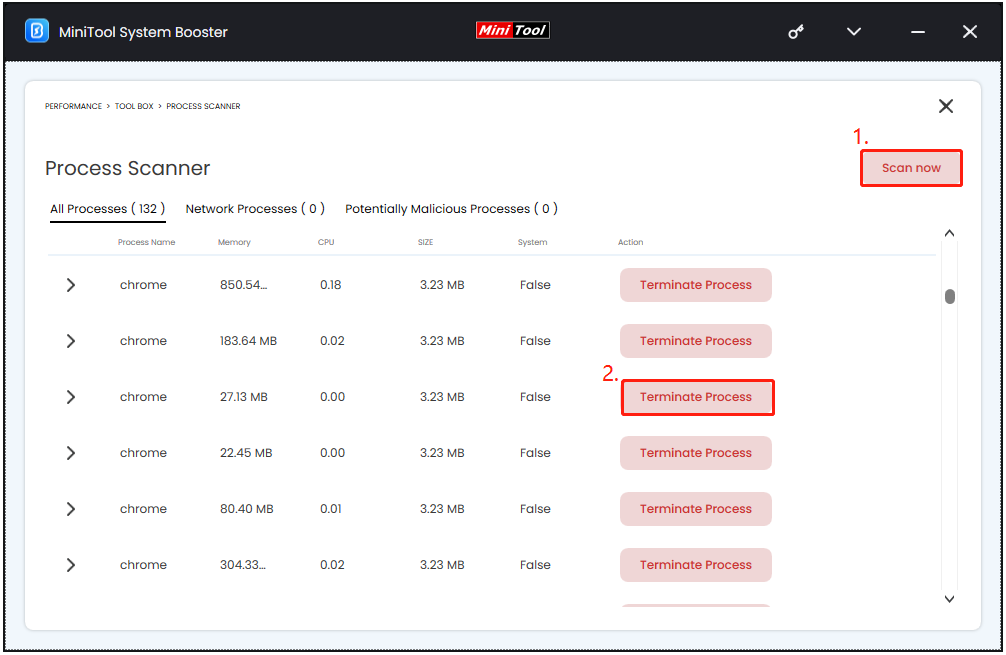
Method 3. Use Process Scanner
If the error persists after performing a Deepclean, you can try running MiniTool System Booster’s Process Scanner to close unnecessary background programs to solve the error. Here’s the way:
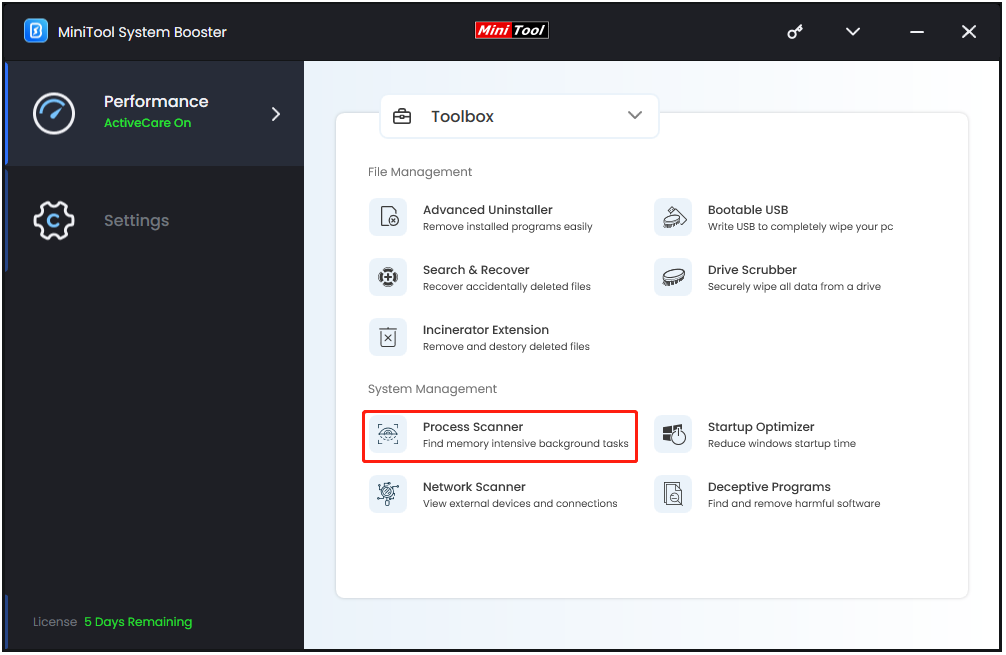
Step 1. On MiniTool System Booster’s main interface, click Performance Home and select Toolbox.
Step 2. Find and select Process Scanner under the System Management section.
Step 3. Click the Scan now button in the top-right corner. Once all the processes are listed, click the Terminate Process button to close the unnecessary background programs.
Once done, try to log in Microsoft account again to check if the error has been resolved.
Method 4. Check DNS Settings
It’s essential to ensure that your DNS can accurately resolve Microsoft 365 endpoints, such as enrollment.manage.microsoft.com. If it doesn’t, you may encounter the error code 80192EE7.
To resolve this issue, consider switching to a public DNS server, like Google’s (8.8.8.8) or Cloudflare’s (1.1.1.1), for testing. Here’s the guide on changing the DNS server to Google’s:
Step 1. Open Settings and go to Network & Internet.
Step 2. Click Change adapter options from the right panel.

Step 3. Right-click on your internet connection (Wi-Fi or Ethernet) and select Properties.
Step 4. Select Internet Protocol Version 4 (TCP/IPv4) and click Properties. Then, set the Preferred DNS server as 8.8.8.8 and the Alternate DNS server as 8.8.4.4.
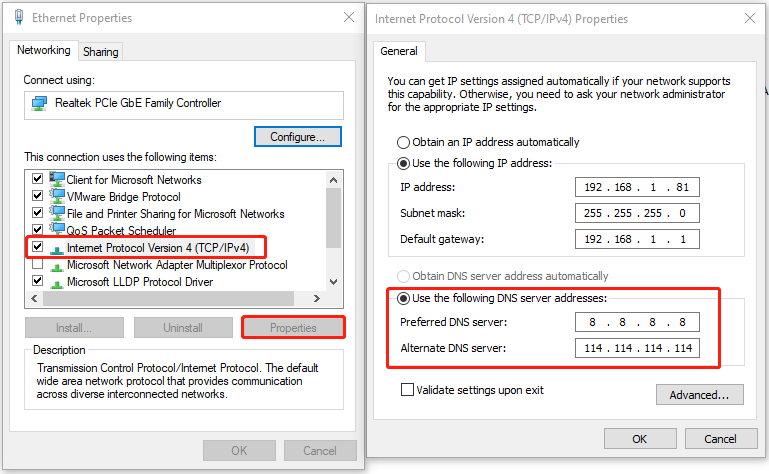
Step 5. Click OK to save the changes. Now, try to log in or add a Microsoft account again to check if the error is fixed.
Also, you can try clearing the DNS cache to fix the error with the following steps:
Step 1. Open the Search window, type “cmd” in the search box, and press Enter.
Step 2. Type the command “ipconfig /flushdns” and press Enter.
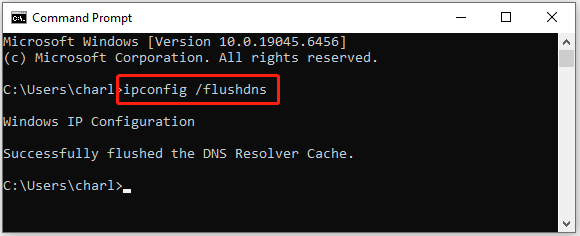
Step 3. Once done, you can see a message saying Successfully flushed the DNS Resolver Cache. Now, close the window and check if the error is fixed.
Method 5. Update Office and Re-sign In
An outdated Office may also be one of the reasons for Microsoft error code 80192EE7. In this case, you can try checking the Office update and re-sign in to fix the error.
To do that, you just need to open Office 365 and go to File > Account > Update Options > Update Now to ensure Office is updated. Then, try signing out and back into your account within an Office application like Excel.
Method 6. Clear Credentials
The residual credentials may also cause the Windows error code 80192EE7. In this situation, you can try clearing credentials to fix the error:
Step 1. Press the Win + S keys to open the Search window, type “control panel” and press Enter.
Step 2. In the Control Panel window, set View by to Large icons, and select Credential Manager.
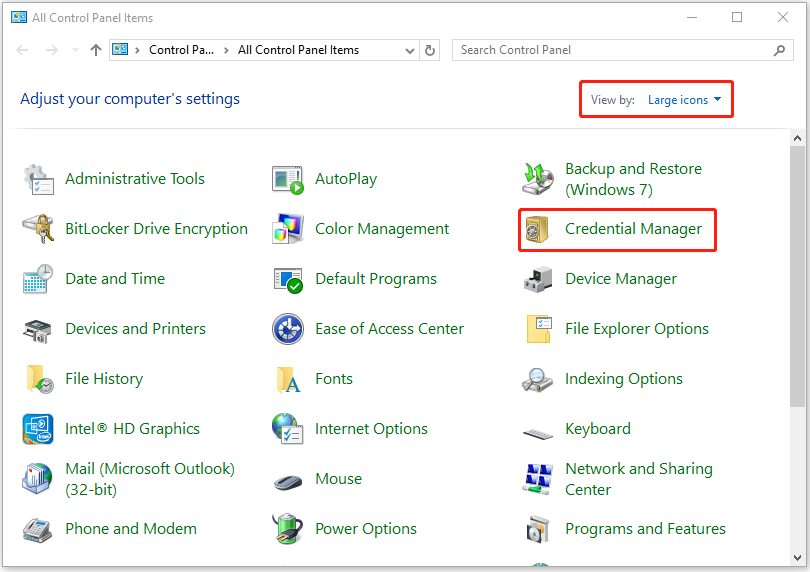
Step 3. Find and remove any Office 365 related entries under Windows Credentials.
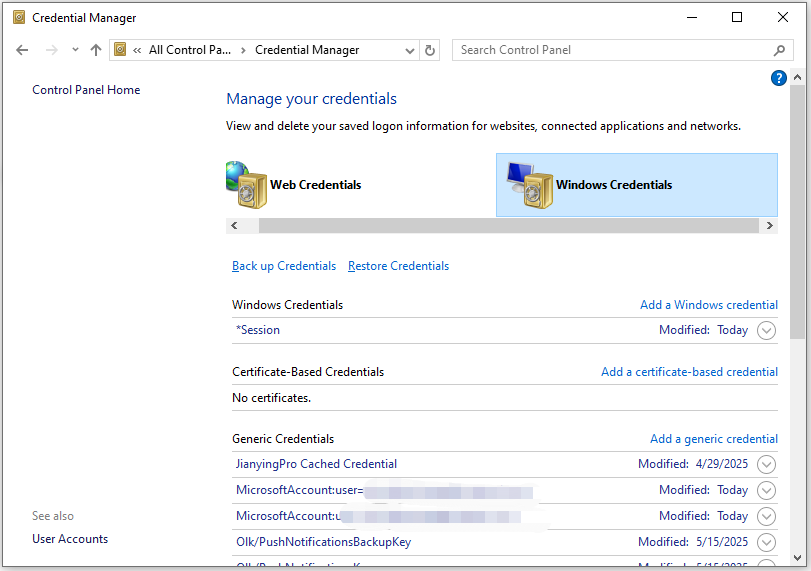
Step 4. Try to sign in to your account again to check whether the error is resolved.
Method 7. Adjust Intune WIP Settings
If you encounter the 80192EE7 error code when attempting to add another account to Microsoft 365 (Office), you can also try resolving the error by adjusting Intune settings. Here’s how to do that:
- Access the Microsoft Azure page.
- Type “wip” in the search box and press Enter.
- Select Mobility (MDM and WIP) > Microsoft Intune.
- Under Windows Information Protection (WIP) user scope, tick None.
- Click Save to apply the changes.
- Once done, try adding another account again and check if the error is fixed.
Method 8. Disconnect and Re-Enroll the Device
If the device was previously enrolled, outdated data may prevent it from being re-enrolled and result in the error code 80192EE7. Then, you can try the following steps to fix the error:
Step 1. Go to Settings > Accounts > Access work or school.
Step 2. Disconnect the affected account. Then, restart your device.
Step 3. Add the work or school account again and then check if the error persists.
Method 9. Re-Register Device with Azure AD
A malfunctioning device registration hinders the authentication process. If the above methods don’t work, please do the following steps:
Step 1. Run Command Prompt as administrator.
Step 2. Type “dsregcmd /status” and press Enter to check device registration.
Step 3. If not properly joined, type the command “dsregcmd /leave” and press Enter.
Step 4. Then, reboot and try enrollment again to check if the error is fixed.
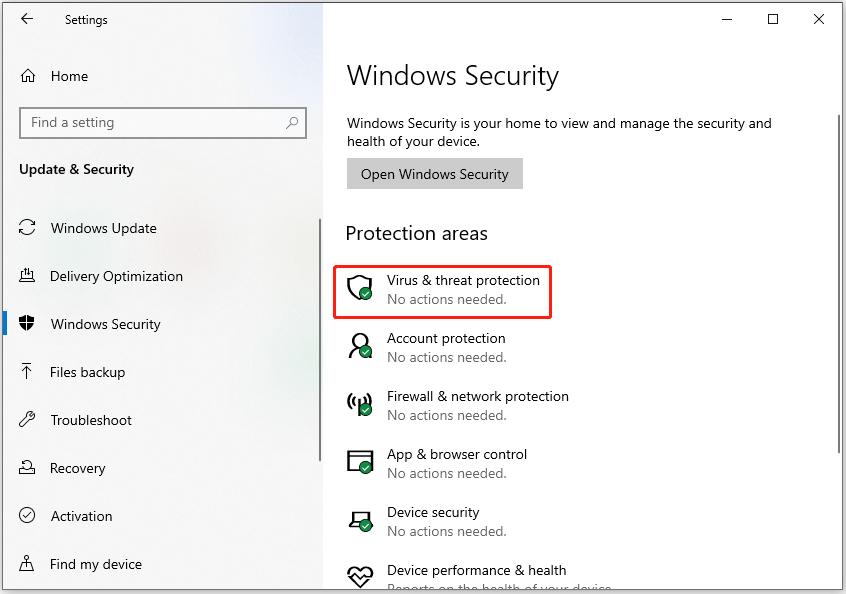
Method 10. Temporarily Disable Security Software
Some security software may also cause the error code: 80192EE7 when you attempt to sign in to your Microsoft apps with the account. In this situation, you can try temporarily disabling security software to fix the error. Here’s the guide:
Step 1. Press the Win + I keys to open the Settings window, and then choose Update & Security.
Step 2. Click Virus & threat protection under the Protection areas section.
Step 3. Under the Virus & threat protection settings section, click Manage settings.
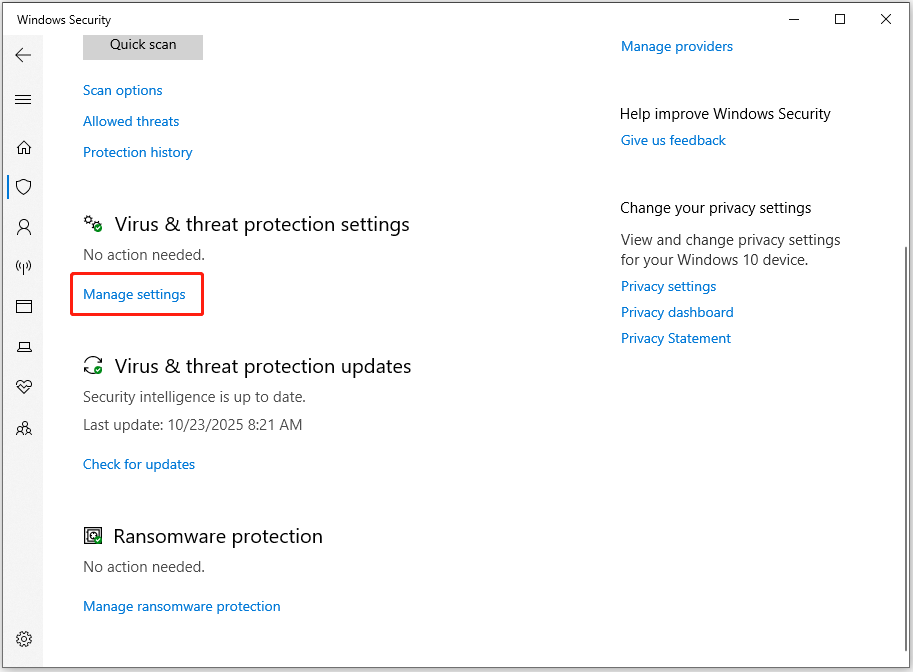
Step 4. Toggle off the switches of Real-time protection, Cloud-delivered protection, Automatic sample submission, and Tamper Protection.
Step 5. After that, try to add a new account in your domain again and check if the error has been resolved.
Method 11. Try a Clean User Profile
Sometimes, the problem may be linked to a corrupted user profile. To determine if this is the case, try creating a new work profile. Here’s the guide:
- Go to Settings > Accounts > Family & other users.
- Add a new account and log in.
- If the new profile functions correctly, you can transfer your data to it.
Method 12. Contact Your IT Administrator
If the problem continues, it may indicate a configuration issue that requires your company’s IT department to investigate the settings in Microsoft Entra ID or Intune. They should verify your account’s domain join status and the Intune policies.
In Conclusion
This post explains the cause of error code 80192EE7 and provides instructions on how to resolve it. If you encounter the same error on your PC, try the above methods.
Also, this post offers MiniTool System Booster for better system performance and stability. If you have any issues with our software, feel free to contact us at [email protected]. We will contact you as soon as possible.
Error Code 80192EE7 FAQ
You might also try clearing cached credentials or using the Microsoft Support and Recovery Assistant.
Besides, you should also clear browser cache and cookies, and ensure all Office applications are closed before clearing the cache for a specific app like Outlook or Teams.
If these steps don’t work, you can try resetting the Windows Update components, performing a clean boot, or manually downloading and installing the update from the Microsoft Update Catalog.
If that doesn’t work, use the Startup Repair or System Restore options in the Windows Recovery Environment. For persistent issues, you can use the "in-place upgrade" feature to reinstall Windows while keeping files, apps, and settings.
About The Author

Position: Columnist
Charlotte is a technology columnist with a strong focus on the Windows operating system, specializing in disk management, backup, and data recovery. She is passionate about analyzing computer errors, identifying root causes, and delivering practical solutions. In her free time, she stays updated on the latest developments in computer systems and hardware while continuously learning new technologies to broaden her expertise. Her writing style is clear and easy to understand, making complex technical topics accessible even to users with limited computer knowledge.