Windows Clipboard is hosted on the cloud. It displays the most recent 25 items copied to the Clipboard. Some users want to clear them. Now, this post from MiniTool tells you how to clear your Clipboard history on Windows 11.
Clipboard history was first introduced in Windows 10’s October 2018 Update. It stores the 25 most recent items you’ve copied, including text, HTML, and images. You can easily access your keyboard history to check the items you’ve copied and easily re-use them in the future.
Although Windows automatically clears your Clipboard data when you shut down or restart your computer, many people find that having a large Clipboard history can create many temporary files that may slow down the device if the service itself hasn’t already.
This post tells you how to clear your Clipboard history on Windows 11.
Way 1: Via MiniTool System Booster
To clear your Clipboard history on Windows 10/11, you can try MiniTool System Booster, which is a powerful and comprehensive PC tune-up software. It allows you to speed up the system to gain optimal performance. It is useful to clean up your computer, increase CPU performance, free up RAM, uninstall unwanted apps, disable startup programs, etc. The following are the main features of this tool:
- Real-time scanning to protect your computer.
- Detect and remove harmful programs on your device.
- Completely delete malicious files from being recovered.
- Find and end memory-intensive background processes.
- Find and stop unnecessary services from starting on the system boot.
MiniTool System Booster TrialClick to Download100%Clean & Safe
1. After installing this software, launch it on your PC.
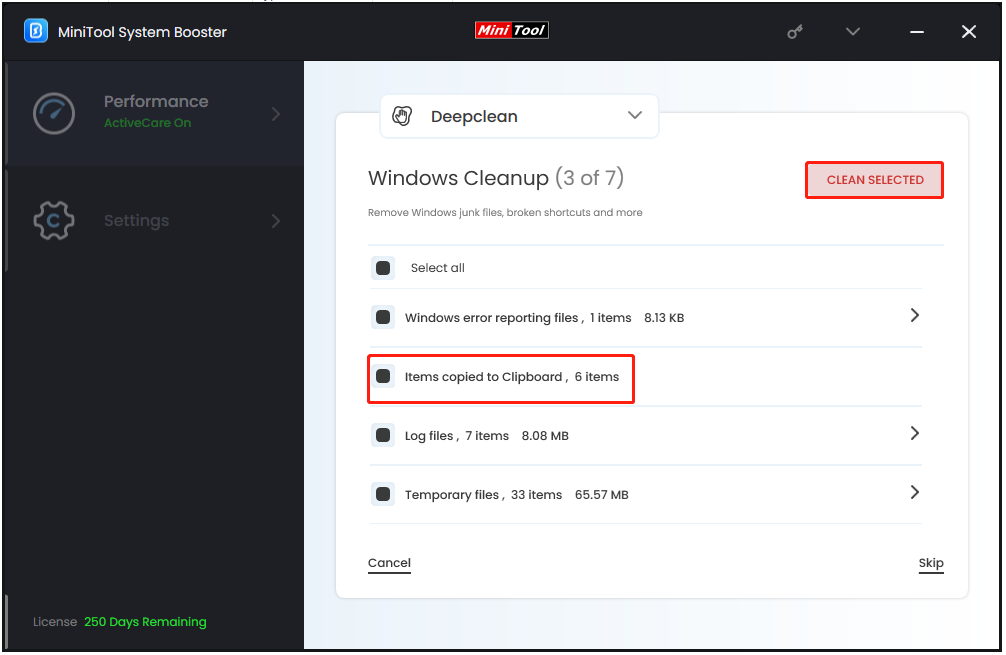
2. Under the Performance page, click the drop-down menu to choose Deepclean. Then, click the START CLEAN button to start the cleanup tasks.
3. Then, it will begin the scan and the cleanup tasks. To clear your Clipboard history on Windows 11, you should stay on the Windows Cleanup page and perform some actions.
4. Here, your Windows junk and private data will be detected, such as temporary files, log files, recent document lists, broken shortcuts, Recycle Bin, and more. Check the items copied to Clipboard and click CLEAN SELECTED.
Way 2: Via the Clipboard Tab
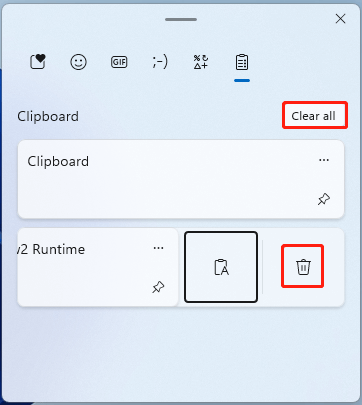
How to clear your Clipboard history? The Clipboard tab on Windows provides an easy way to clear Clipboard history. Here is how to do that:
1. Press the Windows + V key together to open the Clipboard tab.
2. You can click the Clear all button to remove all copied items from your Clipboard. If you want to delete one of the histories, you can click the three-dots next to it and click the Delete icon.
Way 3: Via the Settings App
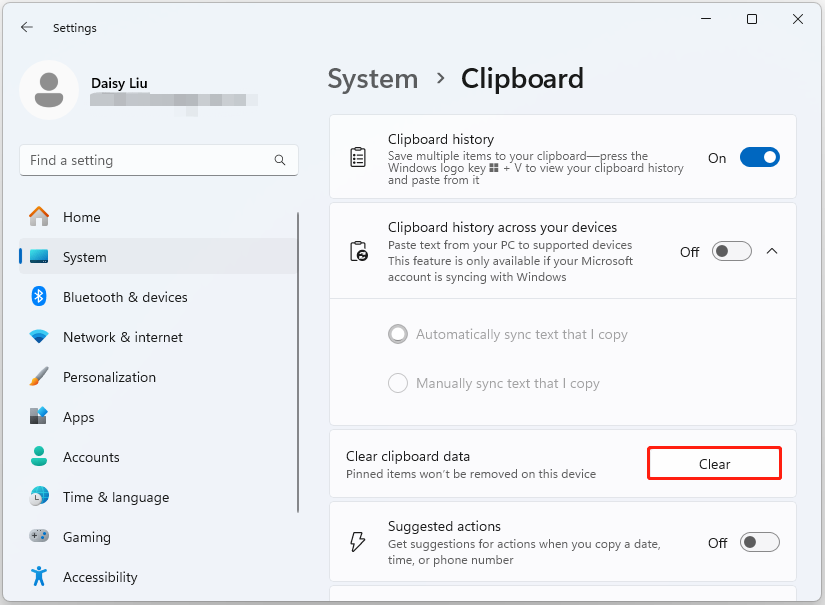
Another option for clearing the Clipboard history in Windows 11 is to use the Settings app. Follow the below guide:
1. Press the Windows + I keys together to open the Settings application.
2. Go to the System tab, and click Clipboard.
3. Click the Clear button next to Clear Clipboard data.
Way 4: Via Command Prompt
Command Prompt is a helpful application. You can clear the Clipboard with command lines and also repair Windows issues. To clear Clipboard history using Command Prompt, here are the steps:
1. Type cmd in the Search box and choose Run as administrator.
2. Copy and paste the following command and press Enter.
echo.|clip
Way 5: Via Desktop Shortcut
You can also create a dedicated shortcut on the desktop of your computer to help you clear the Clipboard. In this situation, you can refer to the following steps to create a shortcut to clear the Clipboard.
1. Right-click any space on your deksyop to click New and then click Shortcut.
2. Type cmd /c echo off. | clip as the location for the shortcut and click Next.
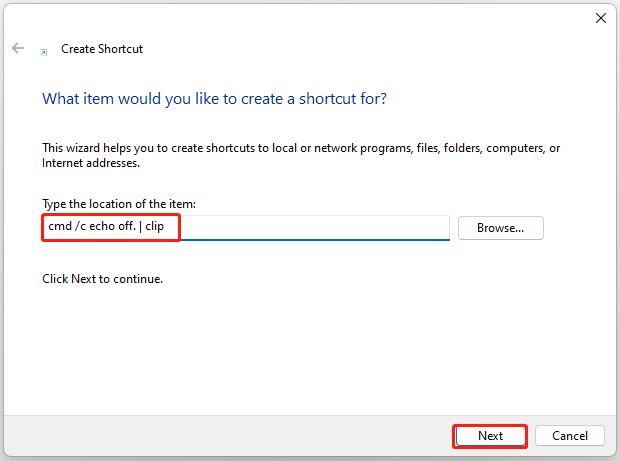
3. Then, type a name for the shortcut, like Clear Clipboard, and click the Finish button.
4. You should be able to see the Clear Clipboard shortcut icon on the desktop of your computer as the following image shows.
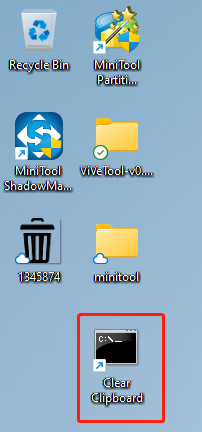
5. After creating this shortcut, you can just double-click it to clear the Clipboard.
Optionally, you can also invoke the newly created shortcut with a keyboard shortcut. Here’s how to do it.
1. Right-click on your desktop shortcut and select Properties.
2. In the Shortcut tab, click the Shortcut key field.
3. Now press the key combination you’d like to use to invoke the shortcut. Your keyboard shortcut will appear in the Shortcut key field.
4. Click Apply and OK.
How to Disable Clipboard History on Windows 11
Some users wonder how to disable the Clipboard history on Windows 11.
1. Press the Windows + I keys together to open the Settings application.
2. Go to the System tab, and click Clipboard.
3. In Clipboard settings, locate the Clipboard history section and toggle the switch to Off.
4. Now you’re free to copy and paste in privacy.
Related posts:
- Enable and Customize Clipboard History in Windows 10
- 5 Effective Methods to Fix Clipboard History Not Working on Windows 10
Final Words
To sum up, this post has introduced 5 ways to clear your Clipboard history on Windows 11. If you have such a need, try these solutions. I hope that this post will be useful to you.

