Google Chrome is one of the most popular web browsers in the world. Sometimes, this browser might consume excessive system resources, resulting in screen or mouse lag, overheating, and more. This guide covers some possible solutions to fix Google Chrome high CPU usage on your computer.
Google Chrome High CPU/Memory/Disk Usage
Sometimes, you might find Google Chrome will use up its available system resources like CPU, memory, or disk usage in response to your demands. Google Chrome high CPU usage is one of the most concerning problems because it might cause a drop in the overall system performance of your computer.
Why is Chrome using so many RAM, CPU, or disk resources? According to different users in forums, extensions, background processes, excessive browsing data, and hardware acceleration might be blamed. If your computer is sluggish due to Google Chrome high CPU, memory, or disk usage, scroll down to get more feasible solutions!
How to Fix Google Chrome High CPU Usage on Windows 10/11?
Fix 1: Delete Browser Cache via MiniTool System Booster
As stated in the beginning, Google Chrome high CPU usage can significantly impact the performance of your computer, so you need to solve this problem at once. Here, a free PC tune-up software – MiniTool System Booster can satisfy all your needs.
This tool is designed to improve PC performance from various aspects such as cleaning up junk files, fixing & repairing system issues, increasing internet speed, and more. To solve Google Chrome high CPU usage, the Deepclean feature can help you out.
This feature contains 7 cleanup tasks that enable you to free up memory, clear temporary files, defragment hard drive and more. Now, here’s how to perform a deep scan with this tool:
Step 1. Launch MiniTool System Booster to enter the Performance Home page.
MiniTool System Booster TrialClick to Download100%Clean & Safe
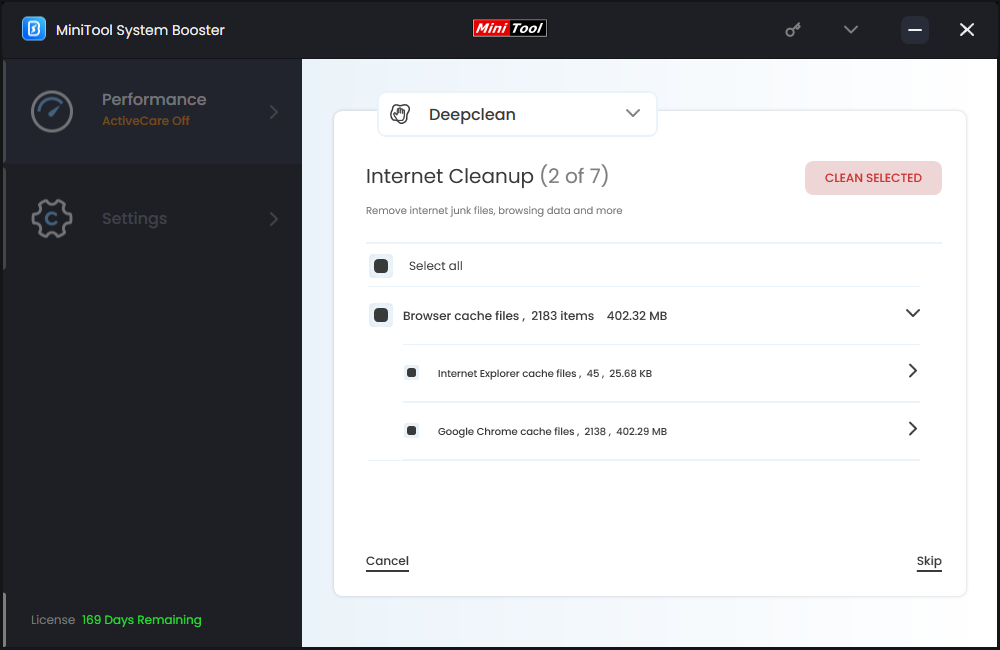
Step 2. In this page, click on START CLEAN to start getting rid of the unnecessary clutter on your computer. As shown in the picture, this feature contains 7 tasks.

Step 3. The second task called Internet Cleanup can clear internet junk files and browsing data including history, cookies, and cache. After scanning, select the items you want to remove and hit CLEAN SELECTED to start the process.
Fix 2: Clear Browsing Data Manually
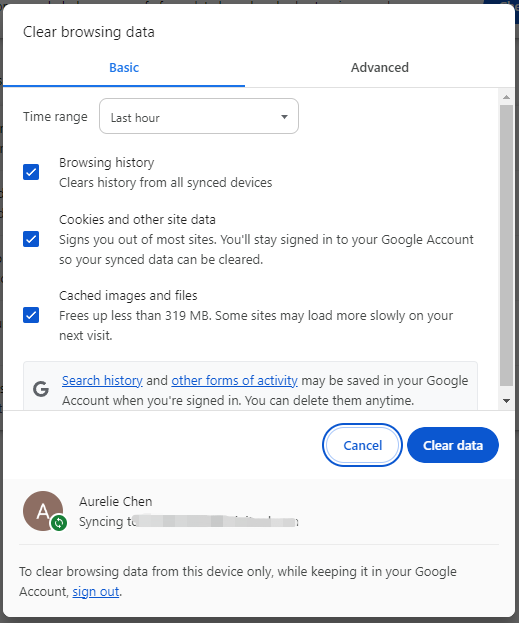
When you open a website, Google Chrome will store some temporary data such as images, scripts, and more for faster response in the future. However, corrupted or overloaded cache might be another reason for Google Chrome high CPU usage. Clearing browsing data might do the trick. To do so:
Step 1. Open Google Chrome Settings.
Step 2. In the Privacy and security section, hit Clear browsing data.
Step 3. Select the time range and check the items you want to clear. Here, you are allowed to clear browsing history, cookies, and cached files.
Step 4. After that, hit Clear data to start the process.
Fix 3: End Tabs in Chrome
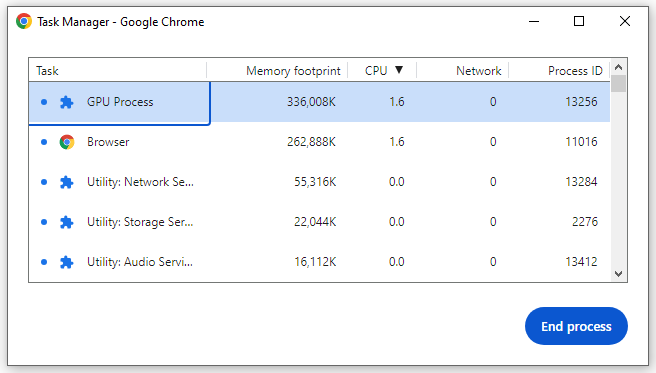
Google Chrome has a Task Manager that allows you to find resource-intensive tabs and processes. Like Task Manager in Windows, you can end some processes that use high CPU usage. To do so:
Step 1. Launch your Google Chrome.
Step 2. Click on the three-dot icon to select More tools > Task Manager.
Step 3. Hit the CPU tab to sort processes by usage.
Step 4. Select the tab that consumes most CPU and hit End process in the lower right.
Fix 4: Disable or Remove Some Extensions
Extension might be the biggest culprit that causes Google Chrome high CPU usage. To address this issue, you can consider disable extensions or remove them if unneeded.
Step 1. Open Google Chrome Settings.
Step 2. In the Extension tab, toggle the unneeded extensions. Hit Remove if you want to delete it.
Fix 5: Disable Hardware Acceleration
The hardware acceleration feature can relieve the stress on your CPU when rendering images, pictures, or other graphic intense tasks on webpages by using the GPU on your computer. However, this feature might work improperly and lead to some issues like Google Chrome high disk, memory, or CPU usage. If you suspect this feature is problematic, follow these guidelines to disable it:
Step 1. Open the settings of your browser.
Step 2. Type chrome://settings/system in the search bar or navigation bar and hit Enter.
Step 3. Toggle off Use hardware acceleration when available and hit Relaunch. After that, Google Chrome will restart with this feature disabled.

Also see: How to Disable Hardware Acceleration on Windows 10
Fix 6: Reset Google Chrome
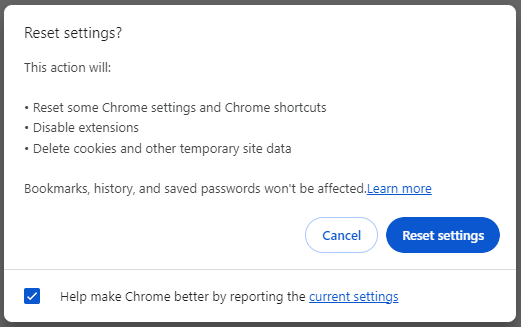
If you still encounter Google Chrome high memory, CPU, or disk usage, resetting your browser to its default state might help you out. By doing so, some browser settings and shortcuts might be reset, and cookies & other temporary site data might be removed. Follow these steps:
Step 1. Launch Google Chrome and open Settings.
Step 2. Select Reset settings in the left pane and hit Restore settings to their original default.
Step 3. Then, a window will appear to show you what this action will do. If you are sure to make this change, hit Reset settings to confirm this operation.
Fix 7: Reinstall the Browser
Reinstalling Google Chrome is an under estimated and effective solution in Google Chrome. Here’s how to do it:
Step 1. Press Win + R to open the Run box.
Step 2. Type appwiz.cpl and hit OK to open Programs and Features.
Step 3. In the program list, right-click on Google Chrome and hit Uninstall.
Step 4. Hit Uninstall again to confirm this action and then follow the prompts on the screen to uninstall Chrome.
Step 5. After that, reboot your computer and go to the official website to download the latest version of Google Chrome.
Final Words
That’s all you can do when experiencing high CPU usage in Google Chrome. More importantly, we introduce you a hand tool called MiniTool System Booster to maximize your PC performance when your computer is slow or less responsive. Hope you can benefit from this post!


