When you are working with your files on Windows 10/11, some errors like not enough quota is available to process this command might crop up. This error can hinder you from editing, moving, copying, or transferring files on your computer. Don’t worry! Every problem has a fix. In this post from MiniTool System Booster, we will walk you through on how to solve it for you.
Error 0x80070718: Not Enough Quota Is Available to Process This Command
It’s common to encounter the not enough quota is available to process this command error when you are trying to copy files to a network folder. Sometimes, this error might be accompanied by error code 0x80070718. The full error message is:
Rename File
An unexpected error is keeping you from renaming the file. If you continue to receive this error, you can use the error code to search for help with this problem.
Error 0x80070718: Not enough quota is available to process this command.
Disk quota refers to the amount of space you have to store files. Every computer account has both a soft and hard quota. The hard quota refers to the maximum amount of disk space the OS grants your account. Once you exceed the hard quota on your computer, you will fail to do anything in your account that needs extra disk space.
According to some users, low disk usage limit, file & folder corruption, and default file save location conspire to rename error not enough quota is available to process this command. Luckily, it will be much easier to address this error after reading the following contents.
How to Fix Not Enough Quota Is Available to Process This Command on Windows 10/11?
Fix 1: Terminate Memory-Intensive Tasks
The process running in the background might use up valuable CPU, disk, or memory, triggering Windows error 0x80070718. Consequently, you can find these unnecessary background tasks and disable them.
To accomplish this goal, a piece of free PC tune-up software called MiniTool System Booster is worth a try. This core feature of this tool is to enhance your system performance in various aspects. With it, you can scan your browser cache and Windows files, optimize your memory, disk, CPU and power usage, clean and defragment hard drives, and so forth.
Now, let’s see how to terminate memory-hogging processes via it:
Step 1. Launch MiniTool System Booster to enter its main interface.
MiniTool System Booster TrialClick to Download100%Clean & Safe
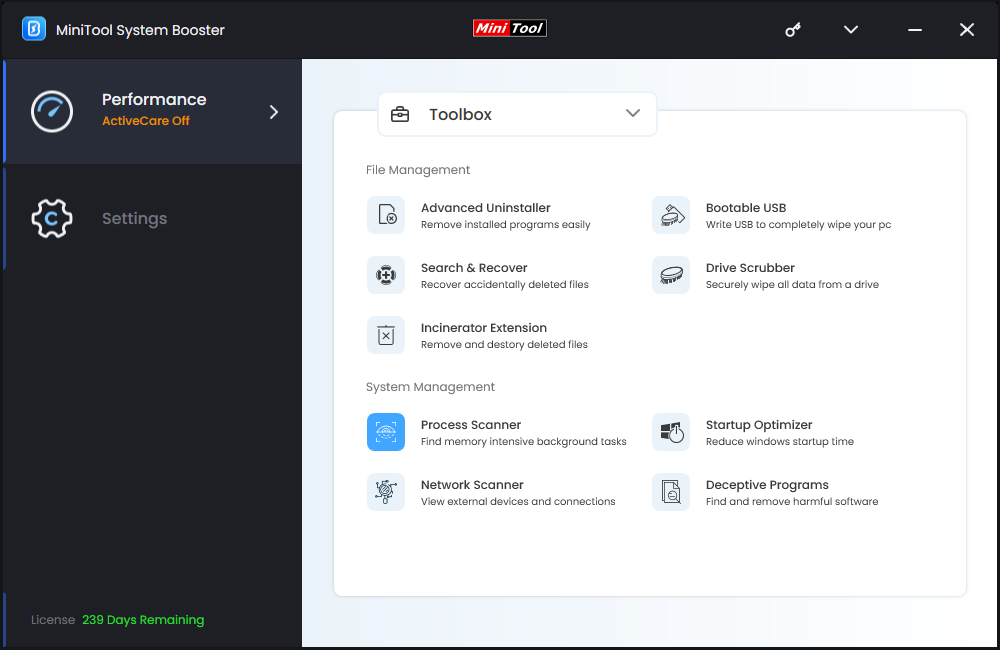
Step 2. Click on Performance Home and select Toolbox from the drop-down menu.
Step 3. In this page, tap on Process Scanner.
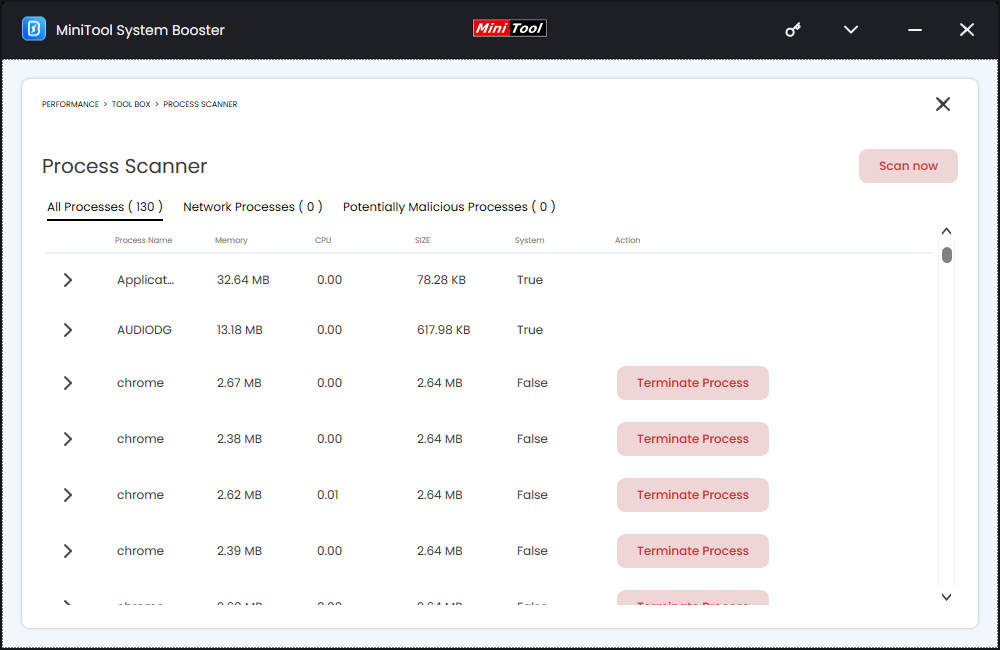
Step 4. After hitting Scan now, you can see all the running tasks and the CPU, and memory they consume. Find the resource-hogging ones and hit the Terminate Process button beside them.
Fix 2: Modify Disk Usage Limit
When your disk usage limit is too low to accommodate the files you want to transfer, not enough quota is available to process this command might also occur. If this is the case, you can increase the disk quota by changing the disk usage settings. To do so:
Step 1. Type control panel in the search bar and hit Enter.
Step 2. In the top right corner, click on the drop-down menu beside View by and select Small icons.
Step 3. Scroll down to find Sync Center and hit it.
Step 4. In the left pane, click on Manage offline files.
Step 5. In the Disk Usage tab, tap on Change limits.
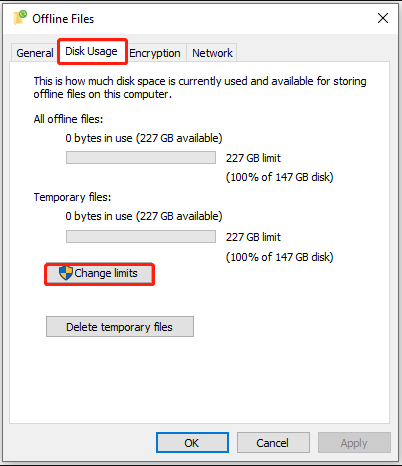
Step 6. Drag the sliders to increase Maximum amount of space all offline files can use and Maximum amount of space all temporary files can use.
Step 7. Save the changes and then restart your computer.
Fix 3: Change the Default Save Location
If the problematic files or folders are hosted on an SSD drive, changing the default location of the user folder is also effective for not enough quota is available to process this command. Here’s how to do it:
Step 1. Right-click on the Start menu and select Run.
Step 2. Type ms-settings:savelocations and hit Enter.
Step 3. Change the default drive that is used for saving from your SSD to the traditional HDD and click on the Apply button.
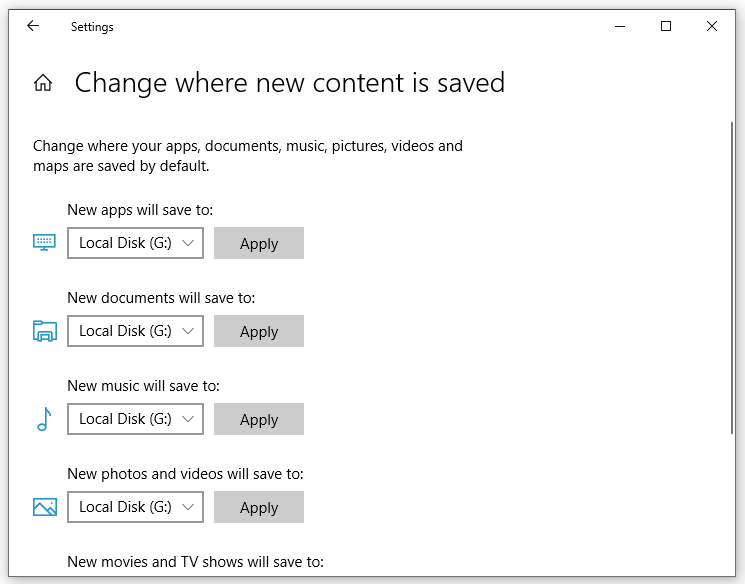
Step 4. Restart your computer to make these changes effective.
Fix 4: Increase Virtual Memory
A paging file is a Windows file that manages virtual memory on your computer. It can make the operating system use more physical memory more effectively for more frequently accessed pages. If the paging file size in the virtual memory settings is too small, it can also lead to the occurrence of Windows rename error 0x80070718. To do so:
Step 1. Press Win + R altogether to open the Run box.
Step 2. Input sysdm.cpl and hit Enter to launch System Properties.
Step 3. In the Advanced section, click on Settings under Performance.
Step 4. Go to another Advanced tab and hit Change under Virtual memory.
Step 5. Untick Automatically manage paging file size for all drives > tick Custom size > enter initial size and maximum size as per your needs > hit Set > tap on OK.
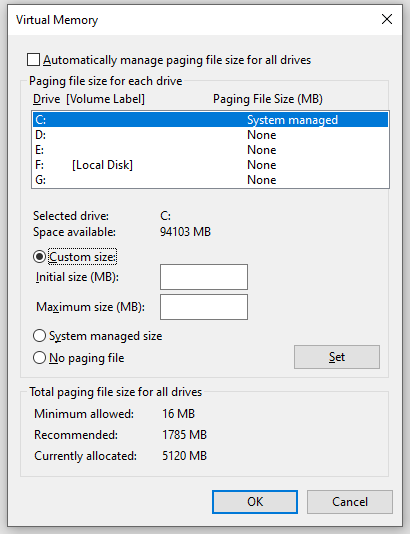
Step 6. Finally, reboot your system to see if not enough quota is available to process this command is gone.
Fix 5: Repair Windows Files & Folders
When you have problems copying, moving, renaming, or deleting files on Windows 10/11, you can utilize Windows File and Folder Troubleshooter to diagnose and repair the issue. Follow these steps:
Step 1. Click here to download Windows File and Folder Troubleshooter
Step 2. Once downloaded, double-click on winfilefolder.DiagCab to open it.
Step 3. Click on Advanced Settings > tick Apply repairs automatically > hit Next.
Step 4. After scanning, check Others or I don’t know and hit Next to continue.
Step 5. Check all the options associated with each repair strategy, hit Next, and wait for the process to complete.
Wrapping Things Up
We sincerely hope that you can benefit from this post and be free from not enough quota is available to process this command on your computer. At the same time, to optimize your Windows machine and unlock more system resources, you can scan your PC with MiniTool System Booster.
MiniTool System Booster TrialClick to Download100%Clean & Safe
For more suggestions about our product, don’t hesitate to share them with us via [email protected]. Appreciate your support and time!


