Razer Cortex boosts your system performance for higher FPS and faster load times so you can game at your best. Somehow, you may encounter Razer Cortex high CPU usage on Windows 11/10. This post covers reasons and solutions for this issue.
Razer Cortex is considered a good game booster. However, some users noticed that it always takes up a lot of CPU power, even if it is not running. The main reasons for the “Razer Cortex high CPU usage” issue are as follows:
- System out of memory
- Razer Cortex-related background processes
- Incorrect configurations
- Wrong files in Razer Cortex’s new update
Now, read on and try the following ways to fix the high CPU problem.
Fix 1. Run MiniTool System Booster
When facing high CPU usage on the game booster Razer Cortex, the best solution is to rely on some professional third-party PC tune-up program like MiniTool System Booster rather than manual troubleshooting.
This freeware can streamline your machine on multiple fronts, such as wiping out internet traces, optimizing hard drive through defragmentation, and clearing out junk files. It offers a feature called Deepclean that enables you to tidy up your browsers, system cache, invalid registry entries, RAM space, etc., saving a ton of time and effort.
Now, let’s see how to fix Razer Cortex using 100% CPU with MiniTool System Booster.
MiniTool System Booster TrialClick to Download100%Clean & Safe
Step 1. After installing this tool on your device, launch it from your Desktop.
Step 2. Perform a Deep Clean
1. Expand the Performance Home menu and select Deepclean from the drop-down menu.
2. Click on START CLEAN to perform 7 cleanup tasks. They will run one by one and it’s advisable to carry out Internet Cleanup, Windows Cleanup, and Memory Mechanic.
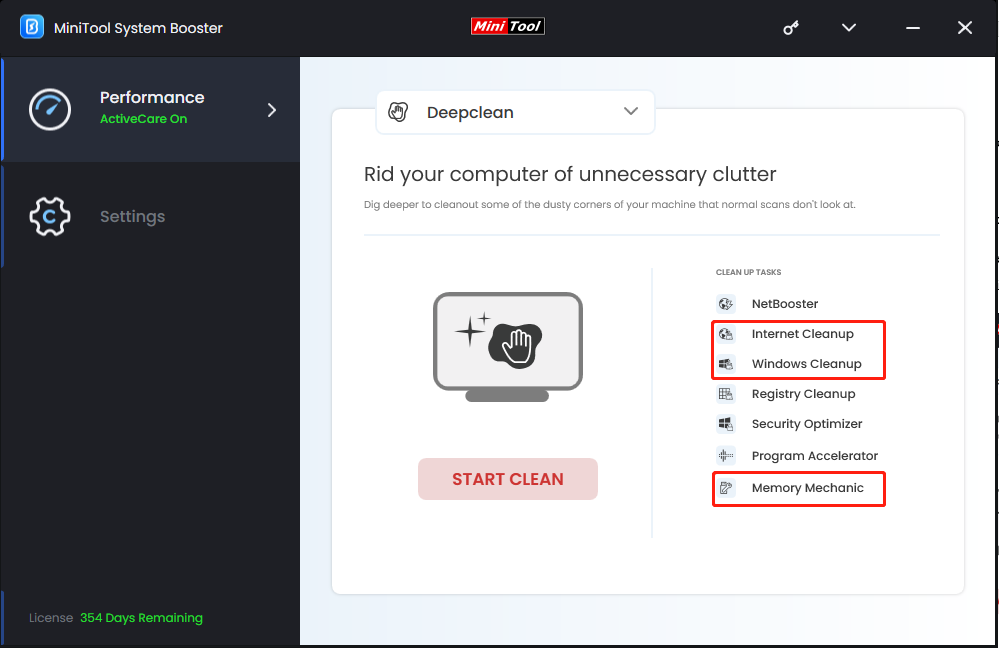
As for the rest tasks, you can perform them as per your needs or skip the unwanted ones.
Step 3. Close Razer Cortex-related processes
1. Go to Toolbox > select Process Scanner under System Management.
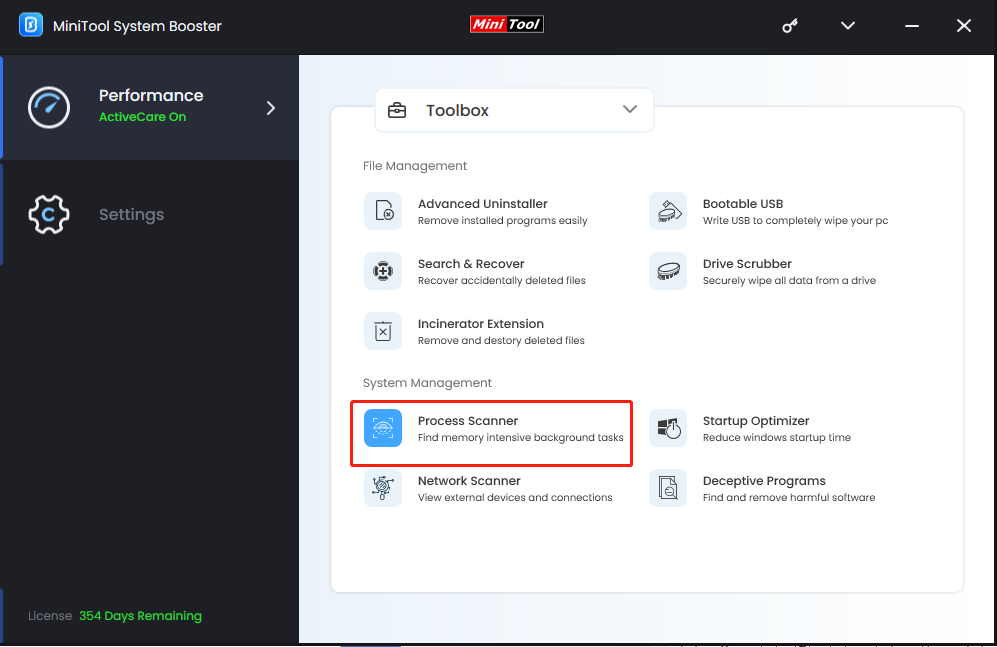
This feature can be used to end Razer Cortex-related processes running in the background which would waste CPU resources.
2. After scanning, hit Scan now > look for Razer-Cortex-related background processes > click on Terminate Process beside them.
Step 3. Remove Razer Cortex from startup
1. In the Toolbox page, select Startup Optimizer under System Management.
2. Scroll down to find Razer Cortex> tap Off to remove if it is operational upon startup.
Fix 2. Redo Lighting Profiles
Lighting is a feature that allows you to control LED-powered devices such as keyboards, mice, and other illuminated accessories. When gaming, it will create a stunning light show that reacts to in-game events, making your gaming sessions more immersive than ever.
However, it also could be the culprit of heavy CPU consumption on your computer. There are some users who have encountered high background CPU usage on Razer Cortex and managed to get rid of it successfully by resetting light profiles. You can give it a try and see if this method works.
Fix 3. Disable Boosting Feature
Razer Cortex has a feature – Auto Boost – will automatically optimize your PC performance. However, in a state where system resources are already strained or when certain background processes are running, it could result in a Razer Cortex high CPU problem. You may need to disable it:
Step 1. Launch Razer Cortex > go to Game Booster > Boost.
Step 2. Toggle off the Auto-Boot button.
Step 3. Or, scroll down to find Specials > disable Enable CPU Core.
Fix 4. Reassign CPU Resources
The method you can try is to reallocate and limit CPU resources for Razer Cortex. Here’s how to do that:
Step 1. Right-click on the taskbar and select Task Manager.
Step 2. In the Details tab, right-click on Razer Cortex > choose Set affinity > determine which CPUs are allowed to run it > click on OK to save.
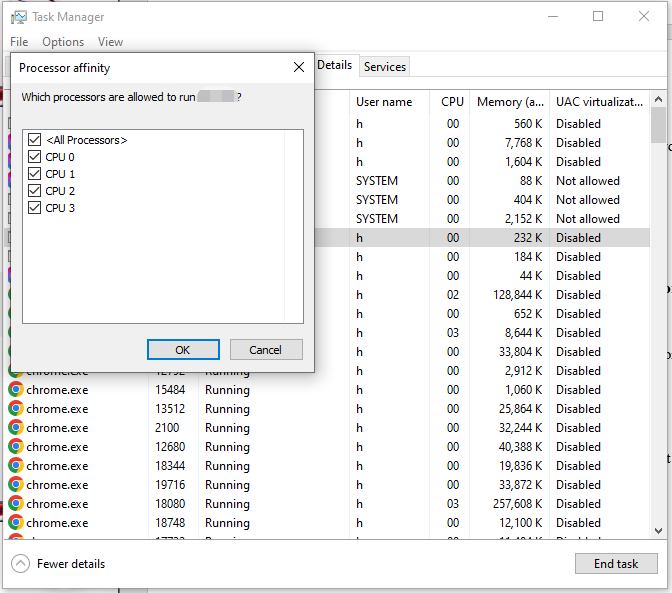
Step 3. Right-click on Razer Cortex again > select Set priority > set the priority to Below normal or Low.

Fix 5. Roll Back to the Previous Version
Many users reported that updating this app led to the Razer Cortex high CPU usage issue. It also causes dramatically low FPS and the worst gaming experience. Try rolling back to the older version:
Step 1. Open Control Panel through Windows Search.
Step 2. Go to Programs > Uninstall a program > find Razer Cortex > right-click on it > select Uninstall. Then check and delete any leftovers of Razer Cortex.
Step 3. Visit the Uptodown site which contains multiple versions of Razer Cortex and then download and install the one you need.
After the reinstallation, check if it still consumes so much of system resources in Task Manager.
Fix 6. Reinstall Razer Cortex
The Razer Cortex high CPU problem could be attributed to corrupted installation files or configurations. Reinstalling it may be a great idea:
Step 1. Uninstall the software by following the first two steps of Fix 5.
Step 2. Then visit the official Razer Cortex website to download the latest version of the Razer Cortex installer.
Step 3. Launch the downloaded installer and follow the onscreen instructions to complete the installation.
Step 4. Once the installation finishes, restart your computer and check if the resources-hogging issue persists.

Bottom Line
In this post, we show you how to solve the Razer Cortex high CPU usage issue with both third-party program and targeted solutions. If you are less familiar with complex system settings, MiniTool System Booster is ideal for you. This program boasts a user-friendly interface and quick system diagnosis.
MiniTool System Booster TrialClick to Download100%Clean & Safe
Do you have any suggestions or problems with our product? If yes, please feel free to contact us via [email protected]. Our support team is always ready to help you out.