If the copy of VMware Tools got corrupted, you couldn’t perform a successful update and there will be some residual files. These residual files will prevent you from reinstalling VMware Tools. Thus, you need to uninstall VMware Tools completely first. This tutorial provides 4 ways.
VMware Tools is a set of services and modules that enable multiple features of VMware products to better manage guest operating systems and enable seamless user interaction with them. However, some users want to uninstall VMware Tools for the following reasons:
- After upgrading VMware Fusion, the VMware Tools installer does not launch automatically when Windows boots.
- The VMware Tools installer fails to launch even after you click Install VMware Tools in the Virtual Machine menu.
- VMware Tools does not install correctly.
Below are the error messages you may receive:
Error: “The feature you are trying to use is on an unavailable network resource. Click OK to try again, or enter an alternate path to a folder containing the installation package “VMware Tools64.msi” in the box below.
Error: VGAuthservice and Alias Manager cannot be installed.
Error: A network error occurred while attempting to read from the file C:\Windows\Installer\VMware Tools.msi.
Next, let’s see how to remove VMware Tools on Windows 11/10.
How to Uninstall VMware Tools
Way 1: Via MiniTool System Booster
How to uninstall VMware Tools Windows 11? First, you can try a professional uninstall tool – MiniTool System Booster. It can uninstall any programs such as Windows built-in apps, any stubborn programs, bloatware, bundled software, etc.
It can also disable startup items, permanently delete files, wipe the entire drive, recover accidentally deleted files, optimize your Internet speed, etc. Now, we will introduce how to uninstall VMware Tools with MiniTool System Booster.
Step 1: Download and install the MiniTool System Booster Trial edition. Then, you can use it free for 15 days.
MiniTool System Booster TrialClick to Download100%Clean & Safe
Step 2: Launch it to enter its main interface and click the drop-down menu to choose Toolbox.
Step 3: Under the File Management part, choose Advanced Uninstaller.
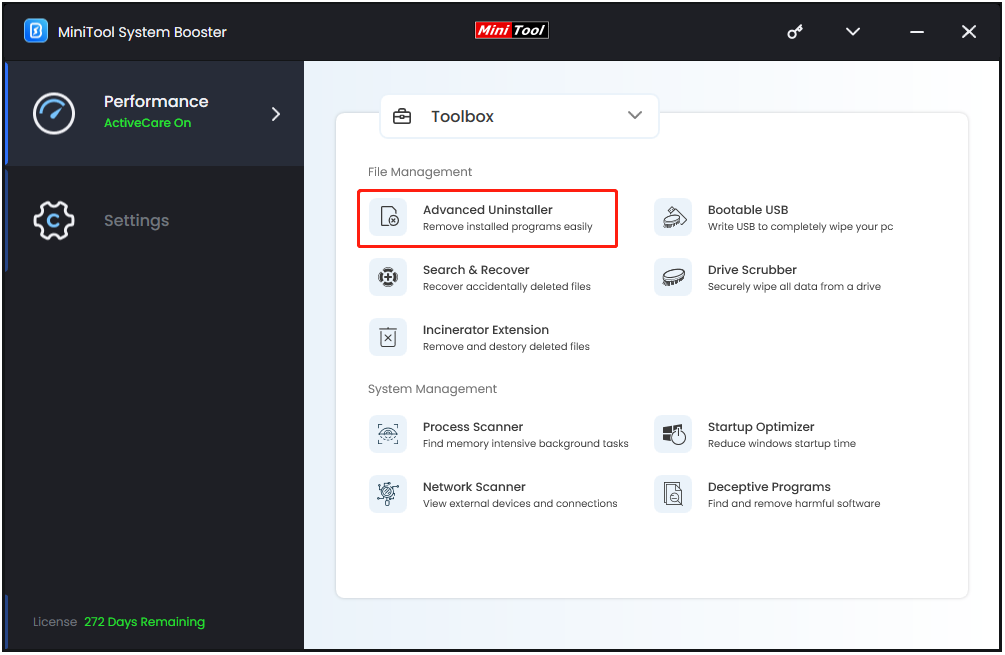
Step 4: Then, you can see the installed programs have been listed. Find VMware Tools and click the UNINSTALL button

Step 5: After uninstalling VMware Tools, you can perform a deep cleanup to remove the resident files and free up space including cleaning up the Windows, registry, internet, RAM, and more.
Way 2: Via Control Panel
If you prefer using Control Panel, that option is still available in both Windows 10 and Windows 11. Follow the steps to uninstall VMware Tools via Control Panel.
Step 1: Type Control Panel in the Search box and click Open to launch it.
Step 2: Change the view method to Category. Click Uninstall a program under the Programs part.
Step 3: Find and right-click VMware Tools and click Uninstall.
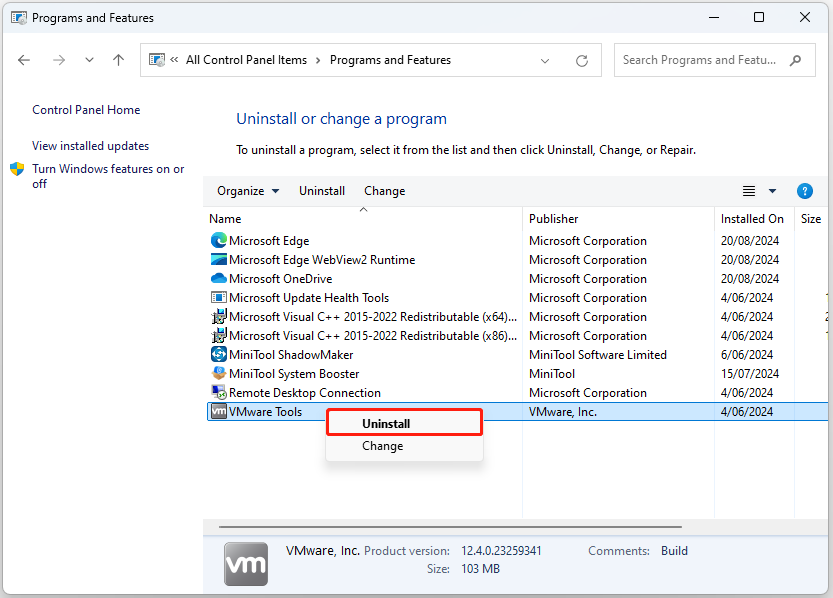
Step 4: Follow the on-screen instructions to uninstall it.
Way 3: Via Settings
Another method to uninstall VMware Tools Windows 11 from your PC includes using the Settings application to access the installed apps.
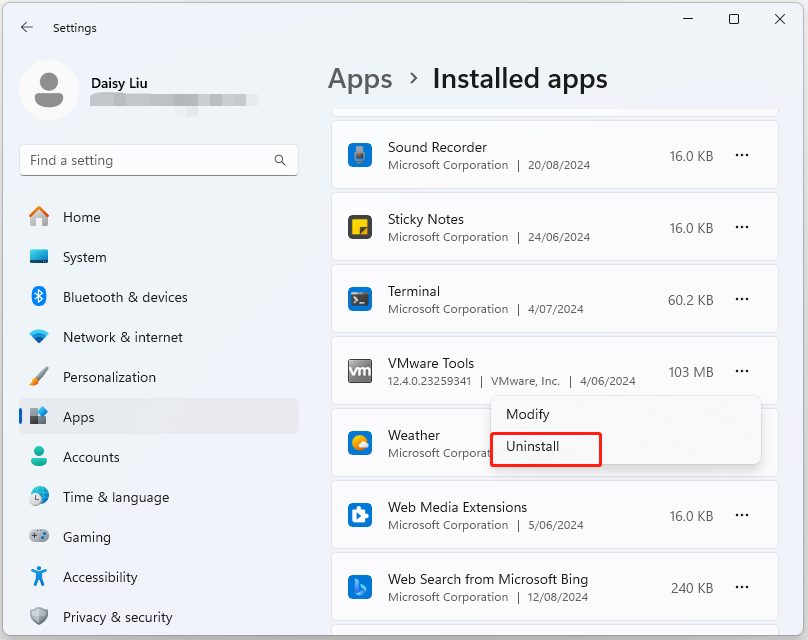
Step 1: Press the Windows + I keys together to open Settings.
Step 2: Go to App > Installed apps. The installed apps are listed here including the Windows pre-installed programs.
Step 3: Find VMware Tools and you click the app menu (three-dots) button. Then, click the Uninstall button.
Way 4: Manually Delete VMware Tools
In addition to the above methods to remove VMware Tools, you can also delete VMware Tools manually. Here are the steps for that:
Step 1: Launch VMware Playstation and power on the Virtual Machine.
Step 2: Press the Windows + E keys together to open File Explorer.
Step 3: Manually delete VMware Tools installation files under these locations:
- C:\Program Files\VMware
- C:\Program Files\Common Files\VMware
- C:\Program Data\VMware
- C:\users\username\App data\VMware
Step 4: Then, press the Windows + R keys together to open the Run dialogue box. Type regedit in it and click OK.
Stpe 5: Go to the following path:
HKEY_LOCAL_MACHINE\SYSTEM\CurrentControlSet\Services

Step 6: Delete all VMware-related items including vmci, vm3dmp, vmaudio, vmhgfs, vmmemctl, vmmouse, VMRawDisk, VMTools, vmusbmouse, vmvss, vmware physical disk helper services, VMwareCAF*.
Step 7: Go to HKEY_LOCAL_MACHINE\SOFTWARE\VMware.Inc and delete the Delete VMware.Inc folder.
Step 8: Open Device Manager and remove the VMware SVGA driver. Then, restart your PC.
How to Reinstall VMware Tools
After removing Vmware Tools completely, you can reinstall it to experience the latest features. Here is how to do that:
Step 1: Run your VMware Workstation as the administrator.
Step 2: Log in to one of the virtual machines and wait for it to load.
Step 3: Go to the VM tab and click the Reinstall VMware Tools… option to continue.
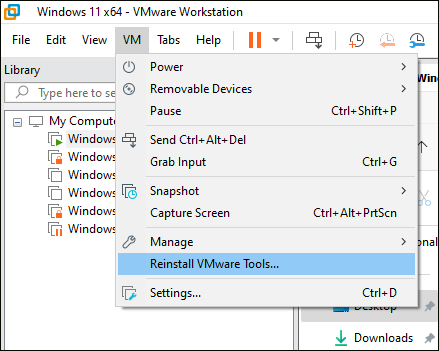
Step 4: Wait for it to finish the reinstallation.
Related post: Install VMware Tools Greyed Out? Easy and Useful Fixes Here!
Bottom Line
We have shown you how to uninstall VMware Tools. Just try one way to fully uninstall it if you have a need. It’s recommended to choose the MiniTool software. Besides, you can also know how to reinstall VMware Tools.