Is your Microsoft Edge sometimes prompted with the STATUS_ACCESS_DENIED error code, even when you try to access Settings? This guide focuses on this STATUS_ACCESS_DENIED error in Edge and lists some effective workarounds for you.
STATUS_ACCESS_DENIED Microsoft Edge Error
When your browser or Windows has been updated recently, or when you are trying to access certain websites, the STATUS_ACCESS_DENIED error may appear, preventing you from entering the webpage.
There are various reasons that might cause the STATUS_ACCESS_DENIED error in Edge.
- Permission conflicts between your browser and the operating system.
- Changes with certain security settings, file permissions, or group policy after updating either the browser or the system.
- Third-party antivirus or Windows security.
- Corrupted user profile or inaccessible temporary files.
How to Fix STATUS_ACCESS_DENIED Error in Edge
Method 1: Check Elevated Permissions
Step 1. Right-click on the Edge icon on Desktop and choose Properties from the shortcut menu.
Step 2. Go to the Security tab and click Edit.
Step 3. Then check if the user account has Full Control permissions. If not, adjust it and click Apply and OK to save the changes.
Method 2: Clear Microsoft Edge Cache with MiniTool System Booster
Over time, Microsoft Edge will be cluttered by various data like cached files, cookies, and browsing data. At this time, it might slow down the load time or just cause a webpage load failure. Consequently, to fix the STATUS_ACCESS_DENIED error in Edge, it’s essential to clear the cluttered data on your Edge.
When it comes to cleaning up junk files in a browser, MiniTool System Booster is a good choice for you, since it can tidy up your online traces and cache in multiple browsers including Edge, Chrome, Firefox, and Opera.
What’s more, this program can upgrade the overall browsing efficiency and speed up your computer by freeing up disk space, defragging hard drives, removing Windows junk files, and more.
Let’s see how to work with this cleaner.
Step 1. Click on the download button below to install MiniTool System Booster for free.
MiniTool System Booster TrialClick to Download100%Clean & Safe
Step 2. Open this tool to enter its main interface and click Performance Home to select Deepclean from the drop-down menu.
Step 3. Click on START CLEAN to start its 7 cleanup tasks. You can either perform these operations one by one or skip some of them directly until you find the one you need.
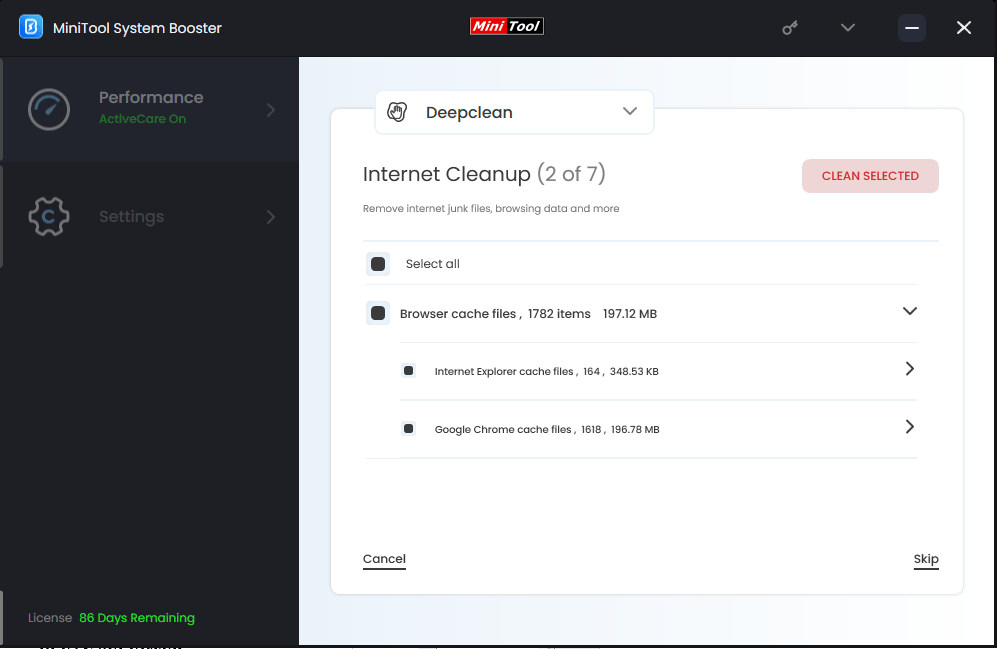
The function mentioned above for cleaning up Edge Cache is Internet Cleanup.

The Internet Cleanup task is specially designed for clearing internet files, expired cookies, download history, cache, and more on all your browsers. After scanning, click on CLEAN SELECTED to remove all the browsing data on your browser.
If you don’t want to do any extra work, you can also choose to clear the cache on your Edge manually. To do that:
Step 1. Open your Microsoft Edge and tap the three dots in the upper right corner of the page and select Settings.
Step 2. Select Privacy, search, and services on the left panel > click the Choose what to clear button under Clear browsing data, and a pop-up will appear.
Step 3. In the pop-up, click the inverted triangle and change the time range to All time. By default, all cached data, browsing history and cookies are selected. Click on Clear now.
When the cleanup work is finished, restart your Windows machine and launch Microsoft Edge to check if it works well.
Method 3: Reset Microsoft Edge
If clearing the cache doesn’t work, you may need to reset Microsoft Edge to its default settings. It helps to solve problems caused by configuration errors or other possible hard-to-detect issues. Here’s how to do it.
Step 1. Launch Edge and head to Settings.
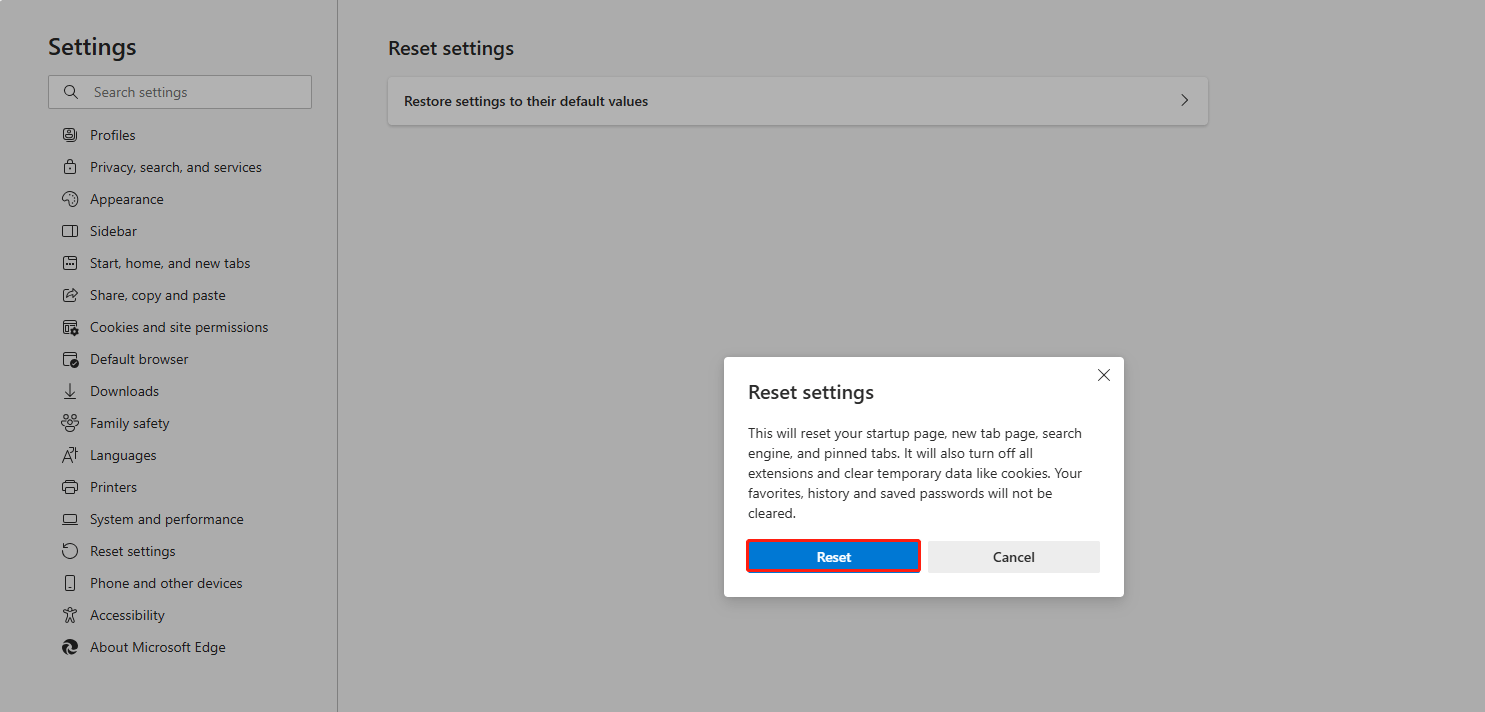
Step 2. Scroll down to select Reset settings from the left pane and click on Restore settings to their default values.
Step 3. In the Reset settings window, click on Reset.

After resetting, the Edge app will restore to its default settings and reopen for you.
Method 4: Delete Microsoft Edge Folders and Reinstall Edge
Some netizens who encountered the same problem shared their successful solution to Edge error code STATUS_ACCESS_DENIED, which was to delete the Edge & EdgeCore folders and reinstall the Edge app. Now, follow the instructions below to delete them.
Step 1. Type File Explorer in Windows Search and open it.
Step 2. Delete the two Edge folders: C:\Program Files (x86)\Microsoft\Edge and C:\Program Files (x86)\Microsoft\EdgeCore.
Step 3. After that, download the MicrosoftSetup.exe installation package at the official Microsoft site.
Step 5. Open the package and follow the on-screen wizard to reinstall Microsoft Edge.
Method 5: Disable Antivirus & Firewall Temporarily
Security software or firewalls may conflict with Edge and prevent Microsoft Edge from running properly. When using your Edge, turning off them for a moment may be helpful. To do that:
Step 1. Open the system tray where you manage and disable your antivirus software.
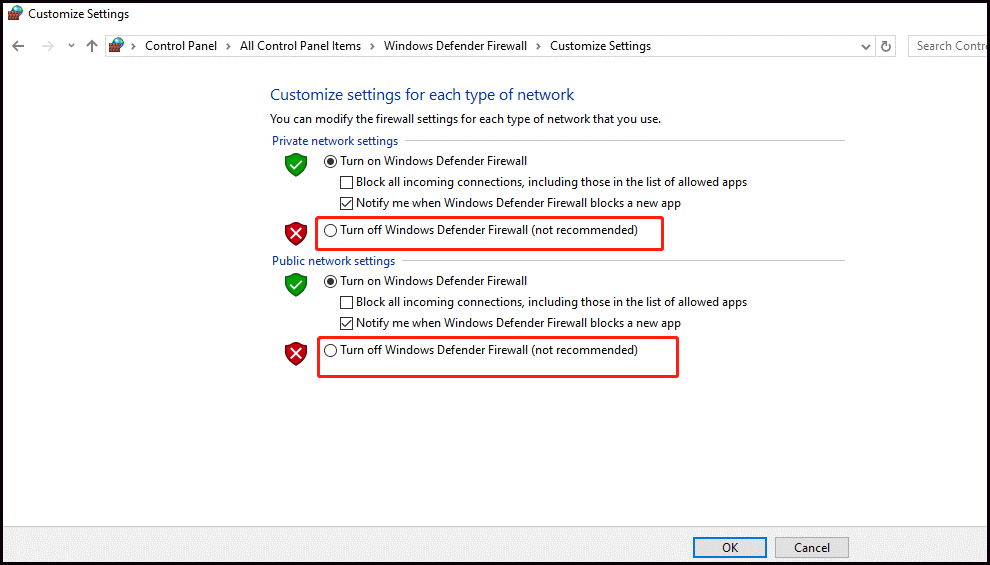
Step 2. Type firewall in the search box and launch Windows Defender Firewall.
Step 3. Select Turn Windows Defender Firewall on or not from the left pane and then check Turn off Windows Defender Firewall for both Private and Public network settings. Remember to enable them again after checking. So does your antivirus software.

Related article: How to Check if Firewall Is Blocking a Port or a Program?
Method 6: Check Windows Update
Go to Settings > Update & Security. Check if there are any available updates. If yes, download and install them. Once done, restart your computer and open Edge to see if the STATUS_ACCESS_DENIED error in Edge is solved.
To Wrap Things Up
How to solve the STATUS_ACCESS_DENIED error in Edge? In this post, we demonstrate 6 proven and targeted ways. To be specific, the third-party program MiniTool System Booster is more effective and achieves multiple goals at one stroke. Just choose the one as per your actual needs.
MiniTool System Booster TrialClick to Download100%Clean & Safe


