SrTasks.exe High CPU Usage
Are you troubled in an issue with SrTasks.exe taking up your CPU? Besides, you may not know what even SrTasks.exe is.
Then, what is SrTasks.exe? SrTasks.exe, also called Microsoft Windows System Protection Background Tasks, is an executable file. It was introduced in Windows 8 and can also be found in the latest versions of Windows 10 and 11. You can find it in C:\Windows\System32.
Microsoft System Protection Background Tasks is responsible for creating a restore point on your system, which can retrieve your computer to a state where everything works fine and makes it essential for system restore.
Why do System Protection Background tasks cause your CPU to overload? There are some potential causes:
- Issues in system
- Conflicts among software
- Virus & malware attacks
- Corrupted system file
If you find the SrTasks.exe process is hogging up CPU resources, take the following solutions to fix it now.
How to Fix High CPU from SrTasks.exe
Solution 1: Run MiniTool System Booster
When facing high CPU from SrTasks.exe, the best solution is to apply a professional PC tune-up software like MiniTool System Booster, saving time and extra effort.
This freeware is designed to optimize your computer performance with some thorough checks & scans and a series of fixes, including deleting junk files, freeing up memory, managing startup programs, and so forth. Available on almost all the Windows systems, MiniTool System Booster Trial Edition allows you to enjoy all its services for free within 15 days. You can use this tool to fix the high CPU issue now.
Download, install, and fire up MiniTool System Booster.
MiniTool System Booster TrialClick to Download100%Clean & Safe
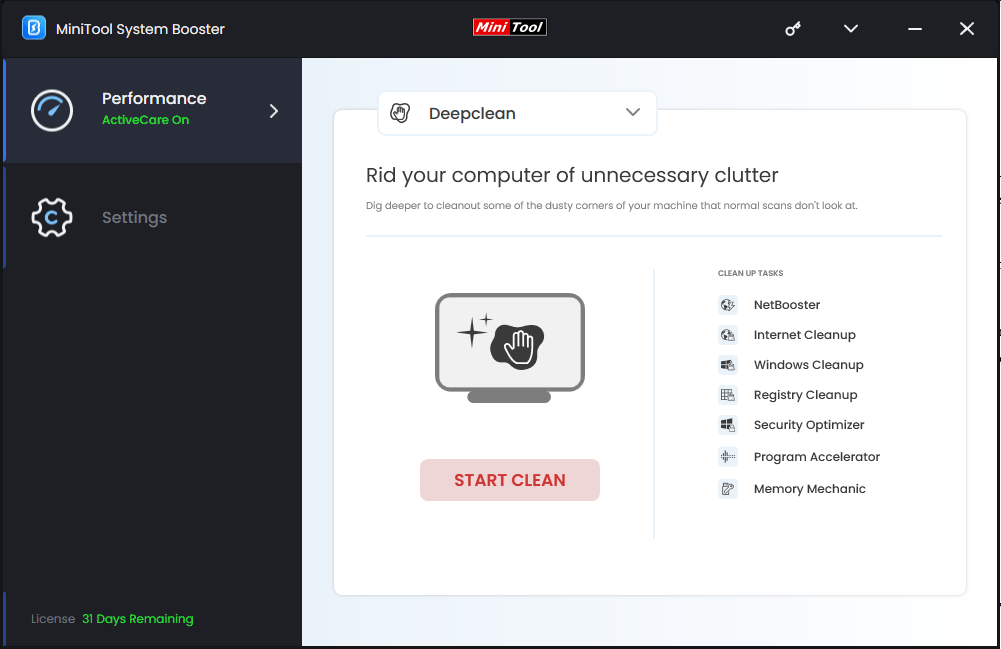
# Deepclean
Step 1. In the Performance page, expand Performance Home and select Deepclean from the drop-down menu.
Step 2. Click on START CLEAN to perform 7 tasks for cleanup. They will run one by one and it’s advisable to carry out Internet Cleanup, Windows Cleanup, and Memory Mechanic. As for the rest tasks, you can perform them as per your needs or skip the unwanted ones.
# Toolbox – Process Scanner
Step 1. Open the top menu and switch to Toolbox.
Step 2. Select Process Scanner under System Management to end those unnecessary background tasks causing a waste of CPU resources.
Step 3. After scanning, click on Terminate beside the one you want to close.
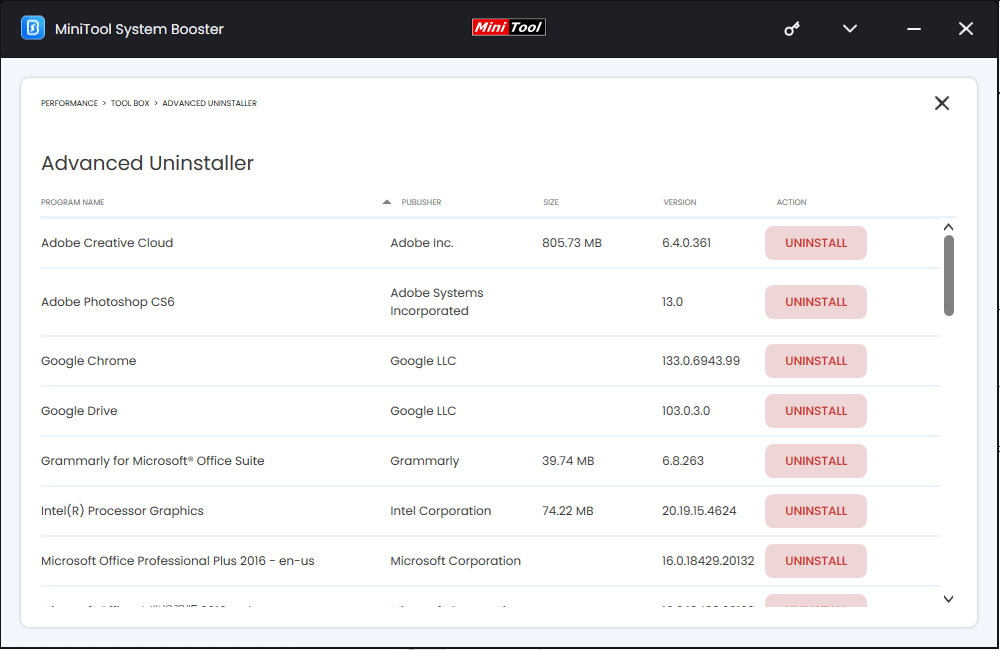
# Toolbox – Advanced Uninstaller
Step 1. Go to Advanced Uninstaller under File Management to uninstall the programs that could result in software conflicts and SrTasks.exe 100% CPU usage.
Step 2. After scanning, click on UNINSTALL next to the unnecessary ones.

Solution 2: Disable Superfetch
Generally, Superfetch will preload all the applications that you frequently use. This might lead to SrTasks.exe to consume a large amount of CPU resources and heat your computer when it is running. In this case, it’s a good option to disable it:
Step 1. Press Win + R to launch the Run window box, type service.msc, and press Enter.
Step 2. In the Services window, navigate to SysMain and then right-click on it to choose Stop from the context menu.
Step 3. After stopping, right-click on SysMain again > select Properties from the shortcut menu > change Startup type to Disabled > click on Apply & OK.
Related article: How to Fix Service Host: SysMain High CPU on PC?
Solution 3: Stop SrTasks.exe in Task Manager
Terminating the SrTasks.exe process can refresh its related processes and help solve the problem that may cause the high CPU usage issue. To do so:
Step 1. Right-click on the Start icon and choose Task Manager,
Step 2. Under the Processes tab, look for SrTasks.exe, right-click on it, and select End task from the dropdown menu.
Step 3. After that, restart your machine and check if this operation works or not.
Solution 4: Run SFC/DISM Scans
The most common cause behind system issues is corrupted system files, so doing some file checks is essential. Here we will show you how to perform SFC and DISM scans:
Step 1. Type cmd in the search bar, choose Command Prompt and select Run as administrator.
Step 2. In the command window, type DISM /Online /Cleanup-Image /RestoreHealth and press Enter. Then wait for it to complete.
Step 3. After that, input sfc /scannow and press Enter. This process will take a couple of minutes.
Solution 5: Disable SrTasks.exe in Restore Point
As a matter of fact, we don’t recommend you turn off System Protection until you are really in need of it, since this process plays an important role in system and could affect other services and your PC performance.
If there’s no other working solutions, you can follow the steps below to disable it:
Step 1. In Windows Search, type create a restore point and click on Open.
Step 2. When the System Properties window appears, choose Local Disk (C:) (System) and click on the Configure button.
Step 3. In the new window, check Disable system protection and tap on Apply & OK.
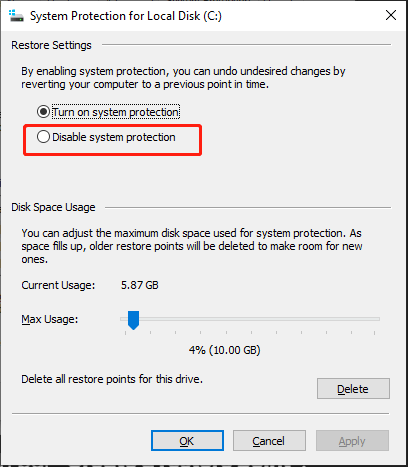
Step 4. After disabling, reboot your device and go to Task Manager to see if high CPU from SrTasks.exe is fixed or not.
Bottom Line
In this guide, we have introduced 5 targeted solutions for you to fix high CPU from SrTasks.exe. For saving time and benefiting your PC performance in the future, it’s highly suggested you use MiniTool System Booster.
Do you have any worries or problems with our product? Please contact our support team via [email protected] and we’ll reply to you as soon as we can.