Chrome users often complain about the “Chrome didn’t shut down correctly” message. When relaunching Google Chrome, this message and the “Restore pages?” message would pop up. This post from MiniTool helps you disable Chrome didn't shut down correctly popup.
If you see the message “Chrome didn’t shut down correctly” when you open Chrome, it means that Chrome wasn’t able to shut down properly the last time you used it. To fix this issue, you can try the following steps at first:
- Restart your computer: Restarting your computer can often resolve many issues, including this one.
- Click the Restore option: To stop Google Chrome from showing this pop-up, you can click the Restore button directly to allow Chrome to reopen the tab.
Method 1: Clear the Browsing Data/Cookies and Cache
Clearing your Google Chrome browsing data, including cache and cookies may be helpful to fix the “Chrome didn’t shut down correctly Windows 11” issue. It’s recommended to use the Windows PC cleaner – MiniTool System Booster. It not only helps you fix the annoying issue but will also optimize your PC.
In addition to clearing the browsing data and caches, it can clean up your registry, clear Windows junk files, disable unwanted startup programs, speed up RAM, etc. You can use the Deepclean feature in MiniTool System Booster to clear the browsing data or cache.
Now, you can download this tool from the below button. Before starting to clear the browsing data, you need to close Google Chrome since junk files cannot be removed when the browser is currently in use.
MiniTool System Booster TrialClick to Download100%Clean & Safe
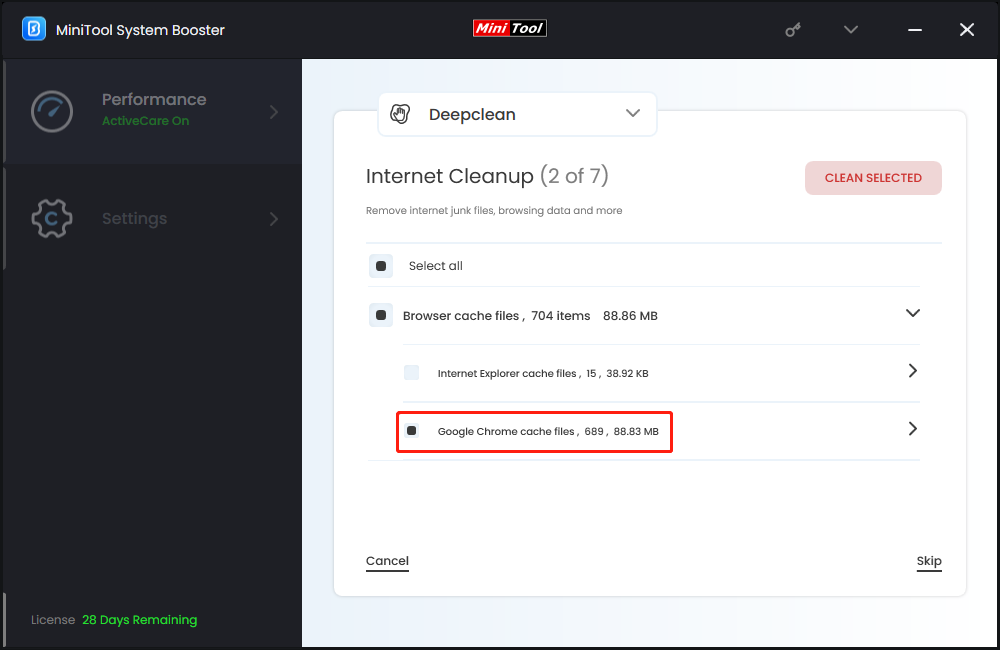
1. Launch MiniTool System Booster. Then, click the drop-down menu to choose the Deepclean option.
2. Click the START CLEAN button to continue.
3. It will run 7 tasks one by one. You can perform the task based on your needs and you can also can click Skip. When you see will see the Internet Cleanup page, you need to stay on this page. To clear the Google Chrome cache, check Google Chrome cache files and click CLEAN SELECTED.
Method 2: Allow Chrome to Run in the Background
If you have prevented Google Chrome from running in the background, the “Chrome didn’t shut down correctly” error message will appear. How to disable Chrome didn’t shut down correctly popup? Follow the guide:
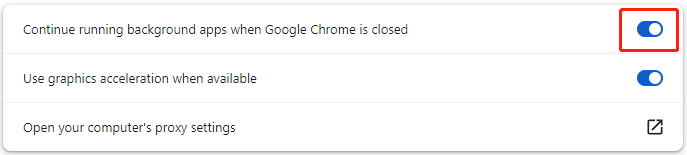
1. Open Google Chrome, click the three-dot menu icon at the top-right corner, and select Settings.
2. Select System. Then, turn on Continue running background apps when Google Chrome is closed.
Method 3: Disable Extensions
Sometimes, extensions can cause the “Chrome didn’t shut down correctly” issue. To disable extensions, open Google Chrome and click the three dots in the top right corner. Select Extensions > Manage Extensions and toggle off any extensions that may be causing the problem.
Method 4: Reset Google Chrome
How to disable Chrome didn’t shut down correctly popup? You may need to reset Chrome settings to their default settings. To do this, click the three dots in the top right corner and go to Settings > Reset settings. Then, select Restore settings to their original defaults.
Method 5: Rename the Default Folder
If resetting Chrome doesn’t fix the “Chrome not shutting down correctly” error, you can try to rename the default folder. To do that, follow the guidelines below.
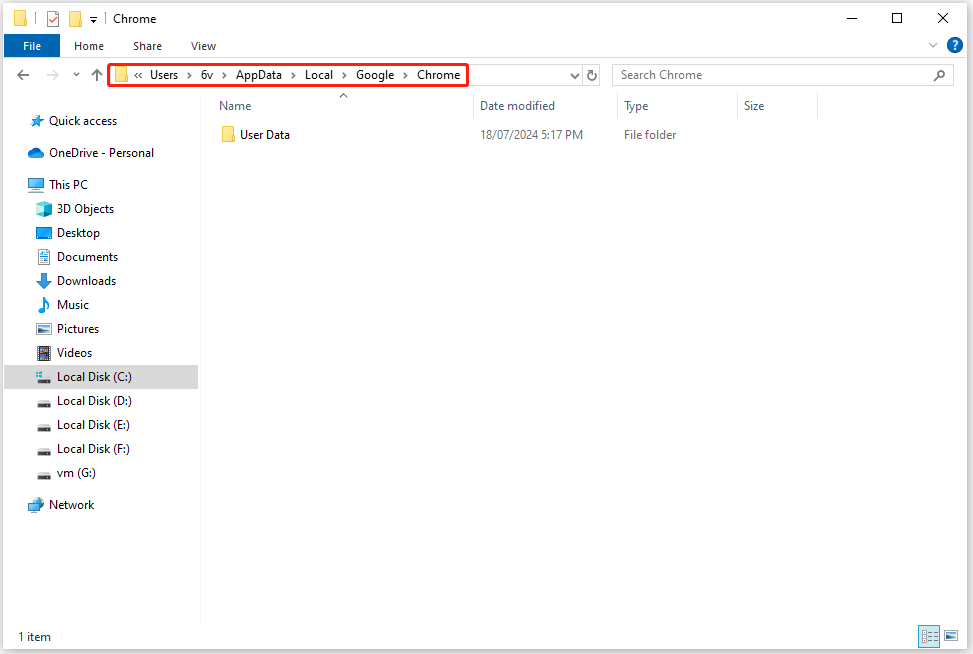
1. Press the Windows key + E key together to open File Explorer.
2. Uncheck the Hidden items box under the View tab.
3. Then navigate to the following path:
C: > Users > (user account) > AppData > Local > Google > Chrome > User Data
4. Right-click the folder and select Rename. Type default_old as the new folder title and press the Enter key.
Method 5: Edit the Preferences File
You can also try editing the Preferences file to fix the “Chrome didn’t shut down correctly” error. Here are the detailed steps:
1. Open File Explorer again.
2. Then, go to the following path:
C: > Users > (user account) > AppData > Local > Google > Chrome > User Data > Default.
3. Right-click Preferences and select Open with. Then select Notepad and click OK.
4. Click Edit and click Find…. Then enter exit_type and click the OK button.
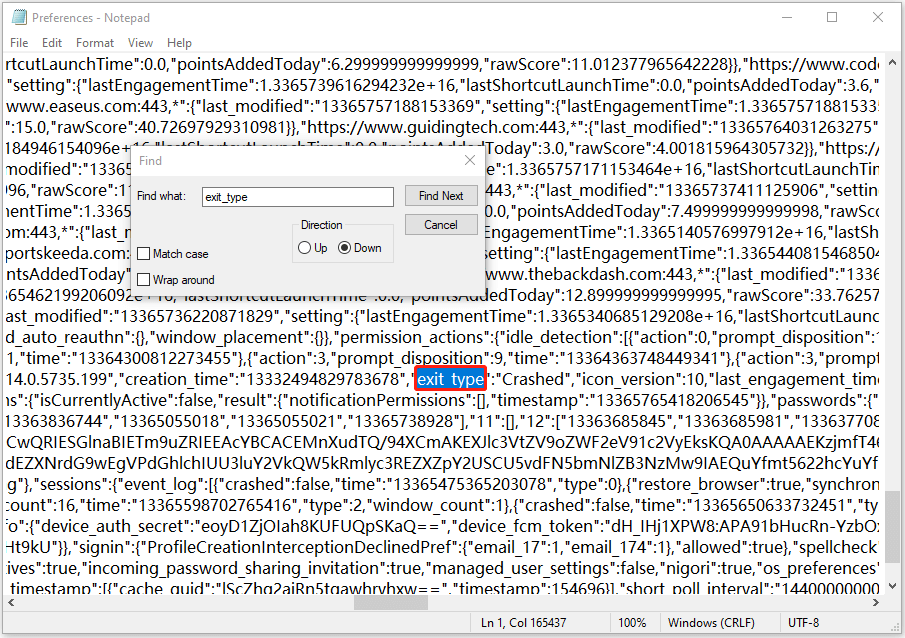
5. Then delete Crashed and type normal to replace it.
6. Click File > Save to save the changes. Then restart your PC and launch Google Chrome to check to see if the “Chrome didn’t shut down correctly” has gone.
Method 6: Reinstall Google Chrome
Reinstalling Google Chrome will replace the previous files and get the latest version. It is reported that some people resolve the “Chrome didn’t shut down correctly Windows 11” issue by this method.
1. Press the Windows + I keys together to open Settings.
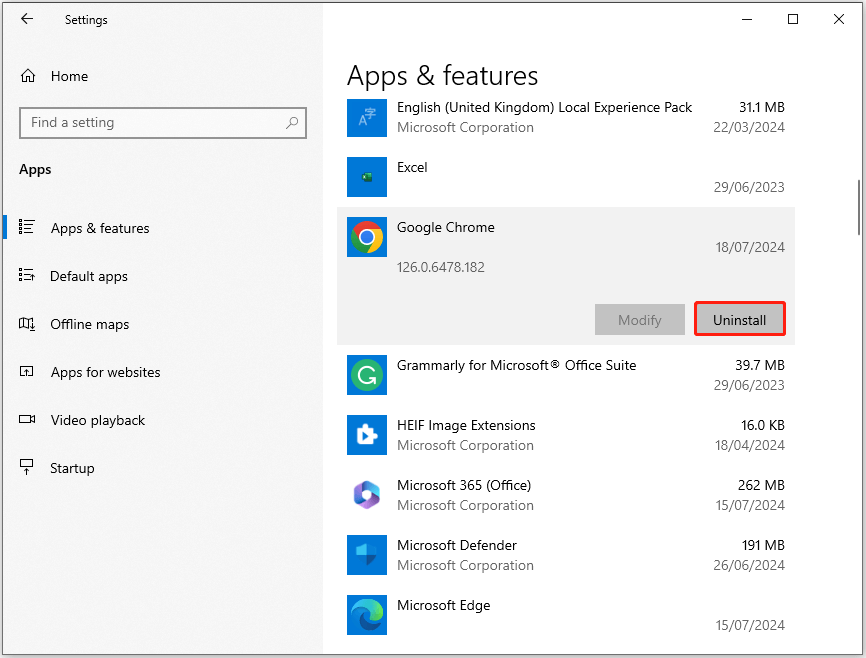
2. Go to Apps > Apps & features.
3. Find Google Chrome and click it to select Uninstall.
4. After uninstalling Google Chrome, download it from its official website, and then check if the error persists.
Method 7: Try Another Browser
If the above solutions are not working to fix the “Chrome didn’t shut down correctly” issue and you really hate this pop-up, trying another browser would be a good way. Microsoft Edge and Firefox are great choices and you can choose one of them based on your needs.
Final Words
Here is all the information on how to fix the “Chrome didn’t shut down correctly” error. If you encounter the same error, you can try the methods mentioned above. Your issue can be fixed by one of them.