Are you struggling with consistently high disk usage? Why do you receive this issue on your computer? Take it easy! In this post from MiniTool System Booster, we will list all the potential causes and solutions on the disk at 99% issue. Without further ado, let’s dive into it!
Windows 10 Disk Usage Shows 99%
When your computer is experiencing high disk usage like disk at 99%, the web pages or applications will take much longer to load or launch, that is to say, a noticeable drop in system performance might crop up. Why do you receive the disk at 99 issue on your computer? Here, we list some possible factors for you:
- Accumulated junk files.
- Too many programs running in the background.
- Malware or virus attack.
- Turning on notifications from apps and other senders.
- Interference of third-party programs.
How to Fix Disk at 99% on Windows 10/11?
Fix 1: Run MiniTool System Booster
As mentioned earlier, high disk usage like disk at 99% or 100% might negatively impact the system performance of your computer. To speed up your PC, a piece of free PC tune-up software called MiniTool System Booster comes in handy.
This tool can help to remove junk files and disable resource-intensive programs that lead to random disk usage spikes. Moreover, with the help of this tool, you can defrag a hard drive, uninstall unwanted programs, force delete a file, free up memory and so on to improve the overall performance of your computer. Here’s how to lower disk usage via this tool:
Option 1: Perform a Deep Clean
At first, MiniTool System Booster enables you to perform a deep scan of your computer to free up more disk space and memory. To do so:
Step 1. Launch MiniTool System Booster and enter its main interface.
MiniTool System Booster TrialClick to Download100%Clean & Safe
Step 2. Click on Performance Home and select Deepclean from the context menu.
Step 3. Click on START CLEAN and it will conduct the following 7 tasks. You can choose to run them one by one or skip some of them according to your needs.
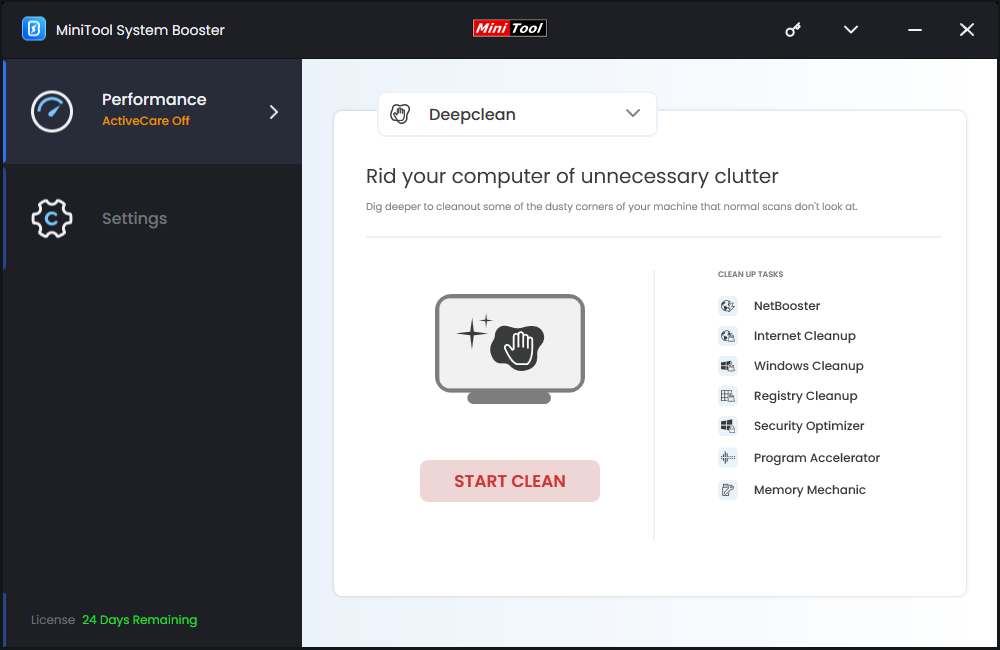
Internet Cleanup, Windows Cleanup, and Registry Cleanup can remove junk files and registry items respectively for you.
Option 2: Terminate Memory-Intensive Processes
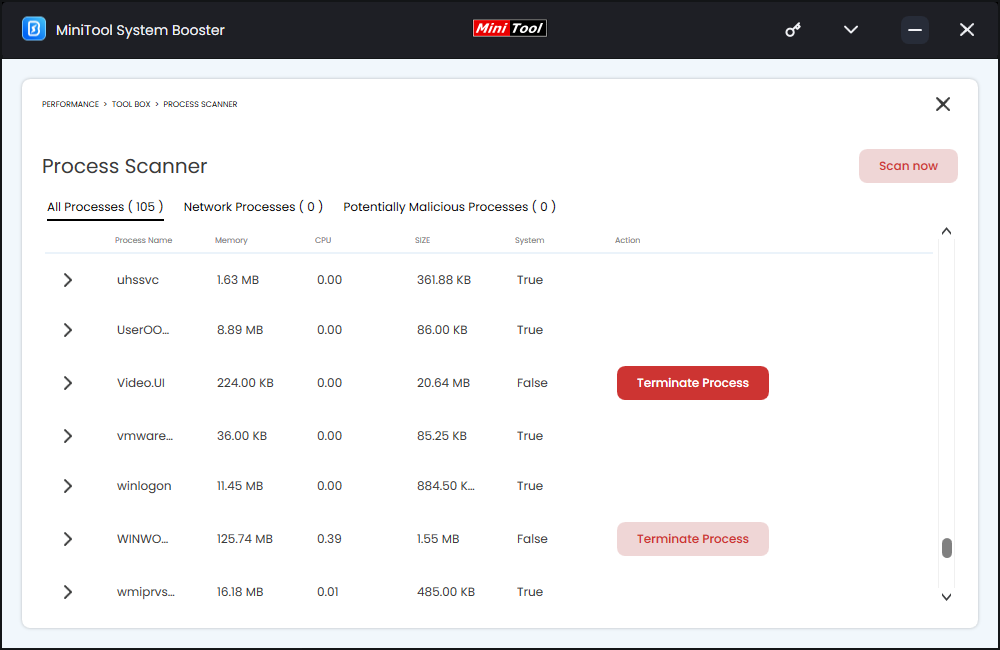
Like Task Manager in Windows 10/11, MiniTool System Booster provides you with an equivalent called Process Scanner that allows you to view each task currently running in the background and terminate it. To do so:
Step 1. Go to the Toolbox page.
Step 2. Select Process Scanner and hit Scan now.
Step 3. Then, this tool will list all the running processes. If you want to end any resource-hogging process, you can hit the Terminate Process button beside it.
Fix 2: Disable Superfetch
Superfetch is a utility in Windows 10/11 that preloads frequently used applications into memory to improve system performance. Sometimes, it might trigger the disk at 99% issue. To lower the disk usage, follow these steps to disable Superfetch:
Step 1. Press Win + R to open the Run box.
Step 2. Type services.msc and hit Enter to launch Services.
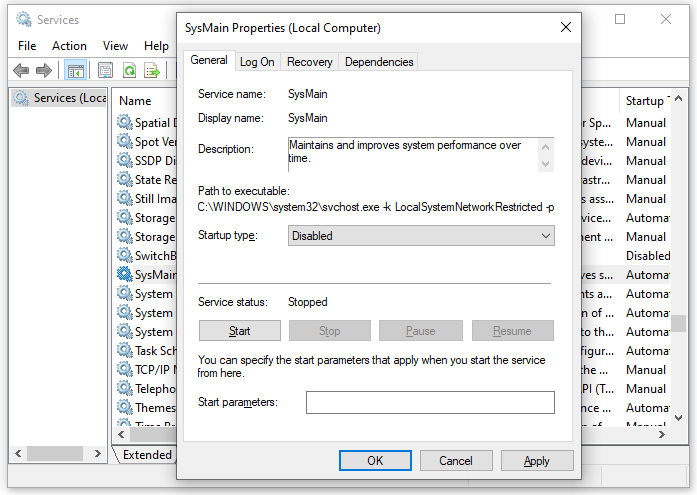
Step 3. Scroll down to find Superfetch or SysMain and right-click on it to choose Properties.
Step 4. Stop this service > set Startup type to Disabled > hit Apply & OK.
Fix 3: Check for Malware
Malware or virus infection can significantly slow down the system performance of your computer, resulting in the disk at 99 percent issue. If this is the case, you need to scan your system with Windows Defender or other third-party antivirus software. Here, we’ll show you how to carry out a thorough scan of your system with Windows Defender:
Step 1. Press Win + I to launch Settings and go to Update & Security.
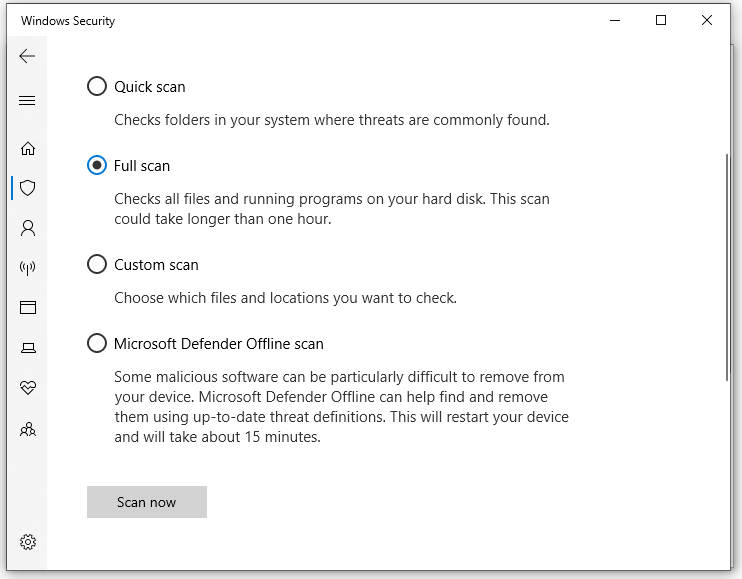
Step 2. In the Windows Update section, click on Virus & threat protection > Scan options > tick Full scan > hit Scan now.
Fix 4: Perform a Clean Boot
Some third-party programs can also trigger issues like Windows 10 disk usage 99%. If you are not sure which program is the culprit, you can perform a clean boot to pinpoint the problematic software. Here’s how to do it:
Step 1. Right-click on the Start menu and select Run.
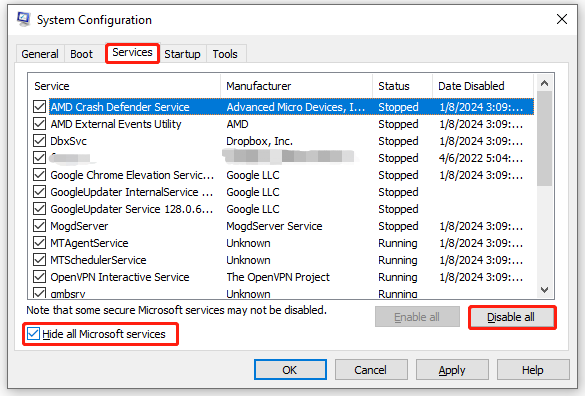
Step 2. Type msconfig and hit Enter to open System Configuration.
Step 3. In the Services section, check Hide all Microsoft services and hit Disable all.
Step 4. Go to the Startup tab and hit Open Task Manager.
Step 5. Right-click on each enabled program and select Disable one by one.
Step 6. Return to System Configuration and hit Apply & OK to make the changes effective.
Step 7. Restart your computer to enter the clean boot environment.
Fix 5: Turn off Notifications from Apps
If you turn on notifications from apps or other senders, the disk at 99 issue might also appear. Therefore, disabling the notifications might work wonders. To do so:
Step 1. Open Windows Settings.
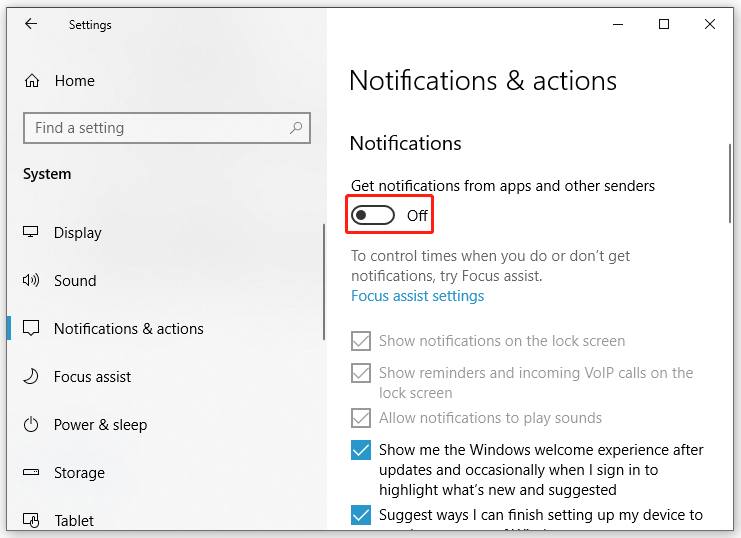
Step 2. In the settings menu, find System and hit it.
Step 3. Navigate to the Notifications & actions tab and then toggle off Notifications.
Fix 6: Stop Running Unnecessary Programs
Background applications might eat up the system resources on your computer, so make sure there are not too many unnecessary programs running in the backend. To do so:
Step 1. Press Ctrl + Shift + Esc simultaneously to open Task Manager.
Step 2. In the Processes tab, right-click on resource-hogging programs one after another and select End task.
Final Words
Now, you must be free from disk 99 percent usage and run your computer smoothly. Which method do you prefer? Personally speaking, it’s highly recommended to utilize the all-in-one tool – MiniTool System Booster to maximize the overall performance of your computer rather than running Windows inbuilt programs one after another.
MiniTool System Booster TrialClick to Download100%Clean & Safe
Do you have any puzzles while trying our product? If yes, welcome to contact us directly via [email protected]. We will reply to you as soon as possible!


