Low Disk Space Windows 11/10
On your Windows PC, you could receive a low disk space warning to tell you that you run out of disk space. An error message in the Taskbar says “You are running out of space on Local Disk X. Click here to see if you can free space on this drive”. You can see this drive has a red bar in File Explorer.
Besides, sometimes the error warning message says “You’re running out of space on this PC. Manage storage to view usage and free up some space”.
What does low disk space mean? It means your drive doesn’t have enough storage capacity to store data. And you cannot install apps, play games, or install Windows updates, which is a vexing situation. What’s more, your PC slows down since programs need enough space to run and potential crashes will also happen.
Fortunately, it is simple to get rid of low disk space E drive/C drive/F drive, etc.
Related post: [Top 6 Fixes] Low Disk Space but Nothing to Delete Win10/11
#1. Stop Low Disk Space Warning via Windows Registry
If you don’t want to receive the “you are running out of disk space on Local Disk E/C/D/F…”, you can try to disable the warning by editing the Windows Registry. Before proceeding, remember to create a restore point or back up your registry to avoid potential crashes caused by mistaken operations.
Then, do as follows:
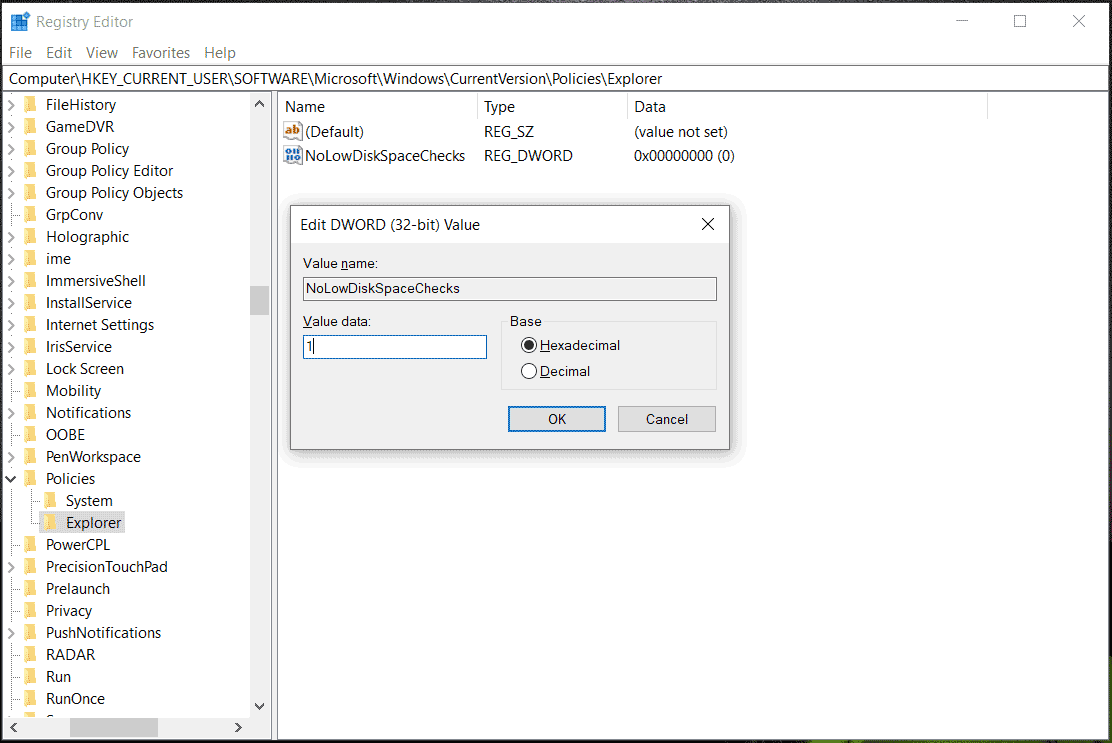
Step 1: In Windows 11/10, type regedit to the search box and press Enter to open Registry Editor.
Step 2: Access this path: HKEY_CURRENT_USER\Software\Microsoft\Windows\CurrentVersion\Policies\Explorer.
Step 3: If you cannot find the Explorer folder, right-click on Policies and choose New > Key to create one. Then, right-click on the blank area on the right side and choose New > DWORD (32-bit) Value, name it NoLowDiskSpaceChecks, then set its value data to 1 and click OK.
This tip only disables the warning but cannot solve the error and you cannot store data on that drive. So the critical steps are increasing the disk space via some measures.
#2. Run MiniTool System Booster
MiniTool System Booster, an excellent PC optimizer, enables you to speed up the system, clean up clutter, speed up CPU/RAM, find & repair system issues, uninstall apps, wipe a hard drive, completely delete files, etc.
Speaking of freeing up space, this tune-up software can also help. With its Deepclean feature, you can easily scan the entire computer and clean up many junk files including Internet temporary files, Windows junk files, broken registry items, and more. Besides, you can run MiniTool System Booster to uninstall some unwanted apps to free up some disk space.
Next, let’s see how to fix low disk space using MiniTool System Booster with its powerful features.
MiniTool System Booster TrialClick to Download100%Clean & Safe
Step 1: Run this MiniTool software and enter its Performance page.
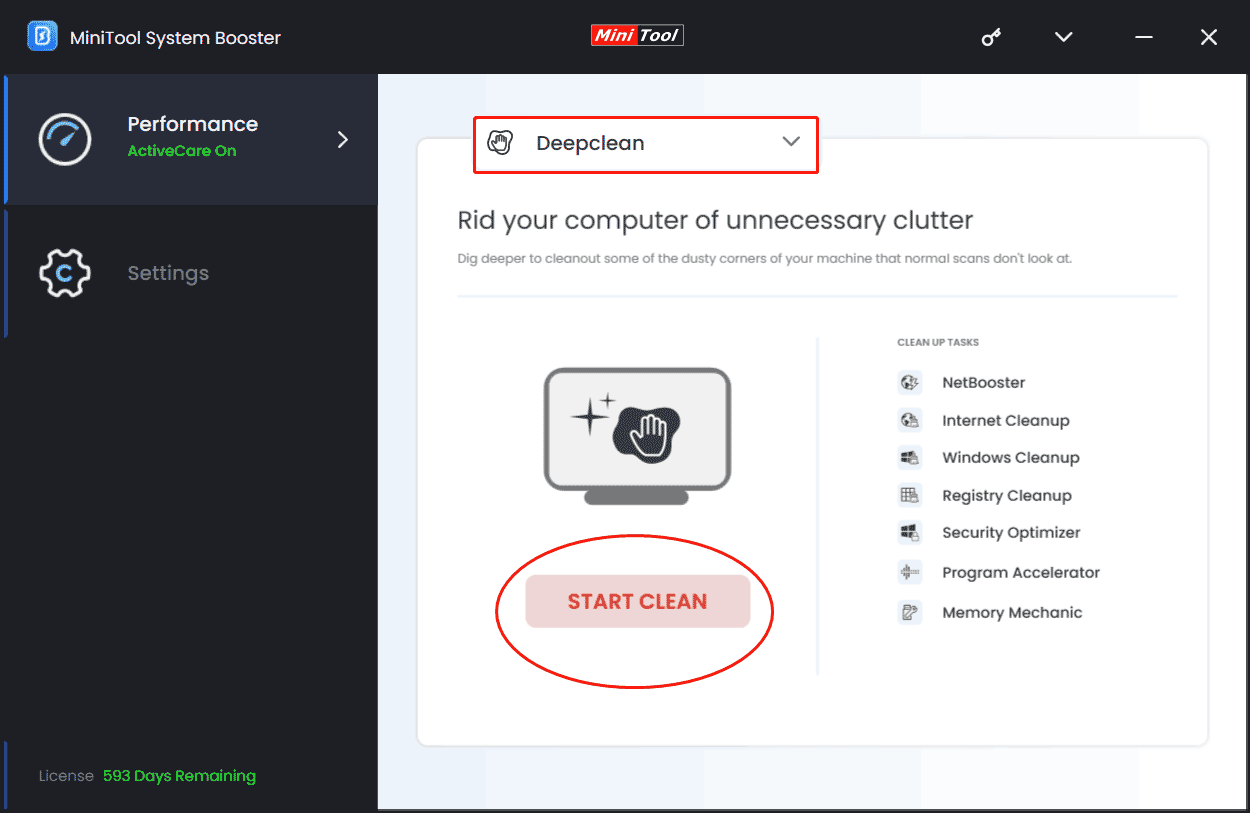
Step 2: Select Deepclean from the drop-down menu at the top and tap on START CLEAN.
Step 3: MiniTool System Booster starts to perform 7 cleanup tasks one by one. You can do some operations to clean up Internet files, Windows junk files, etc. accordingly to free up disk space.
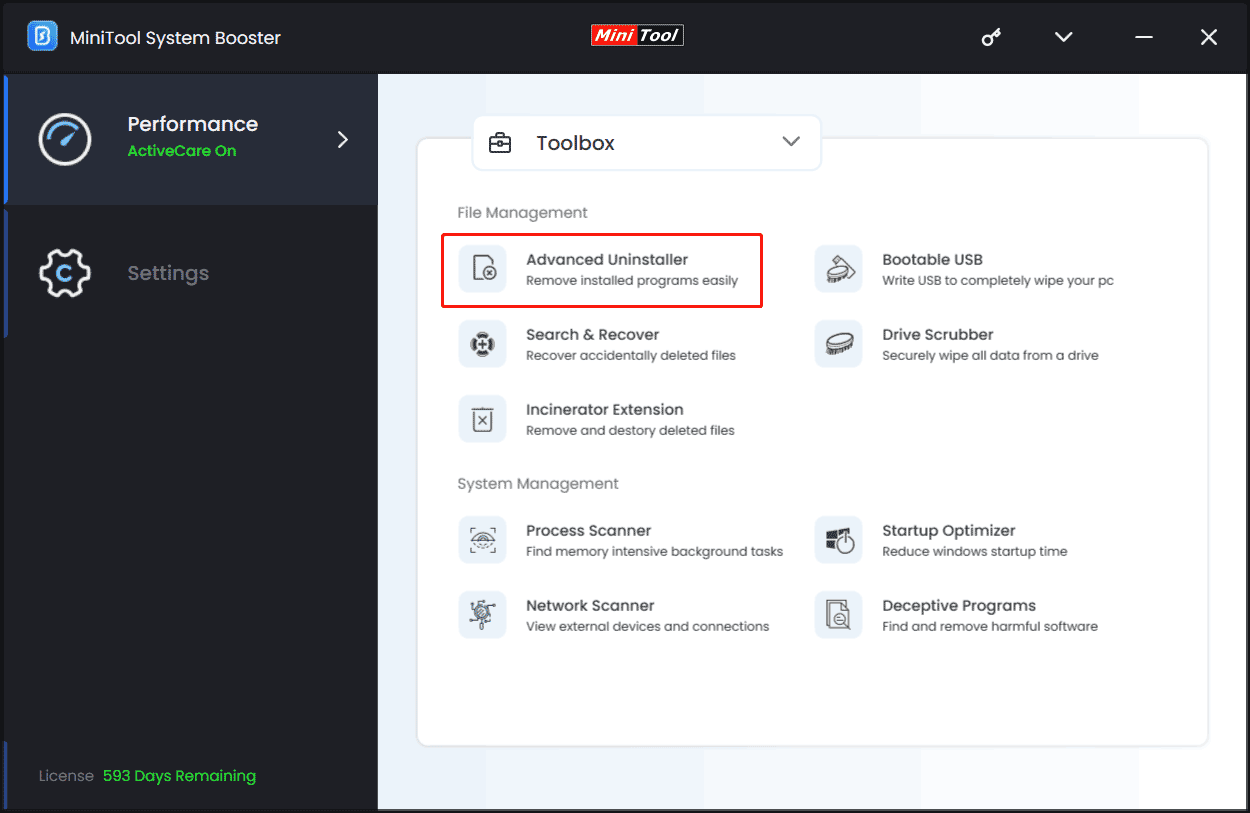
To increase disk space, you can uninstall some unwanted or unnecessary apps from your Windows 11/10 PC. In the Toolbox window, click Advanced Uninstaller. After loading programs, click the UNINSTALL button to uninstall the app you don’t want to use.
#3. Run Disk Cleanup
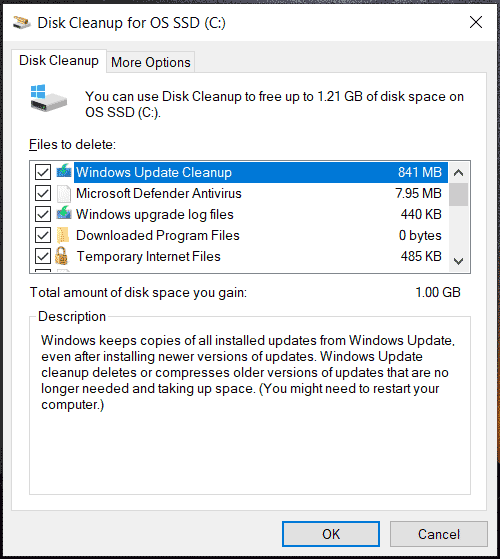
In Windows 11/10, the built-in cleanup tool – Disk Cleanup plays an important role in deleting temporary files like Windows upgrade log files, downloaded program files, thumbnails, temporary internet files, delivery optimization files, and more. These files could take up much storage space, sometimes several gigabytes.
Related post: How to Clean Computer Using CMD? Run These Commands Here
So, delete them using Disk Cleanup:
Step 1: Input Disk Cleanup to the search box and press Enter.
Step 2: Choose the drive you want to clean up, select the items you want to delete, and click OK > Delete Files.
Step 3: To delete system files, click Clean up system files, choose the target drive, check target items, and delete.
These ways involve freeing up the drive that encounters low disk space warning to get some space. If another partition has much extra space, you can extend the small drive.
#4. Extend the Target Drive
Increasing partition space is a simple task if you run a professional partition manager like MiniTool Partition Wizard. This software enables you to move/extend/shrink/delete/format a partition, recover deleted/lost files, clone a hard disk, etc. To get rid of the low disk space warning in Windows 11/10, download and install it on the PC for a try.
MiniTool Partition Wizard FreeClick to Download100%Clean & Safe
Step 1: Launch MiniTool Partition Wizard to its main interface.
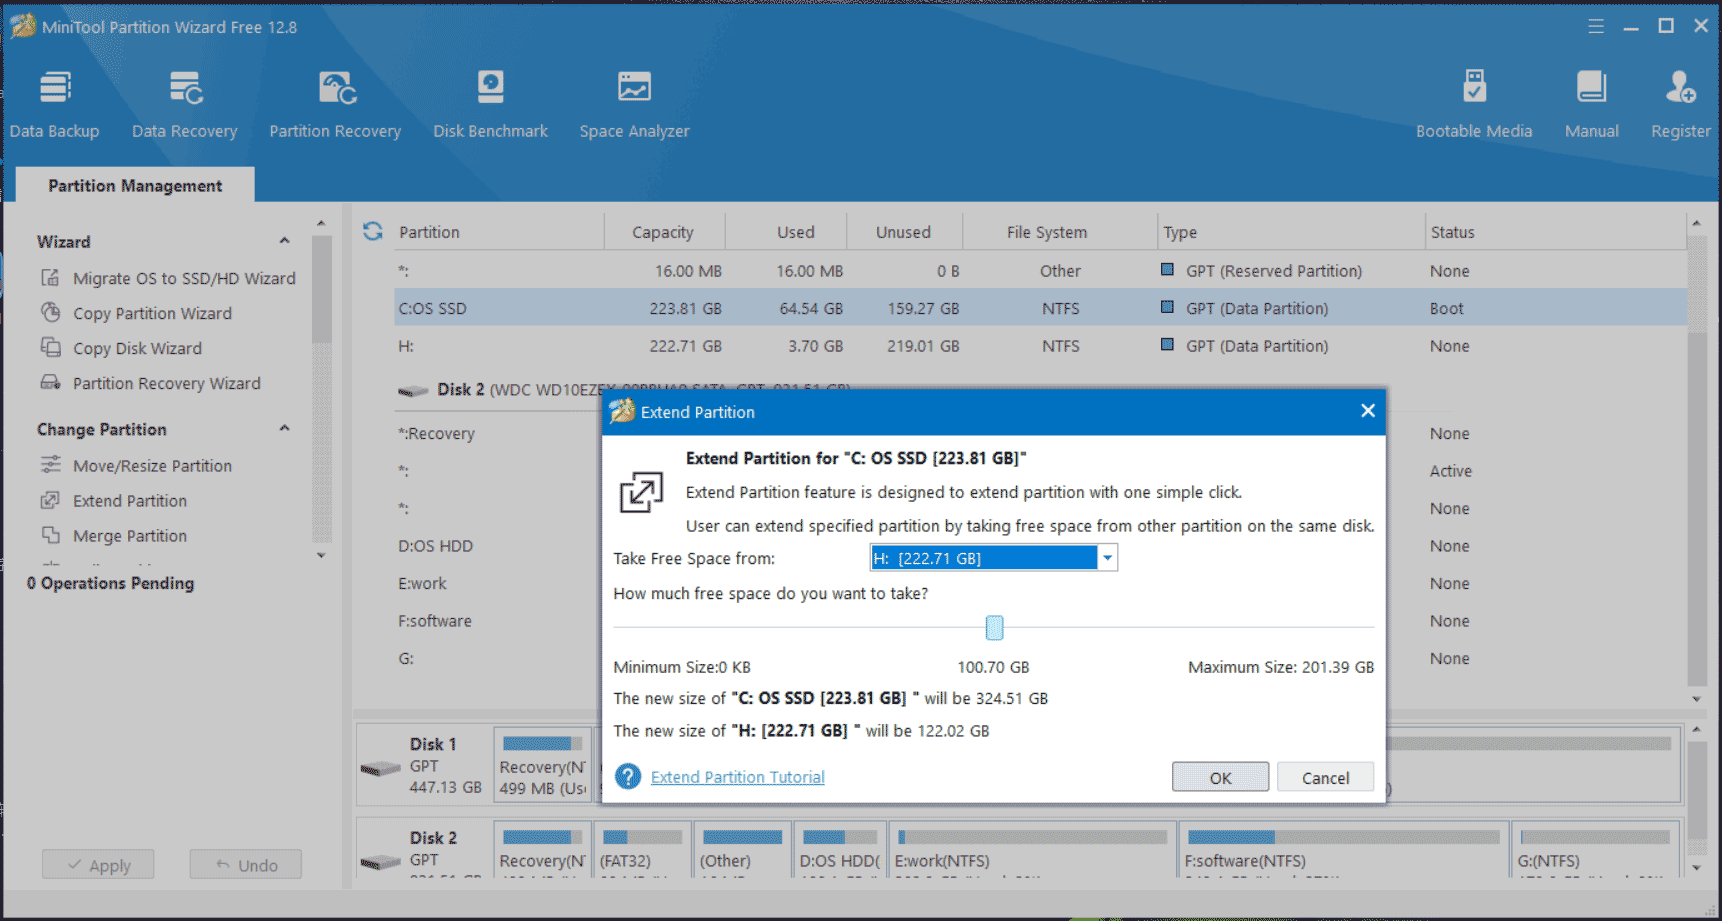
Step 2: Right-click on the target drive and choose Extend.
Step 3: Decide which drive you want to take free space from and how much space to take. Then, click Apply.
#5. Upgrade the Disk to a Larger One
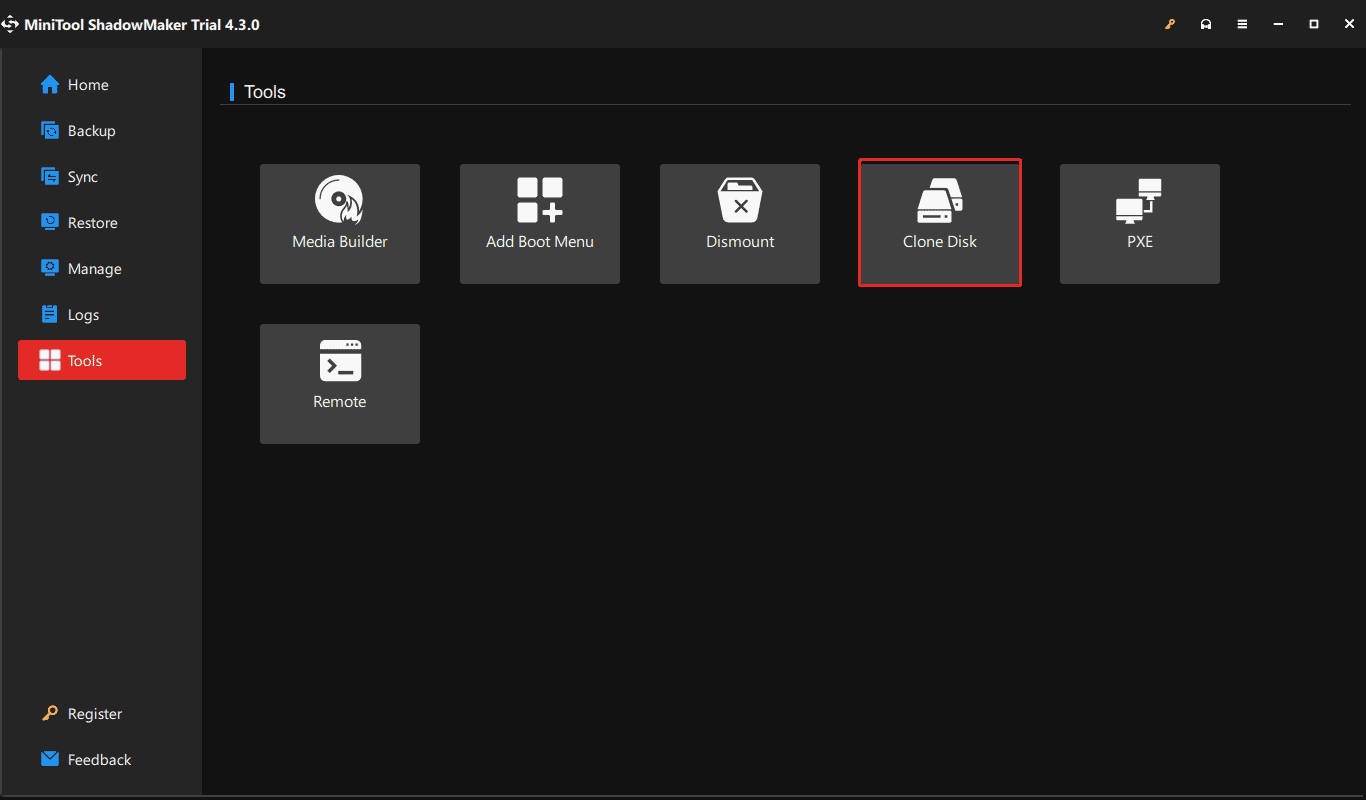
If your entire hard drive doesn’t have enough space, it is a good idea to upgrade the disk to a larger one. Prepare a new hard drive with a big storage capacity and then run MiniTool Partition Wizard to clone the original disk to this new disk.
Alternatively, another cloning software – MiniTool ShadowMaker supports cloning HDD to SSD or cloning a hard drive to a larger disk for disk upgrade. When cloned, replace the small one with the new larger disk.
MiniTool ShadowMaker TrialClick to Download100%Clean & Safe
Wrap Things up
Do you encounter low disk E drive/C drive/F drive? How to fix low disk space? Right now, try these fixes to easily free up disk space or extend your drive to fix the error/warning in Windows 11/10.


