Sometimes, you don’t want to play Overwatch anymore or want to free up PC space, then, you choose to uninstall Overwatch. How to uninstall Overwatch completely? This post from MiniTool shows you 4 reliable ways.
Overwatch is a free-to-play shooter featuring 30+ epic heroes, each with game-changing abilities. However, some players want to uninstall it. There are several reasons for the uninstallation and we list some of them:
- You got bored of the game.
- You need more space on your PC.
- The game was installed to play with your friends, and now you play other games together.
- Overwatch might encounter errors and bugs that require you to reinstall Overwatch. To do that you will need to uninstall it first.
Way 1: Via MiniTool System Booster
How to uninstall Overwatch on Windows? You can try the PC uninstaller – MiniTool System Booster, which is a piece of PC tune-up software. It can be used to uninstall Microsoft Office, WinRAR, Malwarebytes, and so on. In addition to uninstalling apps, it allows you to end some intensive background tasks, disable startup items, deeply clean up your computer, etc.
You only need to download it via the button and install it on your PC for a 15-day free trial.
MiniTool System Booster TrialClick to Download100%Clean & Safe
1. Double-click the MiniTool System Booster icon to open it.
2. Under the Performance page, click Toolbox.
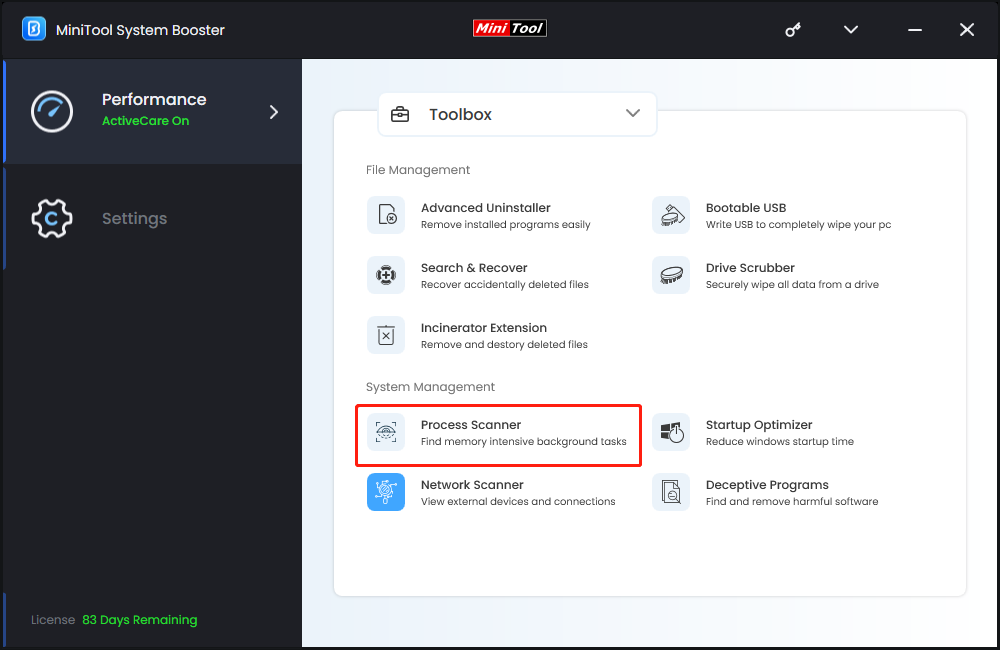
3. Then, select Process Scanner under System Management.
4. Click the Scan now button to start scanning the system.
5. Find Overwatch and click the Terminate Process button.
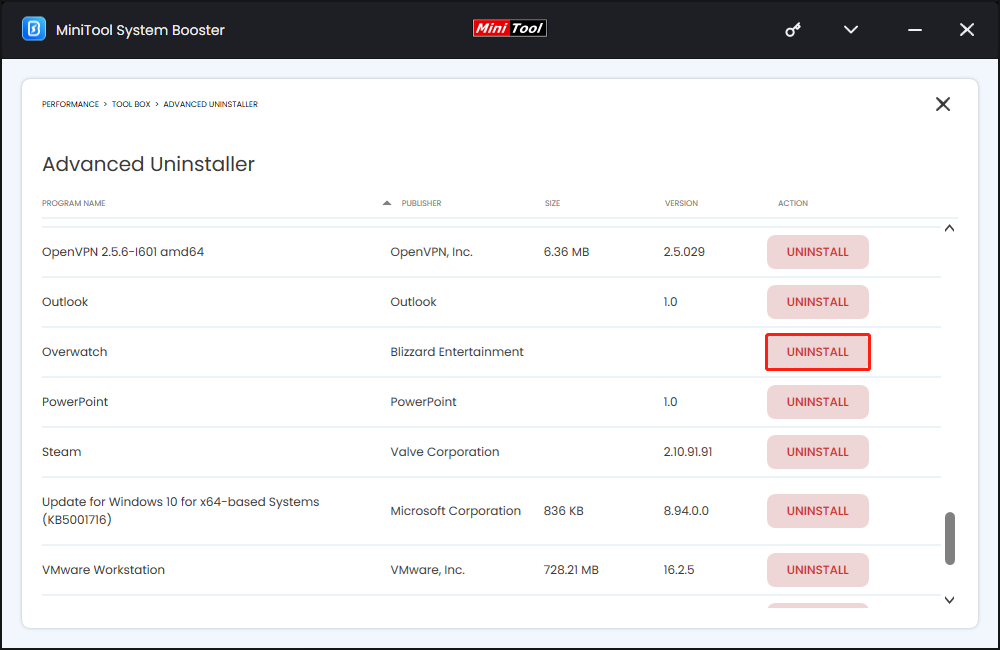
6. Return to the Toolbox page and click Advanced Uninstaller.
7. Find Overwatch and click the UNINSTALL button next to it. Then, click Uninstall in the popup to confirm the operation.
Way 2: Via the Battle.net Desktop app
As for how to uninstall Overwatch, you can also choose to uninstall it via the Blizzard Battle.net desktop App. Now, here is the tutorial.
1. Launch the Blizzard Battle.net app on your desktop.
2. Then click the GAMES tab on the top panel. Under the Installed part, find and click Overwatch.
3. Then click the gear icon to open the Options menu. Find the Uninstall option and click it.
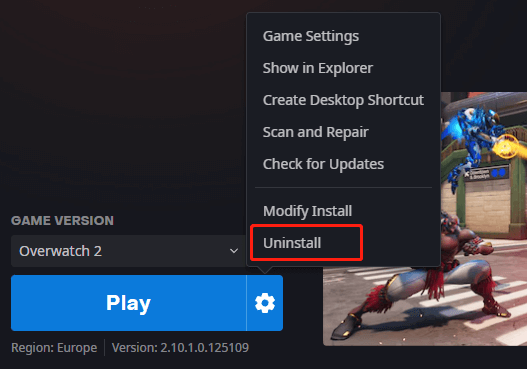
4. Then follow the on-screen wizard to uninstall Overwatch.
Way 3: Via Control Panel
In Windows, one common way to uninstall an app is by using Control Panel. Here, let’s see how to uninstall Overwatch via Control Panel.
1. Open Control Panel via the Search box.
2. View all the items by Category and click Uninstall a program under Programs.
3. Then, find and right-click Overwatch and select Uninstall.
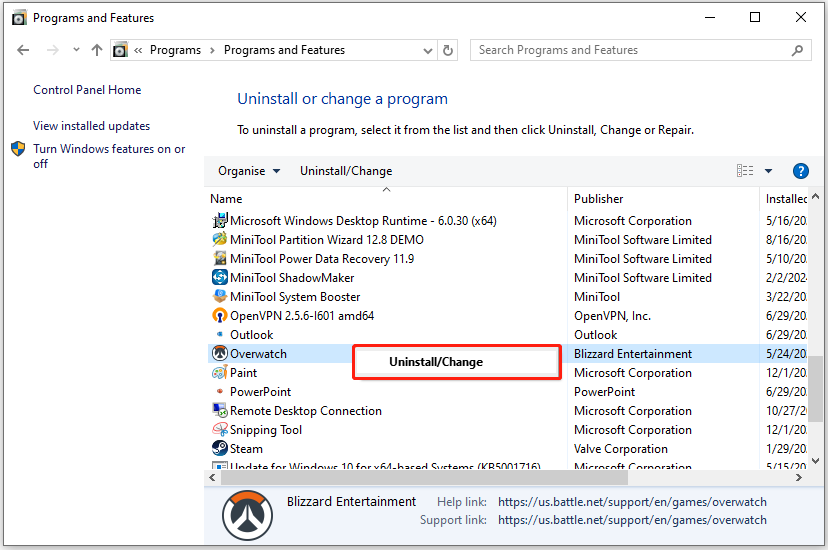
4. Then, follow the on-screen instructions to finish the steps.
Way 4: Via Settings
Another way to remove a program or game like Overwatch is to use the Settings app. Follow the guide on how to how to uninstall Overwatch on a PC via Settings:
1. Go to the Settings application by pressing the Windows + I keys together.
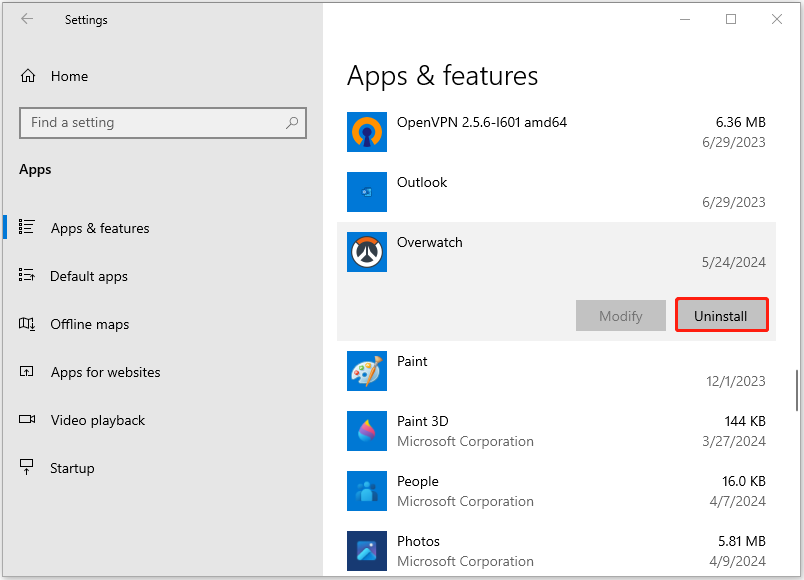
2. Go to Apps > Apps & features.
3. In Windows 10, scroll down the page to find Overwatch, click it, and click Uninstall. In Windows 11, find Overwatch, click three vertical dots, and choose Uninstall.
What to Do When You Can’t Uninstall Overwatch
Sometimes, you may fail to install Overwatch due to active background processes, permission issues, or corrupted installation files. The following are the other possible reasons for the issues:
- There is no uninstall option available for the program.
- Overwatch’s files and data still exist after removing it.
- An unknown error happens when conducting the removal.
- Not sure how to uninstall it and delete personal account information.
If you can’t uninstall Overwatch, you had better make sure that all relevant programs are closed and that you have administrator access to the PC. Then, try the following advanced fixes.
1. Run Antivirus Software
Sometimes Overwatch won’t uninstall since the PC is infected with viruses or malware. Windows 11/10 comes with the built-in tool – Windows Security. It can help scan the entire operating system and delete various threats. Here is how to run the scan.
1. Press the Windows + I keys together to open the Settings application.
2. Click Update & Security > Windows Security > Open Windows Security.
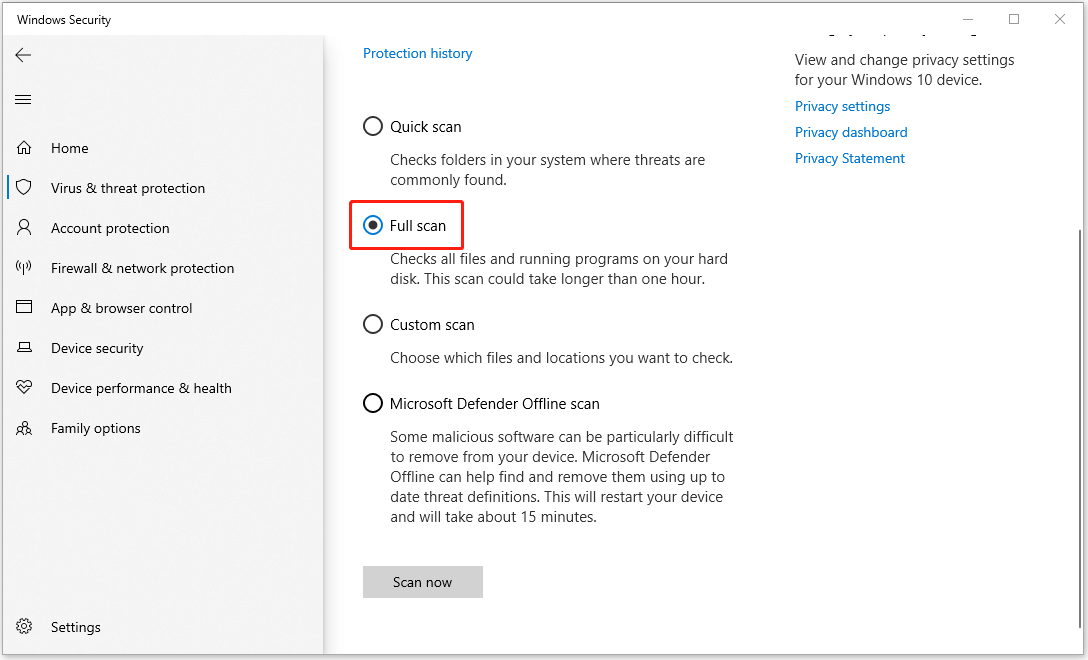
3. Go to Virus & threat protection, click Scan options, and check the Full scan option. Now, click Scan now.
2. Check for the Corrupted System Files
Corrupted system files may also lead to the “can’t uninstall Overwatch” issue. In this case, you can try to fix it by using the SFC and DISM utilities.
1. Type cmd in the Search box and choose Run as administrator.
2. Type sfc /scannow and then press Enter to run the SFC scan.
3. Then, restart your PC and run Command Prompt as an administrator again.
4. To run DISM, type the following commands and press Enter after each.
- DISM /Online /Cleanup-Image /CheckHealth
- DISM /Online /Cleanup-Image /ScanHealth
- DISM /Online /Cleanup-Image /RestoreHealth
Final Words
That’s everything you should know about how to uninstall Overwatch. Just choose the proper way based on your needs and easily remove this game to free up storage space. I hope that this post will be useful to you.


