Hard drive performance plays a pivotal role in the gaming experience. Here comes a question, how to optimize hard drive for gaming on Windows 10/11? In this guide, we will walk you through several methods to make your hard drive run faster for gaming.
Why Do You Need to Optimize Hard Drive for Gaming?
Modern PC games are quite demanding, particularly those with high graphics settings. During gameplay, encountering lags, frame drops, and high ping is not a new thing. Your gaming experience will be dramatically ruined due to various factors including:
- Overheating.
- Insufficient disk storage space.
- Too many fragments on the hard drive.
- Partitions not properly aligned.
- Install games on HDDs rather than SSDs.
In the following paragraphs, we will show you how to optimize hard drive for gaming for better performance with 5 ways. Without further ado, let’s cut to the chase.
Way 1: Clean up Hard Drives with MiniTool System Booster
When it comes to hard drive performance, MiniTool System Booster stands out as it enables you to speed up your computer with a series of tasks like cleaning accumulated junk files in your system and internet, finding and repairing common system errors, defragging your hard drives, sparing more available memory, etc. Here, we will show you how to optimize hard disk for gaming with this PC tune-up software.
MiniTool System Booster TrialClick to Download100%Clean & Safe
#Option 1: Deeply Scan Your Hard Drive
Firstly, it’s advisable to perform a thorough cleanup to make your disk slimmer. In this process, the Deepclean tool will run 7 tasks in sequence to delete temporary files, empty Recycle Bin, clean Windows Registries, re-align program data and more.
Step 1. Run MiniTool System Booster to enter its main interface.
Step 2. Tap on Performance Home and select Deepclean from the drop-down menu.
Step 3. Click on START CLEAN to run 7 cleanup tasks in order:
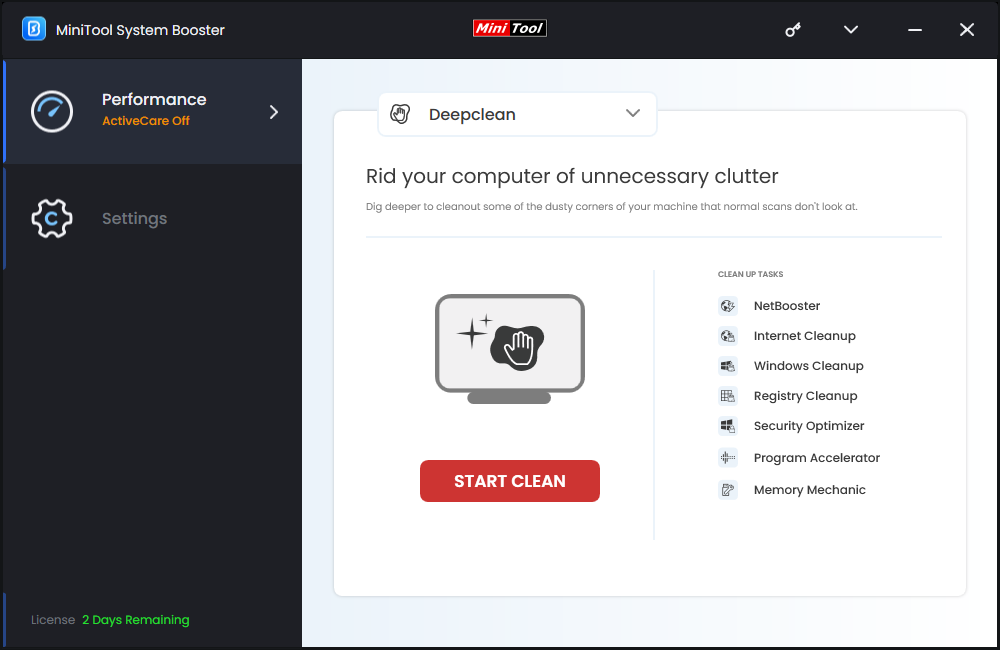
- NetBooster – fine-tunes each internet settings or restores internet settings to speed up internet connection.
- Internet Cleanup – clears junk files in your browsers.
- Windows Cleanup – sweeps up temporary files, broken shortcuts, files in Recycle Bin, and more.
- Registry Cleanup – cleans out invalid registry entries in your computer.
- Security Optimizer – finds and repairs vulnerabilities in your system.
- Program Accelerator – realigns program data and defragments files on your hard drive.
- Memory Mechanic – releases more available memory to increase the overall speed and stability of your computer.
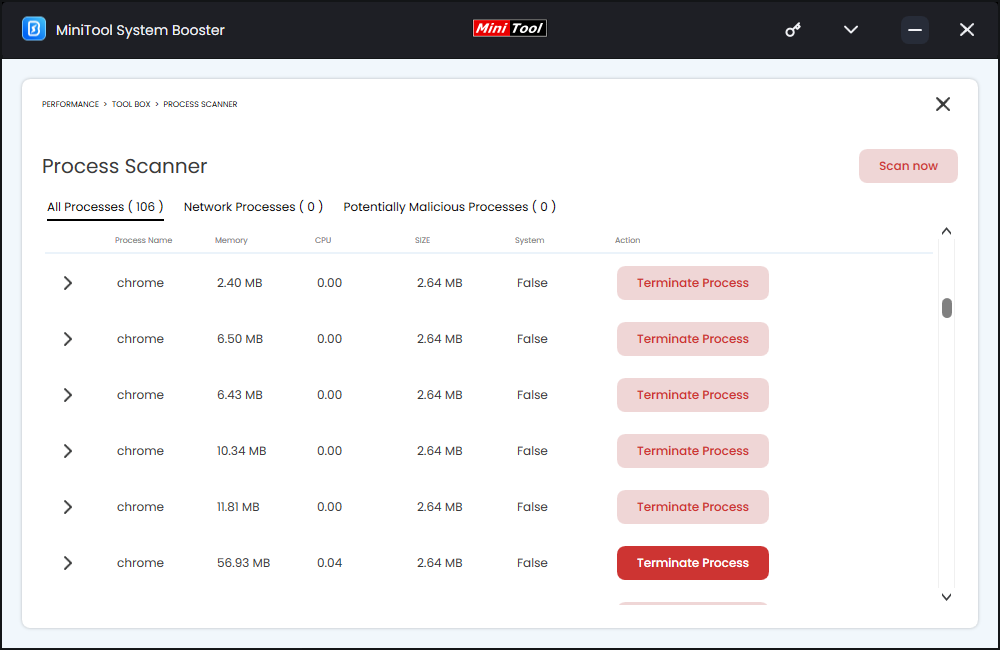
#Option 2: Disable Unnecessary Background Processes
As stated earlier, most PC games require a lot of system resources, so you need to minimize the number of background processes to reduce the strain on your hard drive, memory, CPU, and GPU. To do so:
Step 1. Go to the Toolbox page and select Process Scanner.
Step 2. Click on Scan now and then you can see all the running background processes.
Step 3. Locate the resource-hogging ones and hit the Terminate Process button beside it.
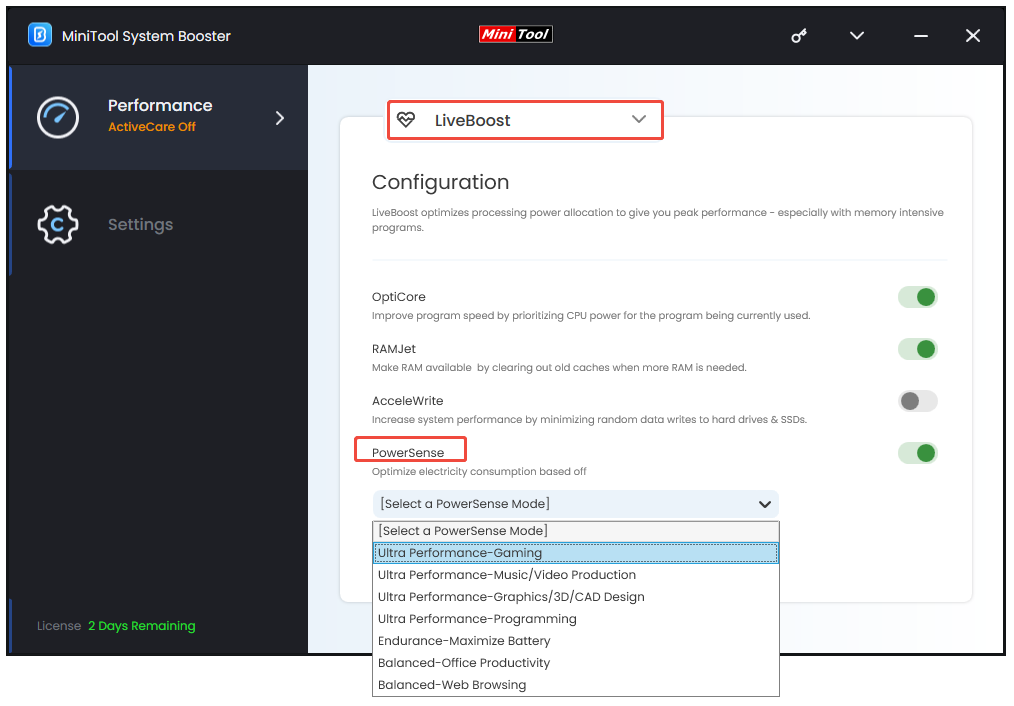
#Option 3: Select A Proper Power Plan
MiniTool System Booster features several power modes that help you to optimize performance and battery life while running different activities. To optimize SSD for gaming, please switch to the Ultra Performance-Gaming mode:
Step 1. Head over to the LiveBoost page.
Step 2. Under PowerSense, select Ultra Performance-Gaming from the drop-down menu.
Way 2: Move Games from HDD to SSD
As is known to all, SSDs outperform HDDs in many aspects, so it’s better to move your games from HDD to SSD for better performance and faster load time. Currently, many game launchers allow you to move installed games from one drive to another without reinstalling them from scratch. Here, we take moving Steam games from HDD to SSD as an example:
Step 1. Launch Steam > click on Steam in the top left corner > select Settings.
Step 2. In the Storage tab, click on your local drive and select Add Drive.
Step 3. In the Add a new Steam library folder window, select a partition on your SSD and then hit Add.
Step 4. Check the games you want to move > hit Move > select the partition you added earlier in the Move Content window > click on Move again to start the process.
Way 3: Extend Game Drive Space
Modern PC games can be very large, requiring significant storage space. If you are going to run out of storage space, extending game drive space might be useful to you. To do so, MiniTool Partition Wizard is a good choice for you. This partition manager can satisfy your needs as it supports resizing, formatting, extending, and creating partitions to help you optimize hard drive for gaming. Follow these steps:
Step 1. Launch MiniTool Partition Wizard.
Free Download PW
Step 2. In the right pane, select the partition in which your games are installed.
Step 3. In the left-hand action panel, choose Extend Partition.
Step 4. Select the partition or unallocated space to take free space from. Then, drag the sliding handle leftwards or rightwards to specify how much free space you want to take. Click on OK to continue.
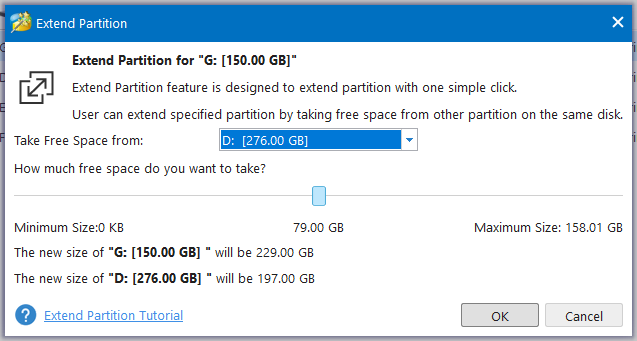
Step 5. After previewing the changes you’ve made, click on Apply in the lower left corner to apply the changes.
Way 4: Apply 4K Alignment
When your partitions are not properly aligned, the performance of your computer will be less satisfying even if you are using an SSD. To maximize your gaming drive’s performance, you can resort to the Align Partition or Align All Partitions feature in MiniTool Partition Wizard. Here’s how to run this feature to boost data access speed:
Step 1. In MiniTool Partition Wizard, select the disk you need to align.
Step 2. In the action panel, choose Align All Partitions.
Step 3. Next, this program will inform you how many partitions need to be aligned.
Step 4. Click on OK to continue and then apply the changes you’ve made.
Way 5: Enable Write Caching
Enabling disk write caching might also boost file transfer speed of your hard drive. Follow these steps:
Step 1. Type device manager in the Windows search bar and hit Enter.
Step 2. Expand Disk drives and right-click on your hard drive or SSD for which you want to enable write caching and click on Properties.
Step 3. Go to the Policies tab and then check Enable write caching on the device.
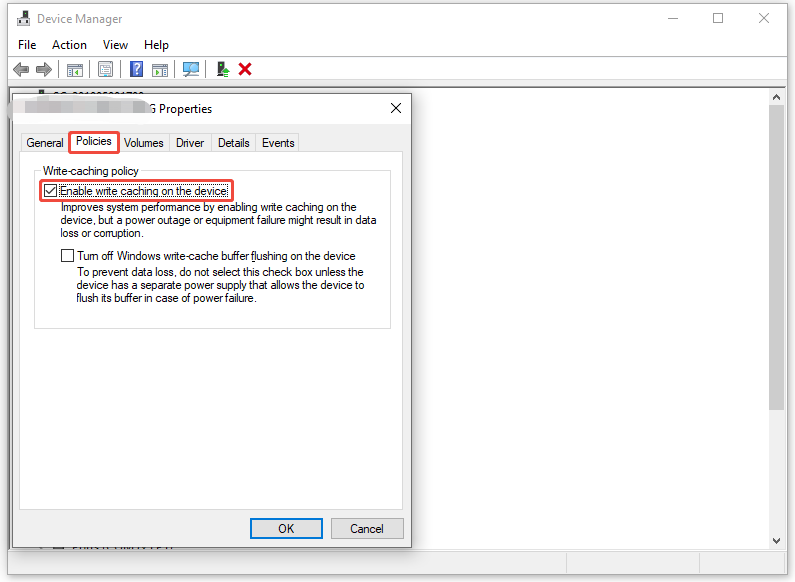
Step 4. Click on OK and restart your computer to make the change effective.
Wrapping Things Up
That’s all the information about how to optimize hard drive for gaming on Windows 10/11. If you are struggling with slow load time and noticeable delays while playing computer games, try these approaches and tools mentioned in this guide to extend partition, free up disk space, reduce defragmentation, align your partition, and more, which will make the most of your hard drive.