Windows Update High CPU Usage
Many users complain about the high CPU usage during Windows updates and once they stop the update, the phenomenon can restore to normal. However, it is not a good solution because you can’t let the update alone all the time. Windows updates can bring some good stuff to enrich the system features and strengthen the security patches.
Although you may run into the Windows Update high CPU usage, it is still worth keeping your system up to date. So, how to effectively resolve this problem? First of all, try to figure out the real culprit. We have concluded some possible reasons for this issue and you can check for them one by one.
- Low system capacity;
- Insufficient RAM;
- Misconfigured Windows Update service;
- App conflicts;
- Too many background programs that are actively running;
- Virus infections;
- Etc.
Fix: Windows Update High CPU Usage
Fix 1: Try MiniTool System Booster
Windows Update high CPU usage is a complicated issue. The most common reason is some other aggressive services compete with the update process and the matters will get worse if the RAM and system capacity is insufficient. Now, don’t worry. All of the problems can be easily fixed by the comprehensive all-in-one tune-up PC software – MiniTool System Booster.
The main functions of this utility are to speed up CPU, RAM, and hard drive resources and fix system bugs to keep the computer stable and issue-free. It can perform real-time monitoring and fix-up and also provide tools to optimize Windows startup programs and memory-intensive background tasks. Now, let’s check how it works.
MiniTool System Booster TrialClick to Download100%Clean & Safe
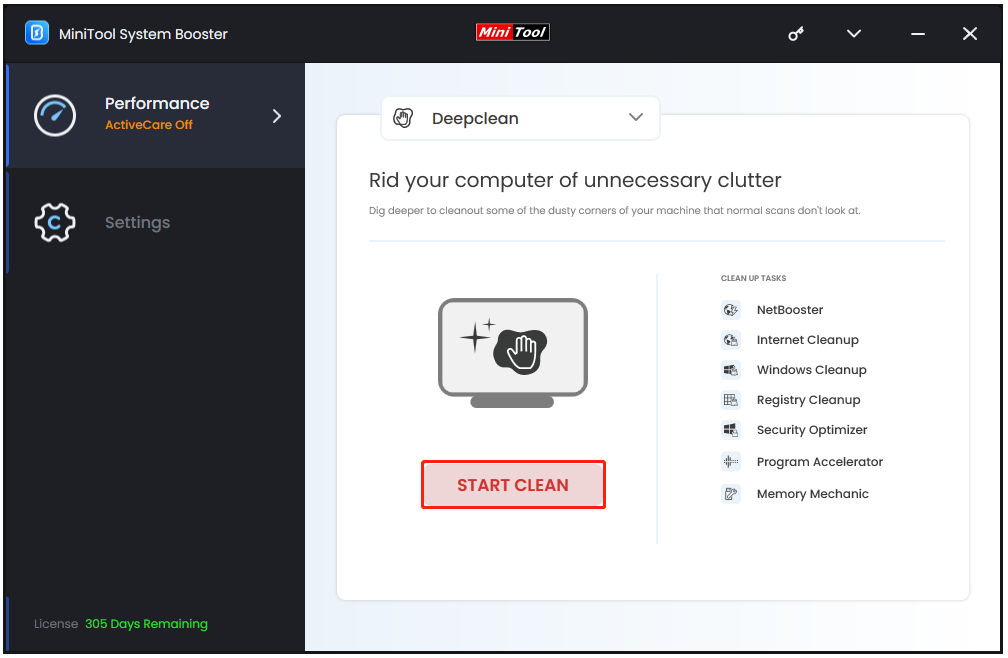
Step 1: After you have downloaded and installed the program, open it and expand the Performance Home menu to choose Deepclean.
Step 2: Click START CLEAN to automatically perform the seven tasks, in which we recommend you use Internet Cleanup, Windows Cleanup, and Memory Mechanic. As for those unnecessary ones, you can click Skip to ignore them and follow the on-screen instructions to perform the scan and fix-up.
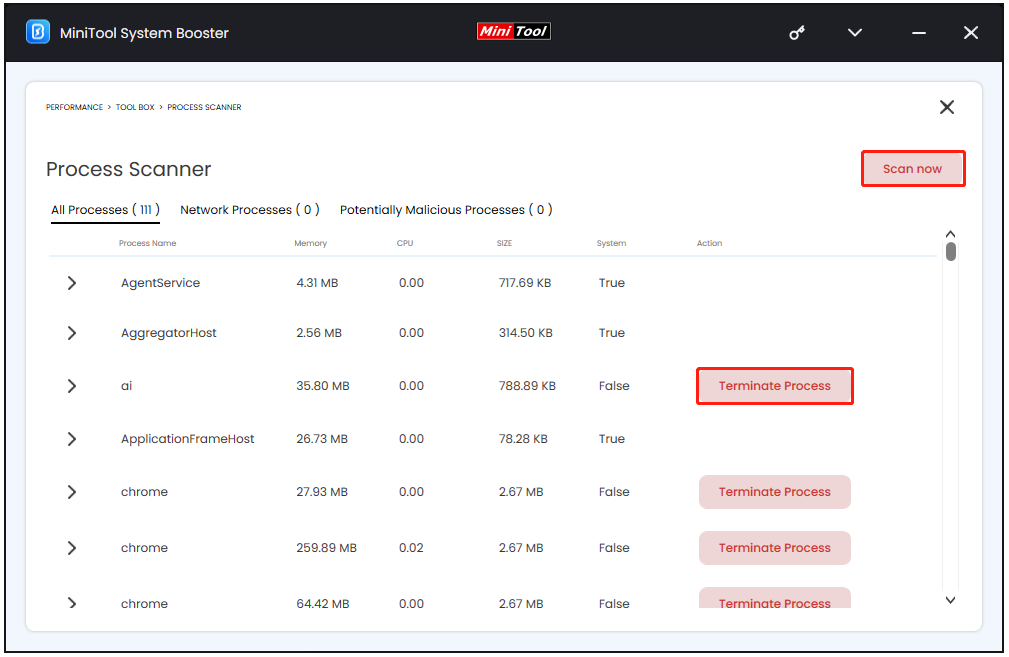
Step 3: Switch the top menu to Toolbox and click Process Scanner. Then click Scan now to show the list of running background processes and click Terminate Process to stop the unwanted ones.
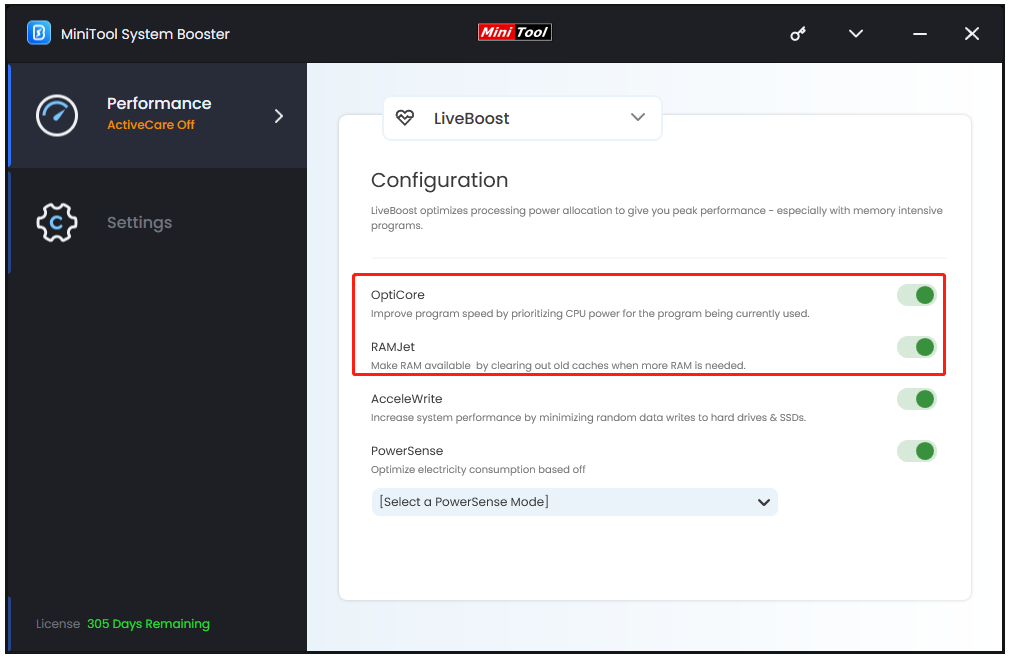
Step 4: Go to the LiveBoost tab and enable the features of OptiCore and RAMJet. The former one can better manage the CPU power for faster speed and the latter one can help clear old caches to make more RAM available.
Fix 2: Restart the Windows Update Service
Sometimes, the temporary update bugs can trigger the “Windows update causing 100%” issue. You can restart the Windows Update service to check if the problem can be resolved.
Step 1: Type Services in Search and open it.
Step 2: Scroll down to locate Windows Update and right-click on it to choose Restart.
There are also some other services you need to restart – Update Orchestrator Service and Windows Modules Installer.
Fix 3: Run the Windows Update Troubleshooter
Windows Update troubleshooter is designed to resolve some issues related to Windows update and you can try this tool to see if “Windows update consuming a high CPU” persists.
Step 1: Open Settings by pressing Win + I and click Update & Security.
Step 2: Go to the Troubleshoot tab and click Additional troubleshooters.
Step 3: Choose Windows Update under Get up and running and click Run the troubleshooter.
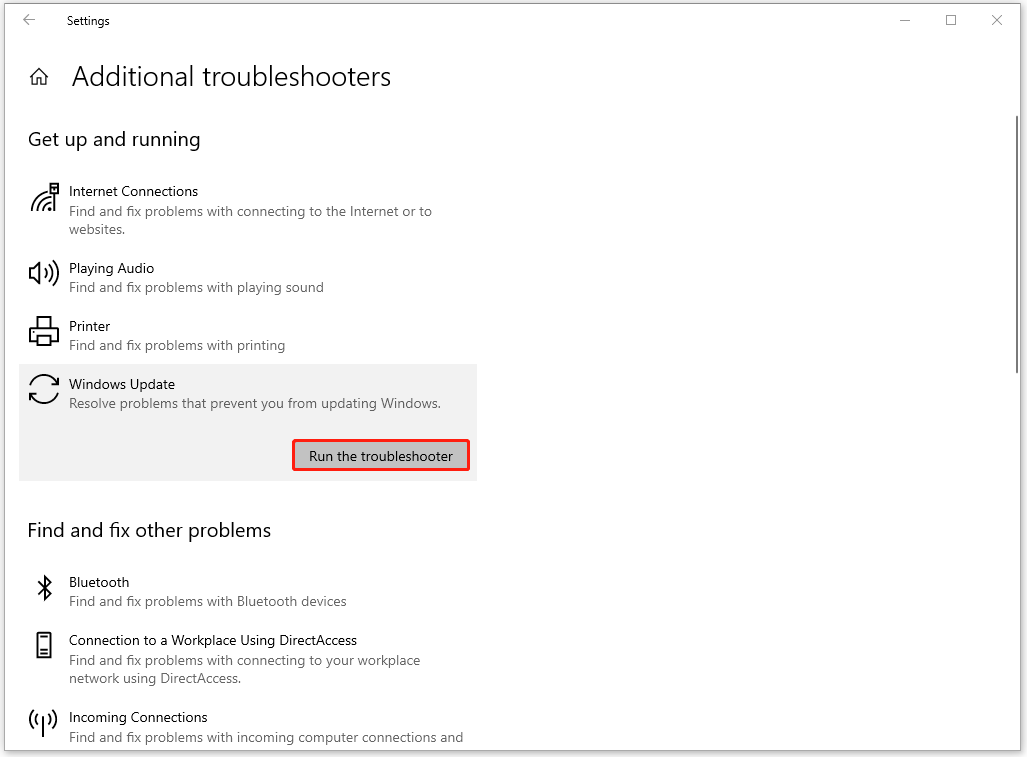
Then you can follow the next on-screen instructions to finish the work.
Fix 4: Perform a Malware Scan
As we mentioned, malware infection can cause the Windows Update high CPU usage, so you can perform a malware scan for security.
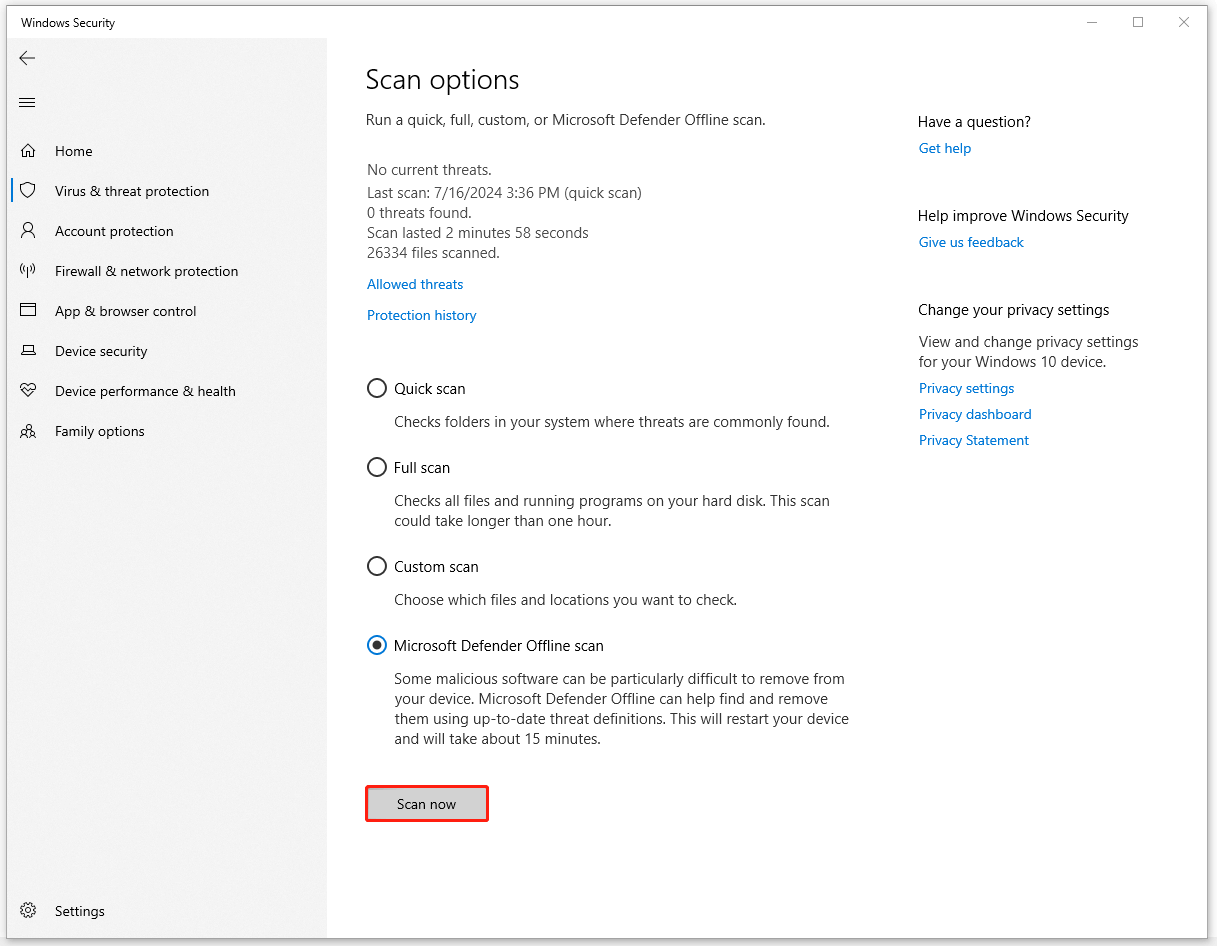
Step 1: Open Update & Security and Windows Security > Virus & threat protection.
Step 2: Click Scan options and then Microsoft Defender Offline scan > Scan now.
Fix 5: Disable Delivery Optimization
Delivery Optimization is a cloud-managed solution that allows Windows devices to download those packages from alternate sources, which may cause Windows update high CPU usage sometimes and you can try to disable it.
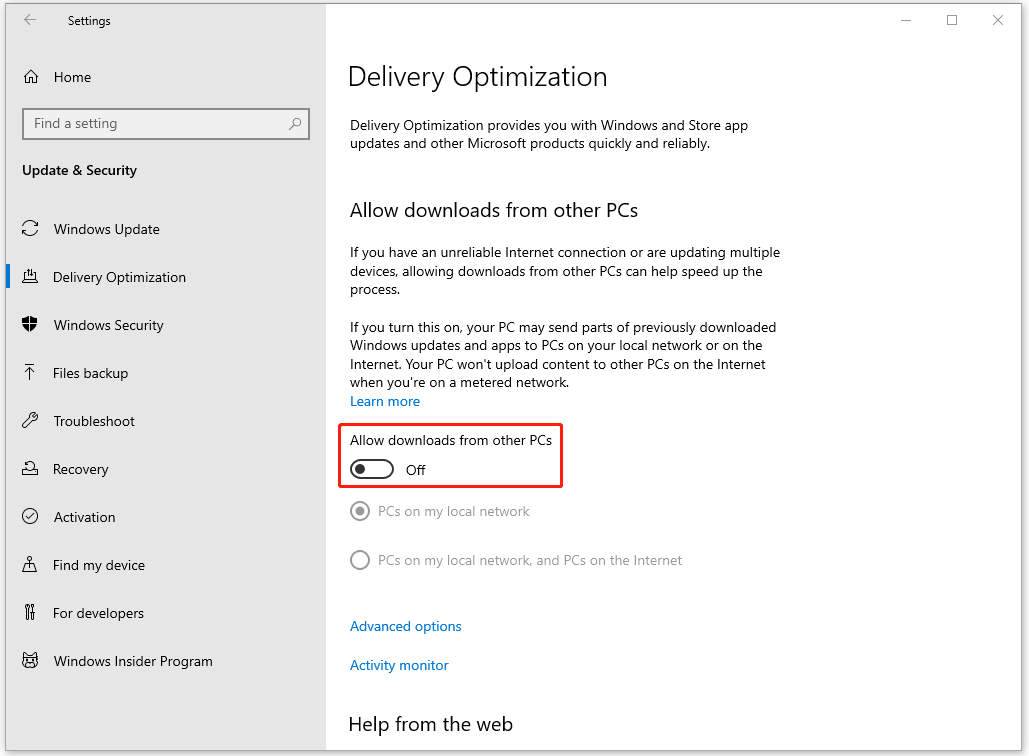
Step 1: Open Update & Security and then Windows Update.
Step 2: Click Advanced options from the right pane and click the Delivery Optimization link.
Step 3: Toggle off the option under Allow downloads from other PCs.
Fix 6: Temporarily Disable Antivirus
You may wonder why the guide asks you to disable antivirus after running a malware scan. That’s because if your PC works safely with the protection of antivirus, we should consider if the installed antivirus software interferes with the Windows update, which is just one of the possible triggers.
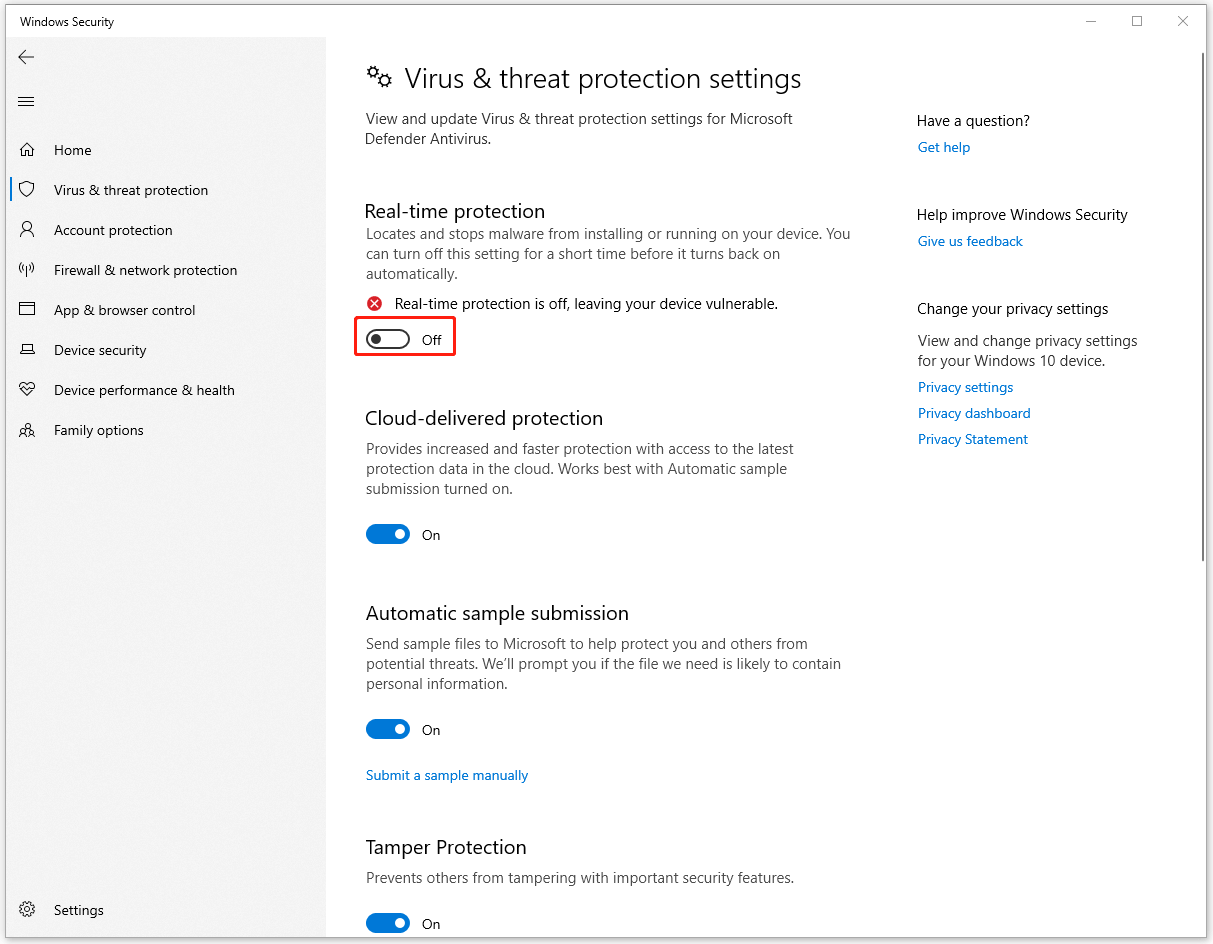
Step 1: Open Virus & threat protection and click Manage settings.
Step 2: Then turn off the Real-time protection.
Fix 7: Run a System File Checker
If all the above methods can’t work, you can consider if your system files get corrupted. Try to perform a SFC scan and repair the system issues.
Step 1: Type Command Prompt in Search and choose Run as administrator.
Step 2: When the elevated Command Prompt window appears, type this command and press Enter to execute it.
sfc /scannow
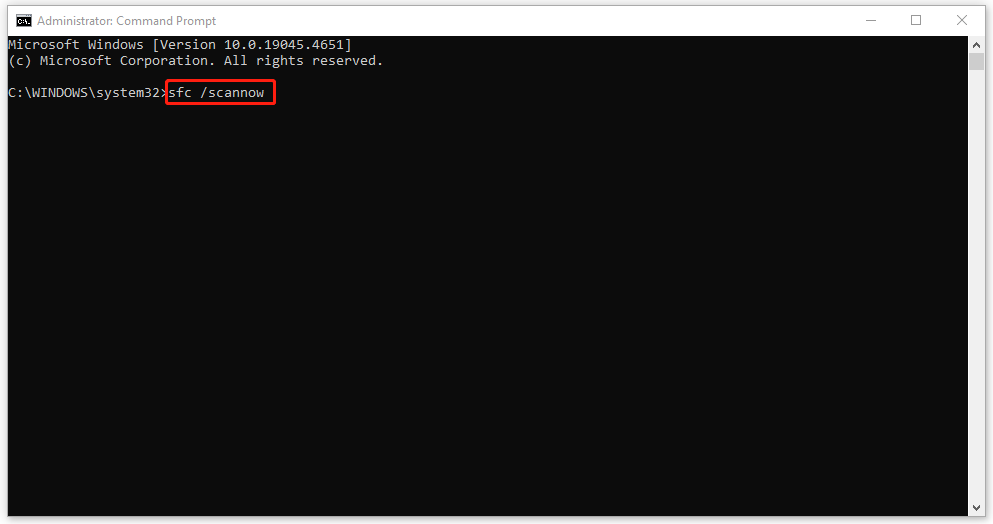
After the execution, if it tells you that the command fails to work, you can try another DISM command – DISM /Online /Cleanup-Image /RestoreHealth.
Bottom Line
Windows update high CPU usage can be caused by low system capacity, insufficient RAM, conflicting applications, etc. Targeting these, MiniTool System Booster may be a better choice to achieve a one-stop service.


