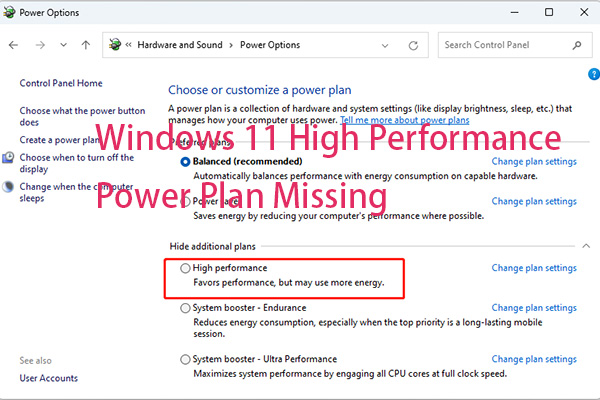
To configure energy consumption on your computer, Windows 10/11 provides a few power plans or modes. If you wonder how to optimize computer power usage without compromising performance or functionality, refer to this guide from MiniTool System Booster to get more information.
What Is Power Plan/Mode?
A power plan (also called power mode) refers to a collection of hardware and system settings that manage power consumption on PC. In other words, you can switch to different power plans to reduce the power consumption of your computer, maximize the system performance, or balance energy consumption and performance rather than modify related settings one after another.
Windows 10/11 offers the following 4 types of power plans or modes to help you to optimize computer power usage:
- Balanced – increases your CPU’s speed when it is necessary and reduces it when your operating system is idle. This is the default power plan in the Windows system.
- High performance – doesn’t lower the speed of your CPU even when it is idle.
- Power saver – reduces the speed of your CPU all the time by lowering screen brightness and other similar settings.
- Ultimate performance – fully squeezes out the performance of your computer by setting Minimum Processor State to 100%. (This power plan is only available in Windows 10 version 1803 and above.)
How to Optimize Computer Power Usage on Windows 10/11?
Way 1: Modify Power Plan via MiniTool System Booster
To customize power consumption while handling different tasks, you can resort to a piece of all-in-one PC tune-up software – MiniTool System Booster. It is designed to speed up your computer from various aspects such as improving internet speed, clearing browsing data, releasing more memory, cleaning your hard drive, and so on.
Now, let me show you how to optimize computer power usage with this tool:
Step 1. Launch MiniTool System Booster to enter its main interface.
MiniTool System Booster TrialClick to Download100%Clean & Safe
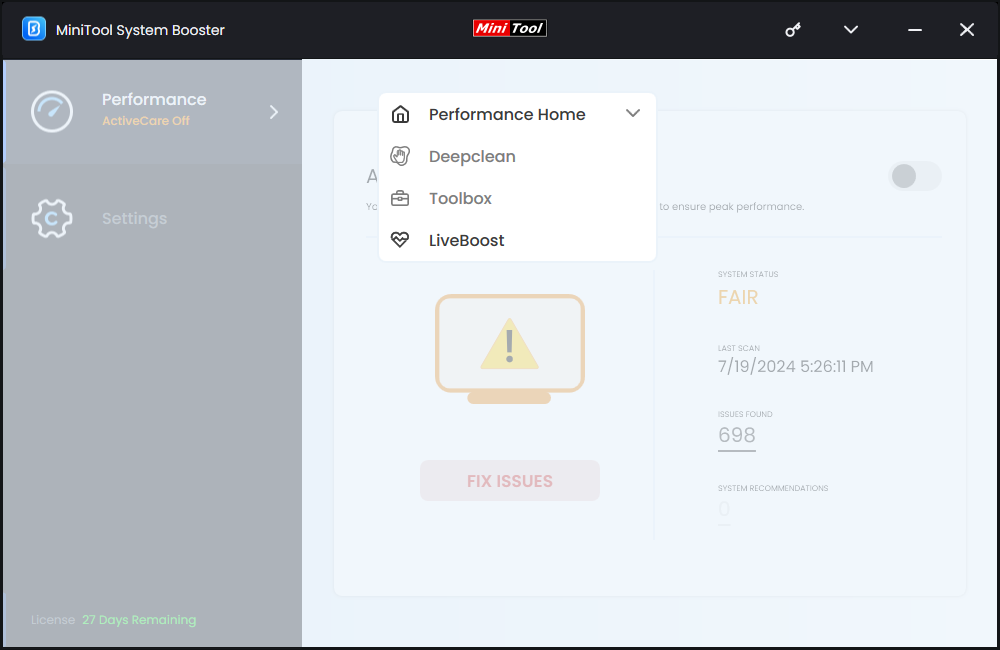
Step 2. Hit Performance Home and select LiveBoost from the context menu.
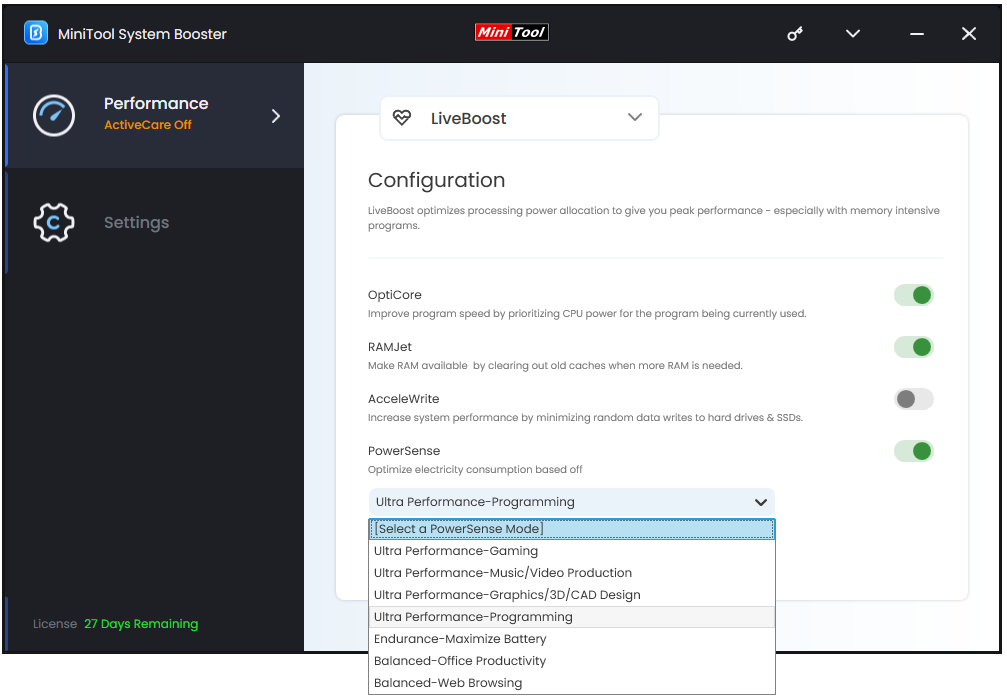
Step 3. Under PowerSense, there are 7 types of power modes for you and you can select one according to your real-time online activities:
- Ultra Performance-Gaming
- Ultra Performance-Music/Video Production
- Ultra Performance-Graphics/3D/CAD Design
- Ultra Performance-Programming
- Endurance-Maximize Battery
- Balanced-Office Productivity
- Balanced-Web Browsing
In addition to configure energy consumption on PC, MiniTool System Booster also provides some advanced functions to manage files and systems on your Windows machine:
- Deepclean – performs a thorough scan of your system to remove unnecessary junk files.
- Startup Optimizer – decrease the startup programs to make your PC boot faster.
- Advanced Uninstaller – remove unwanted programs in the OS.
- Process Scanner – terminate memory-intensive programs to free up more system resources.
Way 2: Modify Power Plan via Control Panel
As one of the most important components in Windows 10/11, Control Panel allows you to access, view and change most settings on your computer including power options. Follow these instructions:
Step 1. Type control panel in the search bar and hit Enter.
Step 2. Click on System and Security and then hit Power Options.
Step 3. In the right pane, you can choose one option from Balanced, Power saver, High performance, and Ultimate performance according to your need.
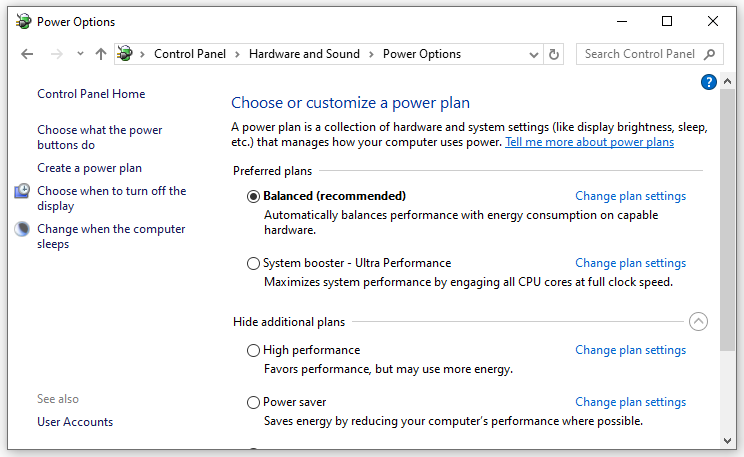
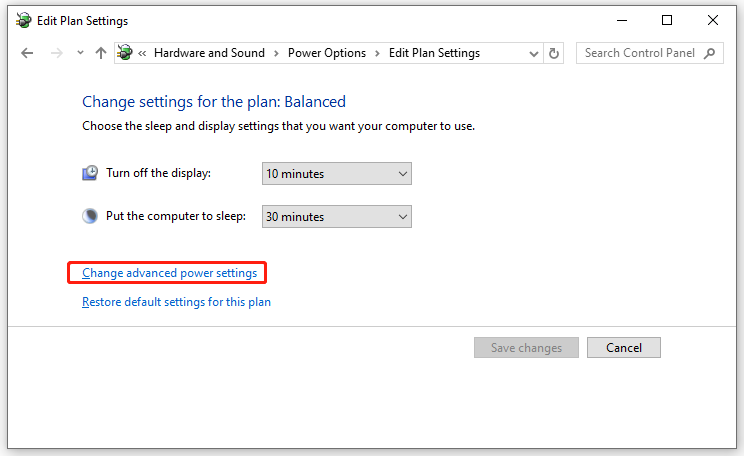
To choose the sleep and display settings that you want your computer to use, you can hit Change plan settings beside the power plan you select and make the changes you want.
To configure more advanced energy consumption settings, hit Change advanced power settings.
Way 3: Modify Power Plan via Windows Settings
To optimize computer power usage, another way is to change your power plan via Windows Settings. Here’s how to do it:
Step 1. Press Win + I to open Windows Settings.
Step 2. In the settings menu, scroll down to find System.
Step 3. In the Power & sleep tab, click on Additional power settings.
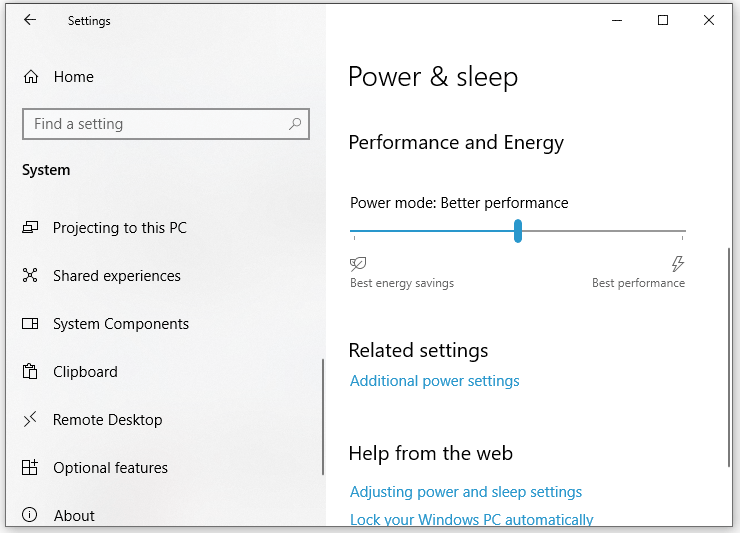
Step 4. Select one of the power plans according to your needs.
Way 4: Modify Power Plan via Command Prompt
Command Prompt is very helpful to execute system functions such as changing the power plans on your computer. Here’s how to run it:
Step 1. Press Win + S simultaneously to evoke the search bar.
Step 2. Type cmd in the search bar to locate Command Prompt and run it as an administrator.
Step 3. To run the Power Saver mode, type the following command and hit Enter:
powercfg.exe /setactive a1841308-3541-4fab-bc81-f71556f20b4a
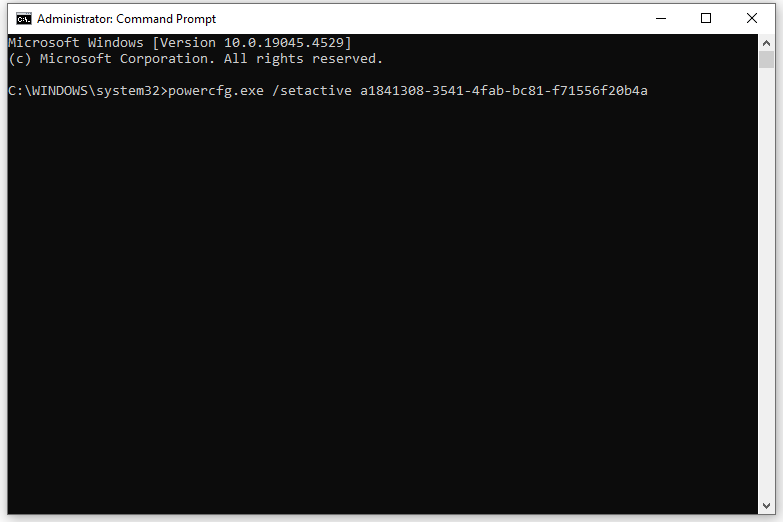
To run the Balanced power plan, input the command below and tap on Enter:
powercfg.exe /setactive 381b4222-f694-41f0-9685-ff5bb260df2e
As for switching to the High Performance mode, run the following command and don’t forget to hit Enter:
powercfg.exe /setactive 8c5e7fda-e8bf-4a96-9a85-a6e23a8c635c
Also see: How to Limit Battery Charge on Different Laptops
# More Tips to Lower Power Usage on PC
- Powers off your computer when it is not in use.
- Lower the brightness of your screen manually.
- Set your monitor to go into Sleep Mode when it is idle for a while.
- Disconnect unnecessary external devices in time to reduce unnecessary power draw.
- Turn off your computer’s RGB stripes, fan lighting, and more.
Final Words
All in all, this guide shows you how to switch to different power plans to optimize computer power usage in 4 ways. Also, we acquaint you with a free PC performance optimizer called MiniTool System Booster. With the help of this tool, you can make your system run at its full potential with ease.
MiniTool System Booster TrialClick to Download100%Clean & Safe
Do you have more queries about our product? Don’t hesitate to contact us via [email protected]. We are looking forward to receiving your feedback!


